
1. Introduction
This manual provides detailed instructions for the proper use and maintenance of your Signstek FF-003 Portable Fish Finder. Please read this manual thoroughly before operating the device to ensure optimal performance and longevity.
The Signstek FF-003 is designed to assist both amateur and professional fishermen in locating fish and understanding underwater topography using sonar technology. Its portable design makes it suitable for various fishing environments.
2. Product Components and What's in the Box
The Signstek FF-003 Portable Fish Finder system includes a main display unit and a sonar transducer. Familiarize yourself with these components:

Figure 2.1: The main display unit and the sonar transducer with its float.

Figure 2.2: Breakdown of the sonar transducer assembly, showing the buoy, mount bracket, and the sonar sensor.
- Display Unit: The handheld device with an LCD screen for viewing sonar data, depth, temperature, and fish icons.
- Sonar Transducer: Emits and receives sonar signals to detect underwater objects. It includes a buoy for floating applications and a mount bracket for attachment.
- Cable: Connects the transducer to the display unit.
2.3 What's in the Box
Upon unboxing, ensure all components are present:

Figure 2.3: The Signstek FF-003 Portable Fish Finder, its packaging, and included accessories such as the transducer and cable.
- Signstek FF-003 Display Unit
- Sonar Transducer with Cable and Float
- Mount Bracket
- User Manual (this document)
3. Setup and Installation
3.1 Battery Installation
The display unit requires batteries for operation. Open the battery compartment on the back of the unit, insert the required batteries (typically AA), ensuring correct polarity. Close the compartment securely.
3.2 Transducer Placement
The sonar transducer must be submerged in water to function correctly. There are several methods for deployment:
- Casting and Floating: Attach the transducer to your fishing line and cast it into the water. The integrated buoy will keep it afloat, allowing the sonar beam to scan beneath.
- Side Hull Mount: Use the provided mount bracket to attach the transducer to the side of a boat hull. Ensure the transducer is fully submerged and positioned to avoid interference from the boat's motor or turbulence.
- Through-Hull (Temporary): For some kayaks or small boats, the transducer can be placed inside the hull, directly on the bottom, with a small amount of water or gel to ensure good contact. This method may reduce signal strength.
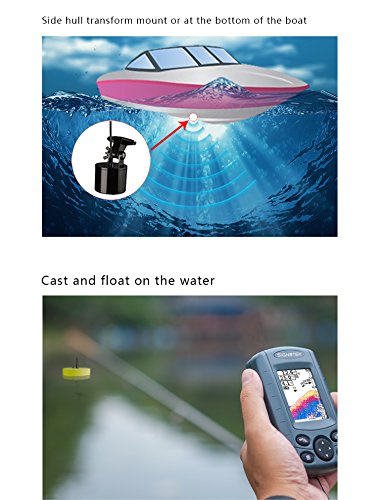
Figure 3.1: Illustration of transducer deployment methods, including side hull mounting and casting with the float.
3.3 Connecting the Transducer
Connect the transducer cable to the designated port on the display unit. Ensure the connection is secure to prevent water ingress and signal loss.
4. Operation
4.1 Powering On/Off
Press and hold the Power Key (usually marked with a power symbol) to turn the device on or off. The LCD screen will illuminate.
4.2 Understanding the Display
The Signstek FF-003 features a 2.4-inch LCD display that provides various pieces of information. The display is designed for readability even in sunlight.
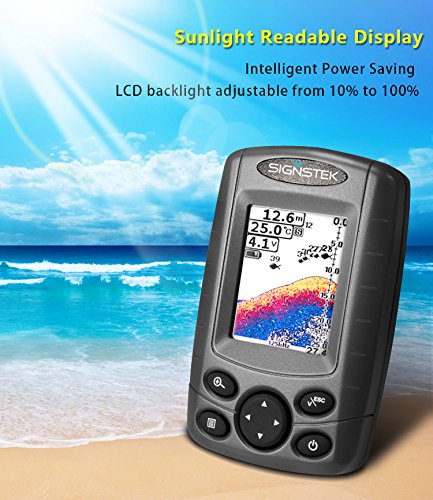
Figure 4.1: The display unit demonstrating its readability under bright conditions.
Refer to the diagram below for an explanation of the display elements and control keys:

Figure 4.2: Labeled diagram of the Signstek FF-003 display and control keys.
- Water Depth: Current depth of the water.
- Water Temperature: Temperature of the water.
- Battery Voltage: Indicates the remaining battery power.
- Fish Targets: Icons representing detected fish.
- Bottom: Representation of the lakebed or seabed.
- 200KHz Icon: Indicates the active sonar frequency.
- Chart Zoom Key: Used to zoom in or out on the sonar chart.
- Menu Key: Accesses the device's settings menu.
- Direction Key: Navigates through menus and adjusts settings.
- Upper Limit: Top of the depth range displayed.
- Depth Scale: Visual scale for depth measurements.
- Bottom Contour: Detailed representation of the bottom structure.
- Bottom Signal: Strength of the signal reflecting off the bottom.
- Lower Limit: Bottom of the depth range displayed.
- Check/ESC Key: Confirms selections or exits menus.
- Power Key: Turns the device on or off.
4.3 Sonar Functionality
The FF-003 utilizes a dual-beam sonar frequency to provide accurate readings. The sonar transducer emits sound waves and measures the time it takes for the echoes to return, calculating depth and detecting objects in the water column.

Figure 4.3: Illustration of the dual beam sonar detecting depth and fish targets within its coverage area.
The device can detect depths up to 72 meters and uses 200KHz and 83KHz frequencies for high accuracy.
4.4 Menu Settings
Press the Menu Key to access various settings. Use the Direction Key to navigate and the Check/ESC Key to select or exit. Common settings include:
- Sensitivity: Adjusts how sensitive the sonar is to echoes. Higher sensitivity detects smaller objects but may also show more clutter.
- Depth Range: Manually set the depth range or use auto-ranging.
- Fish ID: Toggles fish icons on or off.
- Backlight: Adjust the LCD backlight intensity (from 10% to 100%).
- Units: Select preferred units for depth (meters/feet) and temperature (Celsius/Fahrenheit).
5. Maintenance
- Cleaning: After each use, wipe the display unit and transducer with a soft, damp cloth. Do not use abrasive cleaners or solvents.
- Storage: Store the device in a dry, cool place away from direct sunlight. Remove batteries if storing for extended periods to prevent leakage.
- Transducer Care: Ensure the transducer cable is not kinked or damaged. Inspect the transducer surface for any debris or marine growth before and after use.
- Battery Replacement: Replace batteries promptly when the battery indicator shows low power to ensure consistent performance.
6. Troubleshooting
- No Power:
- Check battery installation and ensure correct polarity.
- Replace with fresh batteries.
- Ensure the power button is pressed and held sufficiently.
- No Sonar Reading / Erratic Readings:
- Ensure the transducer is fully submerged in water and free from air bubbles or obstructions.
- Check the transducer cable connection to the display unit.
- Adjust sensitivity settings. If too low, it might miss targets; if too high, it might show excessive noise.
- Avoid operating near other sonar devices or strong electrical interference.
- If using a through-hull mount, ensure good contact with the hull and no air gaps.
- Inaccurate Depth Readings:
- Verify the transducer is pointing straight down and not angled.
- Ensure the water is deep enough for the sonar to get a return signal.
- Check for debris on the transducer face.
- Display Issues:
- Adjust backlight settings for better visibility.
- If the screen is frozen, try turning the device off and on again.
7. Specifications
| Feature | Specification |
|---|---|
| Brand | Signstek |
| Model | FF-003 |
| Display Type | LCD |
| Screen Size | 2.4 Inches |
| Sonar Frequency | 200KHz, 83KHz (Dual Beam) |
| Max Depth Capability | 72 meters (approx. 236 feet) |
| Power Source | Batteries (type not specified, typically AA) |
| Product Dimensions | 11.99 x 3 x 8 cm |
| Item Weight | 449 g |
| Special Features | Portable |
8. Warranty and Support
Information regarding product warranty and customer support is not provided in the available product details. Please refer to the product packaging or contact the retailer for specific warranty terms and support options.