
1. Introduction
The Labconco FreeZone 6 Liter Console Freeze Dry System, Model 7753024, is designed for the efficient freeze drying of light to moderate aqueous sample loads in laboratory environments. This system is capable of removing up to 4 liters of water within a 24-hour period. It is important to note that this model is not intended for use with samples containing acetonitrile.
Key features include a robust brushed stainless steel and epoxy-coated steel exterior, a stainless steel collector chamber and coil, and a 3/4 hp CFC-free refrigeration system capable of cooling the collector to -50°C (-58°F). The system incorporates an LCD display for monitoring operating parameters, an automatic start-up switch for collector cool-down and vacuum pull-down, and a hot gas defrost function for convenient maintenance.
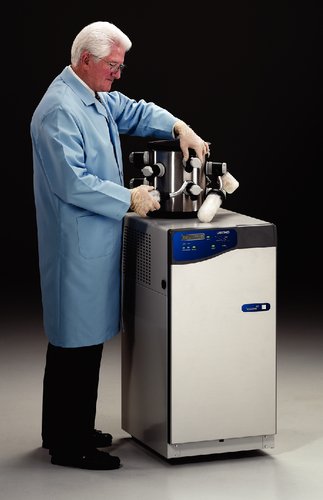
Figure 1: A scientist in a lab coat and gloves is shown adjusting a component on the top of the Labconco FreeZone 6 Liter Console Freeze Dry System. The system features a stainless steel exterior with a blue control panel, indicating its operational status.
2. Safety Information
Adherence to safety guidelines is crucial for the proper and safe operation of the FreeZone Freeze Dry System. Failure to follow these instructions may result in personal injury or damage to the equipment.
- Electrical Safety: Ensure the unit is connected to a properly grounded electrical outlet (115V, 60 Hz). Do not operate with damaged power cords. Disconnect power before performing any maintenance or service.
- Chemical Handling: Always wear appropriate personal protective equipment (PPE), such as gloves and eye protection, when handling samples or cleaning the collector chamber. Avoid freeze drying samples containing acetonitrile, as this system is not designed for such applications.
- Vacuum Pump: A vacuum pump is required for operation and is not included. Ensure the vacuum pump used is compatible with the system and properly maintained. Refer to the vacuum pump's instruction manual for its specific safety guidelines.
- Ventilation: Operate the system in a well-ventilated area to prevent the accumulation of heat and ensure proper air circulation for the refrigeration system.
- Maintenance: Only qualified personnel should perform internal maintenance or repairs. Refer to the troubleshooting section for minor issues.
3. System Components
The FreeZone 6 Liter Console Freeze Dry System comprises several key components:
- Exterior Casing: Brushed stainless steel and corrosion-resistant glacier white epoxy-coated steel with blue accents.
- Collector Chamber and Coil: Stainless steel, upright design, cooled by a CFC-free refrigeration system.
- Control Panel: Features an LCD display for system parameters (temperature in °C/°F, vacuum in mBar/Pa/Torr), LED vacuum and temperature wave graphs, and a red alarm light.
- Purge Valve: With switch, for releasing vacuum.
- Refrigeration System: 3/4 hp CFC-free, cools collector to -50°C (-58°F).
- Moisture Sensor: Patented technology to detect moisture levels.
- Vacuum Control/Break Valve: For precise vacuum management.
- RS-232 Port: Rear-mounted for data communication.
- Start-up Switches: Automatic for collector cool-down and vacuum pull-down, with manual override.
- Hot Gas Defrost: With switch, for rapid defrosting of the collector coil.
- Collector Drain Line: Retractable, 9" length.
- Drying Accessory Port: 3" diameter for connecting various drying accessories (e.g., manifolds).
- Vacuum Pump Connection: Rear-mounted electrical receptacle for vacuum pump (pump not included), 3/4" OD vacuum connection, 3/4" ID vacuum hose, and two clamps.
4. Setup and Installation
Follow these steps for initial setup of your FreeZone Freeze Dry System:
- Unpacking: Carefully remove the system from its packaging. Inspect for any shipping damage. Report any damage to the carrier immediately.
- Placement: Position the freeze dryer on a level, stable surface in a well-ventilated area. Ensure adequate clearance around the unit for air circulation, especially at the rear and sides where ventilation grilles are located.
- Electrical Connection: Connect the system's power cord to a dedicated, grounded 115V, 60 Hz electrical outlet.
- Vacuum Pump Installation:
- Place the vacuum pump (not included) near the freeze dryer.
- Connect the provided 3/4" ID vacuum hose to the 3/4" OD vacuum connection port on the rear of the freeze dryer. Secure with one of the provided clamps.
- Connect the other end of the vacuum hose to the inlet of your vacuum pump. Secure with the second clamp.
- Plug the vacuum pump's power cord into the rear-mounted electrical receptacle on the freeze dryer. This allows the freeze dryer to control the vacuum pump's operation.
- Drying Accessory Connection: If using a drying accessory (e.g., a manifold), connect it to the 3" diameter port on the top of the freeze dryer. Ensure a secure, airtight seal.
- Initial Cleaning: Before first use, wipe down the collector chamber and any sample-contacting surfaces with a mild, laboratory-appropriate cleaning solution.
5. Operating Instructions
This section outlines the general operating procedure for the FreeZone Freeze Dry System.
- Power On: Turn on the main power switch located on the front panel. The LCD display will illuminate, showing system status.
- Collector Cool-Down: Press the "Collector Cool" button or activate the automatic start-up switch. The refrigeration system will begin cooling the collector coil to -50°C. Monitor the temperature on the LCD display. Allow sufficient time for the collector to reach its target temperature before proceeding.
- Prepare Samples: Ensure your samples are properly frozen and prepared for freeze drying. Attach them to the drying accessory (e.g., manifold ports).
- Initiate Vacuum: Once the collector has reached its operating temperature, press the "Vacuum" button or activate the automatic start-up switch. The vacuum pump will start, and the system will begin to pull a vacuum. Monitor the vacuum level on the LCD display and LED wave graphs.
- Load Samples: When the desired vacuum level is achieved, carefully attach your frozen samples to the drying accessory. Ensure all connections are secure to maintain vacuum integrity.
- Monitor Process: Continuously monitor the freeze drying process via the LCD display, which shows temperature and vacuum readings. The patented moisture sensor will help indicate the progress of drying. The red alarm light will activate if critical parameters are exceeded.
- End of Run: Once samples are completely dry, turn off the vacuum pump. Slowly release the vacuum by opening the vacuum break valve or purge valve.
- Remove Samples: Carefully remove the dried samples from the drying accessory.
- Defrost Collector: After each run, or as needed, activate the hot gas defrost switch to melt the ice accumulated on the collector coil. The retractable drain line can be used to collect the melted water.
- Power Off: Once the collector is defrosted and drained, turn off the main power switch.
6. Maintenance
Regular maintenance ensures the longevity and optimal performance of your FreeZone Freeze Dry System.
- Collector Cleaning: After defrosting, clean the stainless steel collector chamber with a mild, non-abrasive laboratory detergent and water. Rinse thoroughly and dry.
- Exterior Cleaning: Wipe down the exterior surfaces with a damp cloth and mild detergent. Avoid harsh chemicals that could damage the epoxy coating.
- Vacuum Pump Maintenance: Refer to your vacuum pump's instruction manual for its specific maintenance schedule, including oil changes and filter replacements. A well-maintained vacuum pump is critical for system performance.
- Gasket Inspection: Periodically inspect all gaskets and O-rings for cracks, wear, or deformation. Replace any damaged seals to maintain vacuum integrity.
- Ventilation Grilles: Ensure ventilation grilles on the unit are free from dust and obstructions to allow proper airflow for the refrigeration system.
7. Troubleshooting
This section provides solutions to common operational issues. For problems not listed here, contact Labconco technical support.
| Problem | Possible Cause | Solution |
|---|---|---|
| System not powering on. | No power to unit; power cord disconnected; faulty power switch. | Check power outlet and cord connection. Ensure main power switch is ON. |
| Collector not cooling. | Refrigeration system issue; insufficient ventilation; "Collector Cool" not activated. | Ensure "Collector Cool" is active. Check for obstructions around ventilation grilles. If problem persists, contact service. |
| Vacuum not pulling or poor vacuum. | Vacuum pump off or faulty; leaks in vacuum connections/gaskets; purge valve open; excessive moisture in samples. | Ensure vacuum pump is ON and functioning. Check all vacuum connections and gaskets for leaks. Close purge valve. Pre-freeze samples thoroughly. |
| Red alarm light active. | System parameter outside normal range (e.g., high temperature, low vacuum). | Check LCD display for specific alarm message. Address underlying issue (e.g., poor vacuum, collector not cold enough). |
8. Technical Specifications
- Model Number: 7753024
- Brand: Labconco
- Collector Capacity: 6 Liters
- Ice Removal Capacity: 4 liters in 24 hours
- Collector Temperature: -50°C (-58°F)
- Refrigeration System: 3/4 hp, CFC-free
- Electrical Requirements: 115V, 60 Hz
- Exterior Construction: Brushed stainless steel and corrosion-resistant glacier white epoxy-coated steel
- Vacuum Connection: 3/4" OD port, 3/4" ID hose
- Drying Accessory Port: 3" diameter
- RS-232 Port: Included
9. Warranty and Support
For detailed warranty information, please refer to the documentation provided with your purchase or visit the official Labconco website. For technical assistance, troubleshooting beyond this manual, or to order replacement parts, please contact Labconco Customer Service directly.
Labconco Contact Information: (Typically found on the manufacturer's website or product documentation)
- Website: www.labconco.com
- Phone: Refer to website for regional contact numbers.


