
Yato YT-36119
Yato YT-36119 Rivet Nut Tool Instruction Manual
Model: YT-36119
1. Introduction
This instruction manual provides essential information for the safe and effective use of your Yato YT-36119 Rivet Nut Tool. Please read this manual thoroughly before operating the tool to ensure proper function, prevent injury, and extend the product's lifespan. Keep this manual for future reference.
2. General Safety Information
WARNING: Always follow basic safety precautions when using power tools to reduce the risk of fire, electric shock, and personal injury.
- Wear Eye Protection: Always wear appropriate safety glasses or goggles to protect against flying debris.
- Wear Hand Protection: Use work gloves to protect hands from pinching or sharp edges.
- Keep Work Area Clear: Ensure your work area is well-lit and free from clutter.
- Secure Workpiece: Always secure the material you are working on to prevent movement.
- Inspect Tool Before Use: Check the tool for any damage or loose parts before each use. Do not use if damaged.
- Use Correct Mandrel: Ensure the correct size mandrel is installed for the rivet nut being used.
- Keep Children Away: Do not allow children or untrained persons to operate the tool.
- Store Safely: Store the tool in a dry, secure place, out of reach of children.
3. Package Contents
Upon opening the package, verify that all components are present and undamaged:
- Yato YT-36119 Rivet Nut Tool (338 mm length)
- 5 Interchangeable Mandrels (M5, M6, M8, M10, M12)
- Storage Case

Figure 1: Yato YT-36119 Rivet Nut Tool, mandrels, and accessories neatly organized within its durable black storage case.
4. Tool Components Overview
Familiarize yourself with the main parts of the Yato YT-36119 Rivet Nut Tool:
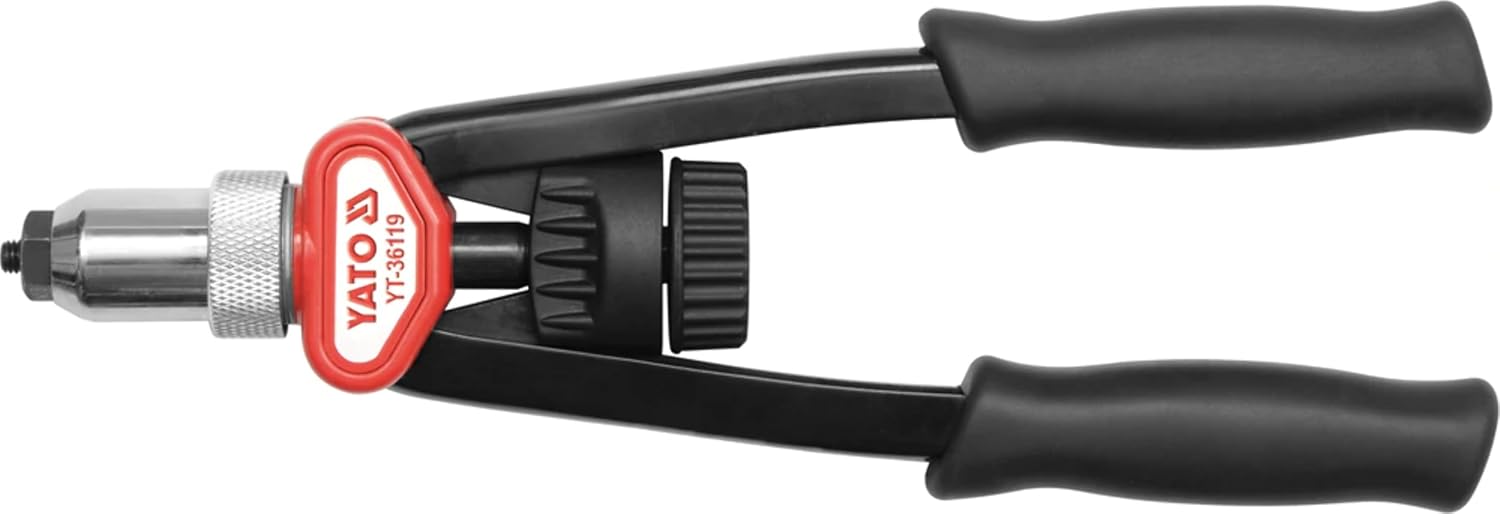
Figure 2: The Yato YT-36119 Rivet Nut Tool, featuring ergonomic handles, a robust body, and the adjustable head assembly for various rivet nut sizes.
- Handles: Ergonomically designed with rubber grips for comfortable and secure operation.
- Body: The main frame of the tool, housing the leverage mechanism.
- Head Assembly: Contains the mandrel and nose piece, where the rivet nut is threaded.
- Mandrel: The threaded rod that holds and pulls the rivet nut. Interchangeable for different sizes.
- Adjustment Knob: Located on the head, used to adjust the stroke or depth of the mandrel.

Figure 3: Detailed view of the tool's head, highlighting the threaded mandrel and the knurled adjustment knob for precise setting depth.
5. Setup and Mandrel Installation
Before using the tool, ensure the correct mandrel is installed for the size of rivet nut you intend to use.
5.1 Selecting the Correct Mandrel
The Yato YT-36119 supports M5, M6, M8, M10, and M12 rivet nuts. Each mandrel is marked with its corresponding size. Select the mandrel that matches the thread size of your rivet nut.

Figure 4: The Yato YT-36119 tool displayed alongside its five interchangeable mandrels, clearly indicating the supported M5 to M12 rivet nut sizes.
5.2 Installing/Changing Mandrels
- Open Handles: Fully open the tool handles to release any tension on the mandrel.
- Remove Nose Piece: Unscrew the outer nose piece from the tool head.
- Remove Existing Mandrel: Unscrew the currently installed mandrel from the tool.
- Install New Mandrel: Carefully thread the desired new mandrel into the tool head until it is finger-tight.
- Reattach Nose Piece: Screw the nose piece back onto the tool head, ensuring it is securely tightened.
- Adjust Stroke (Optional): The adjustment knob can be used to fine-tune the setting depth of the rivet nut. Turn clockwise for a deeper set, counter-clockwise for a shallower set. Test on scrap material if precise depth is critical.
6. Operating Instructions
Follow these steps to properly install a rivet nut using the Yato YT-36119 tool:
- Prepare the Workpiece: Drill a hole in the material that matches the diameter of the rivet nut body. Ensure the hole is clean and free of burrs.
- Thread Rivet Nut: Thread the chosen rivet nut onto the installed mandrel of the tool until it is snug against the nose piece.
- Position the Tool: Insert the rivet nut into the prepared hole in your workpiece. Ensure the rivet nut flange is flush against the material surface.
- Actuate the Tool: Firmly and steadily squeeze the handles of the tool together. You will feel resistance as the rivet nut deforms and clamps onto the material. Continue squeezing until the rivet nut is fully set.
- Release and Remove: Once the rivet nut is set, release the handles. Then, unscrew the tool from the newly installed rivet nut by rotating the tool counter-clockwise while holding the handles slightly open.

Figure 5: Visual guide demonstrating the two-part operation: applying pressure to set the rivet nut (left) and rotating the tool to detach it (right).
6.1 Compatible Materials
This tool is suitable for setting rivet nuts in various materials, including:
- Stainless Steel
- Steel
- Aluminium

Figure 6: Iconography confirming the tool's capability to work with stainless steel, steel, and aluminum rivet nuts.
7. Maintenance
Regular maintenance ensures the longevity and reliable performance of your tool.
- Cleaning: After each use, wipe down the tool with a clean, dry cloth to remove any dust or debris.
- Lubrication: Periodically apply a small amount of light machine oil to the pivot points and threaded parts of the tool to ensure smooth operation.
- Inspection: Regularly inspect mandrels for wear or damage. Replace worn mandrels to prevent improper rivet nut setting or tool damage.
- Storage: Store the tool in its original case in a dry, clean environment, away from direct sunlight and extreme temperatures.
8. Troubleshooting
If you encounter issues while using the Yato YT-36119 Rivet Nut Tool, consider the following common problems and solutions:
| Problem | Possible Cause | Solution |
|---|---|---|
| Rivet nut not setting properly or pulling out. | Incorrect mandrel size; insufficient force applied; material too thick/thin; incorrect adjustment. | Ensure mandrel matches rivet nut size. Apply more force. Adjust tool stroke. Verify material thickness is within rivet nut's grip range. |
| Mandrel breaks or strips. | Over-tightening; incorrect mandrel size; worn mandrel; cross-threading. | Do not over-tighten. Use correct mandrel. Replace worn mandrels. Ensure rivet nut threads smoothly onto mandrel. |
| Tool jams or is difficult to operate. | Lack of lubrication; debris in mechanism; damaged components. | Lubricate pivot points and threaded parts. Clean the tool thoroughly. Inspect for damage and replace if necessary. |
9. Technical Specifications
| Feature | Specification |
|---|---|
| Model Number | YT-36119 |
| Brand | Yato |
| Rivet Nut Sizes | M5, M6, M8, M10, M12 |
| Tool Length | 338 mm |
| Material | Chrome-Molybdenum Steel |
| Weight | 1.96 kg |
| Dimensions (L x W x H) | 33.8 x 10 x 6 cm |
| Color | Black |
| Exterior Finish | Chrome |

Figure 7: Key specifications including the tool's overall length and the range of rivet nut sizes it can accommodate.
10. Warranty and Support
Specific warranty information for the Yato YT-36119 Rivet Nut Tool is typically provided by the retailer at the time of purchase or can be found on the official Yato website. Please retain your proof of purchase for any warranty claims.
For technical support, spare parts, or further assistance, please contact your authorized Yato dealer or the customer service department of the retailer from whom you purchased the product.
Ask a question about this manual
Ask about setup, troubleshooting, compatibility, parts, safety, or missing instructions. Manuals+ will review the question and use this page’s manual context to help answer it.