Introduction
This manual provides comprehensive instructions for the safe and effective use of your CATEYE HL-EL135 Headlight and Omni 3 Taillight bicycle light set. Please read this manual thoroughly before initial use and retain it for future reference. Proper installation and operation are essential for optimal performance and safety.

Image: The CATEYE HL-EL135 Headlight and Omni 3 Taillight shown together, illustrating the complete bicycle light set.
Safety Information
Always prioritize safety when cycling. This light set is designed to enhance your visibility to others and illuminate your path. Adhere to the following safety guidelines:
- Ensure lights are securely mounted before each ride.
- Regularly check battery levels and replace them as needed to maintain optimal light output.
- Do not look directly into the headlight beam to avoid temporary vision impairment.
- Comply with all local traffic laws and regulations regarding bicycle lighting.
- While these lights enhance visibility, they do not replace the need for cautious riding, especially in low-light conditions.
Setup
1. Unpacking Contents
Verify that all components are present:
- CATEYE HL-EL135 Headlight
- CATEYE Omni 3 Taillight
- Headlight Flextight Bracket
- Taillight Flextight Bracket (with clip)
- Batteries (AA for headlight, AAA for taillight - typically included)
2. Battery Installation
HL-EL135 Headlight:
- Open the battery compartment cover on the underside of the headlight.
- Insert the two AA batteries, ensuring correct polarity (+/-).
- Securely close the battery compartment cover.

Image: The CATEYE HL-EL135 Headlight, showing its front and side profile. The battery compartment is located on the underside.
Omni 3 Taillight:
- Open the battery compartment cover on the rear of the taillight.
- Insert the two AAA batteries, ensuring correct polarity (+/-).
- Securely close the battery compartment cover.

Image: The CATEYE Omni 3 Taillight, displaying its red lens and the location of the battery compartment on the back.
3. Mounting the Lights
Both lights utilize Flextight brackets for tool-free installation.
HL-EL135 Headlight Mounting:
- Attach the headlight bracket to your bicycle's handlebar. The bracket is designed to fit various handlebar diameters.
- Wrap the flexible strap around the handlebar and secure it by tightening the knob until the bracket is firm and does not rotate.
- Slide the HL-EL135 Headlight onto the bracket until it clicks into place.
- Adjust the angle of the headlight to illuminate the path ahead without blinding oncoming traffic.

Image: The CATEYE Flextight bracket for the headlight, showing its adjustable strap and mounting mechanism.
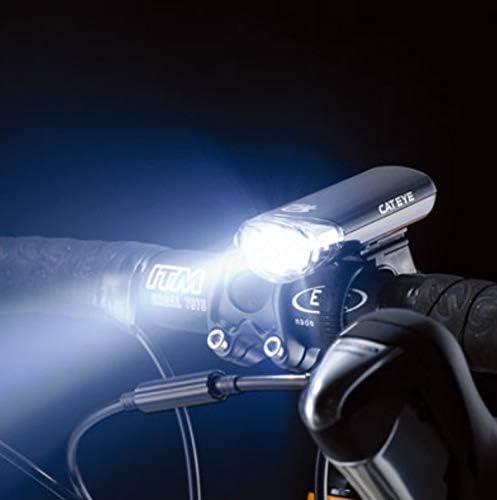
Image: The HL-EL135 Headlight mounted on a bicycle handlebar, demonstrating its position and beam direction.
Omni 3 Taillight Mounting:
- Attach the taillight bracket to your bicycle's seatpost. The bracket is designed to fit various seatpost diameters.
- Wrap the flexible strap around the seatpost and secure it by tightening the knob until the bracket is firm and does not rotate.
- Slide the Omni 3 Taillight onto the bracket until it clicks into place.
- Ensure the taillight is positioned to be clearly visible from the rear.
- Alternatively, use the integrated clip to attach the taillight to a backpack, saddlebag, or clothing.
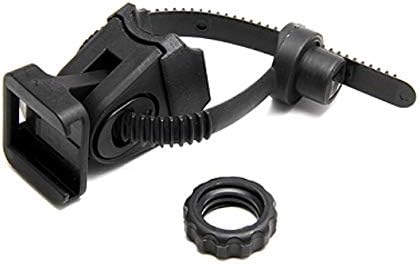
Image: The CATEYE Flextight bracket for the taillight, showing its adjustable strap and mounting mechanism, including the clip feature.
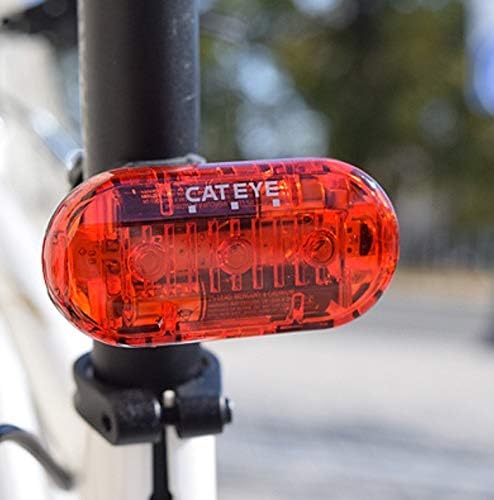
Image: The Omni 3 Taillight mounted on a bicycle seatpost, showing its rear-facing visibility.
Operating Instructions
1. Power On/Off
- HL-EL135 Headlight: Press the power button once to turn on. Press and hold for approximately 1 second to turn off.
- Omni 3 Taillight: Press the power button once to turn on. Press and hold for approximately 1 second to turn off.
2. Mode Selection
Both lights offer multiple lighting modes to suit various conditions and preferences.
- HL-EL135 Headlight: Press the power button repeatedly to cycle through available modes (e.g., Constant, Flashing).
- Omni 3 Taillight: Press the power button repeatedly to cycle through available modes (e.g., Constant, Flashing, Rapid).
3. Battery Life
Expected battery runtimes are approximate and may vary based on battery type, temperature, and selected mode:
- HL-EL135 Headlight: Up to 320 hours (in flashing mode).
- Omni 3 Taillight: Up to 150 hours (in flashing mode).
Maintenance
1. Cleaning
To maintain optimal performance and appearance:
- Wipe the light bodies and lenses with a soft, damp cloth.
- Avoid using abrasive cleaners or solvents, which can damage the plastic or lens.
- Ensure the battery compartments are clean and dry before closing.
2. Battery Replacement
Replace batteries when light output diminishes significantly. Refer to the 'Battery Installation' section for detailed steps. Always use fresh, high-quality batteries of the specified type (AA for HL-EL135, AAA for Omni 3).
3. Storage
For extended periods of non-use, remove batteries from both lights to prevent leakage and potential damage. Store the lights in a cool, dry place away from direct sunlight.
Troubleshooting
If you encounter issues with your CATEYE light set, refer to the following common solutions:
| Problem | Possible Cause | Solution |
|---|---|---|
| Light does not turn on. | Dead or incorrectly installed batteries. | Check battery polarity. Replace with fresh batteries. |
| Light is dim or flickers. | Low battery power. | Replace batteries. |
| Light detaches from bracket. | Bracket not securely tightened or light not fully clicked in. | Ensure bracket knob is tight. Re-attach light, listening for a click. |
| Water inside the light. | Battery compartment not properly sealed or extreme water exposure. | Open compartment, dry thoroughly. Ensure seal is intact when closing. While lights are waterproof (IP65), avoid submersion. |
Specifications
| Feature | Detail |
|---|---|
| Brand | CATEYE |
| Model (Headlight) | HL-EL135 |
| Model (Taillight) | Omni 3 |
| Power Source | Battery Powered (AA for HL-EL135, AAA for Omni 3) |
| Water Resistance Level | Waterproof (IP65) |
| Item Weight | Approximately 0.3 Pounds (combined) |
| Mounting Type | Flextight Handlebar Mount (Headlight), Flextight Seatpost Mount / Clip (Taillight) |
| Number of Settings | 3 (Omni 3), 2 (HL-EL135) |
| Brightness | High candela |
| UPC | 725012024836 |
Warranty
This CATEYE product is covered by a 2-year manufacturer's warranty from the date of purchase. This warranty covers defects in materials and workmanship under normal use. Please retain your proof of purchase for warranty claims. For specific warranty terms and conditions, refer to the official CATEYE website or contact customer support.
Support
For further assistance, technical support, or inquiries regarding your CATEYE HL-EL135 Headlight and Omni 3 Taillight set, please visit the official CATEYE website or contact their customer service department. Contact information can typically be found on the product packaging or the manufacturer's website.


