
RM-Series TOSHIBA DVR17
RM Series Replacement Remote Control User Manual
Model: TOSHIBA DVR17 Replacement
1. Introduction
This manual provides comprehensive instructions for the RM Series Replacement Remote Control, designed to operate all functions of your original TOSHIBA DVR17 remote control. This remote is a dedicated replacement and requires no programming or setup; simply insert batteries, and it is ready for immediate use.
The RM Series remote controls are assembled and tested in the UK, utilizing the latest chip-set technology to ensure precise infra-red code matching with the original device. All buttons are correctly labeled to reflect their exact function, eliminating the need for constant reference to external instructions.
2. Setup
2.1. Battery Installation
The RM Series remote control operates on standard Alkaline batteries. Follow these steps to install or replace batteries:
- Locate the battery compartment on the back of the remote control.
- Slide the battery compartment cover downwards or in the direction indicated by an arrow to open it.
- Insert the required batteries (typically AAA or AA, refer to the compartment for specific type and polarity) ensuring the positive (+) and negative (-) ends align with the markings inside the compartment.
- Gently slide the battery compartment cover back into place until it clicks securely.

Figure 2.1: Back view of the remote control with the battery compartment open, illustrating correct battery insertion.
Once batteries are correctly installed, the remote is ready for use. No pairing or programming is required.
3. Operation
The RM Series remote control is designed to replicate the full functionality of your original TOSHIBA DVR17 remote. All buttons are clearly labeled to match their corresponding functions on your device.
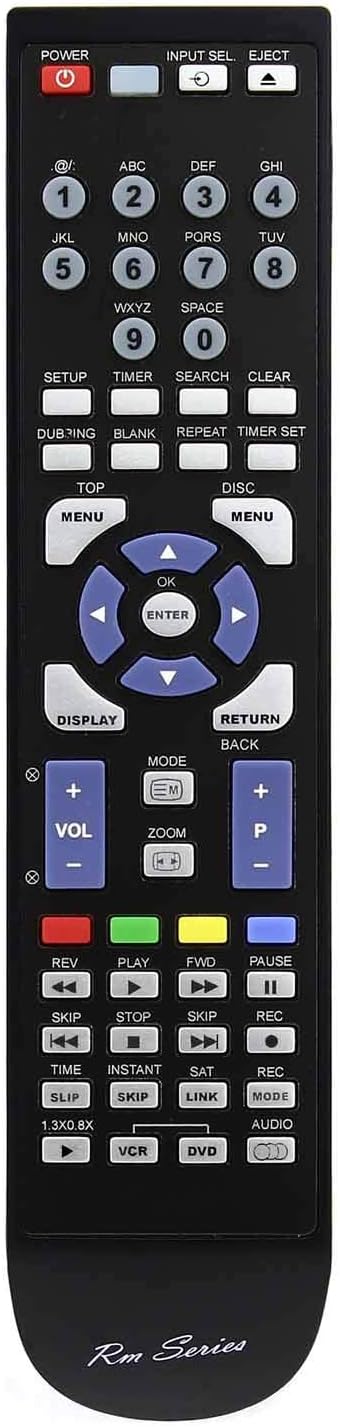
Figure 3.1: Front view of the RM Series remote control, displaying the button layout.
3.1. Basic Functions
- Power Button: Located at the top left, press to turn your device on or off.
- Input Select: Use to cycle through available input sources.
- Numeric Keypad (0-9): For direct channel selection or inputting numbers.
- Volume Up/Down (VOL +/-): Adjusts the audio volume.
- Channel Up/Down (P +/-): Changes the channel.
- Navigation Buttons (Up, Down, Left, Right, OK/Enter): Used for menu navigation and selection.
- Playback Controls (Play, Pause, Stop, Rewind, Fast Forward, Skip): Standard controls for media playback.
- Menu/Disc/Top Buttons: Access various menus and disc functions.
3.2. Key Features
- Full Functionality: Operates all functions of the original remote control supplied with your TOSHIBA DVR17 device.
- Dedicated Replacement: This is not a generic "universal" remote; it is specifically designed for the TOSHIBA DVR17.
- No Programming Required: Works immediately out of the box upon battery insertion.
- LED Indicator: Features a red LED indicator for signal transmission confirmation.
- Correctly Labeled Buttons: All buttons are accurately labeled, matching the original remote's functions.
4. Maintenance
4.1. Cleaning
To maintain the remote control's appearance and functionality, clean it regularly:
- Use a soft, dry cloth to wipe the surface of the remote.
- For stubborn dirt, slightly dampen the cloth with water or a mild, non-abrasive cleaner. Avoid excessive moisture.
- Do not use harsh chemicals, solvents, or abrasive cleaning agents, as these can damage the remote's finish or internal components.
4.2. Battery Replacement
Replace batteries when the remote's performance degrades (e.g., reduced range, inconsistent response) or if the LED indicator does not light up. Always replace all batteries at the same time with new ones of the same type. Refer to Section 2.1 for battery installation instructions.
Remove batteries if the remote will not be used for an extended period to prevent leakage and potential damage.
5. Troubleshooting
| Problem | Possible Cause | Solution |
|---|---|---|
| Remote does not work or is unresponsive. |
|
|
| Buttons are sticky or unresponsive. |
|
|
| Remote works intermittently. |
|
|
6. Specifications
| Model Number | TOSHIBA DVR17 Replacement |
| Brand | RM-Series |
| Connectivity Technology | Infrared (IR) |
| Controller Type | Button Control |
| Maximum Range | 10 Metres |
| Product Dimensions (L x W x H) | 22.71 x 5 x 2.39 cm |
| Item Weight | 86 g |
| Battery Type | Alkaline (not included) |
7. Warranty and Support
RM Series products are manufactured to high standards and undergo vigorous testing to ensure long-term reliability. All RM Series products are CE and ROHS compliant.
For any issues, questions, or support inquiries regarding your RM Series Replacement Remote Control, please contact the retailer or manufacturer directly. Please have your product model number (TOSHIBA DVR17 Replacement) and purchase details ready when contacting support.
Related documentsTOSHIBA DVR17


Ask a question about this manual
Ask about setup, troubleshooting, compatibility, parts, safety, or missing instructions. Manuals+ will review the question and use this page’s manual context to help answer it.