Important Safety Instructions
Always observe basic safety precautions when using electric power tools to reduce the risk of fire, electric shock, and personal injury. Read all instructions carefully before operating the tool.
- Wear Eye Protection: Always wear safety goggles or safety glasses with side shields.
- Use Hearing Protection: Prolonged exposure to noise can cause hearing damage.
- Keep Work Area Clean: Cluttered areas and benches invite accidents.
- Avoid Dangerous Environments: Do not use power tools in damp or wet locations, or expose them to rain. Do not use in the presence of flammable liquids or gases.
- Secure Workpiece: Always clamp or otherwise secure the workpiece to prevent movement during operation.
- Disconnect Power: Always disconnect the tool from the power supply before changing accessories, making adjustments, or performing maintenance.
- Maintain Proper Footing and Balance: Do not overreach. Keep proper footing and balance at all times.
- Use Correct Tool: Do not force small tool or attachment to do the job of a heavy duty tool.
Product Overview
The Einhell TE-AG 115 Angle Grinder is a robust and powerful corded electric tool designed for a wide range of grinding, cutting, and polishing tasks. Its compact design and ergonomic features ensure comfortable and safe operation for both DIY enthusiasts and professionals.

Image: The Einhell TE-AG 115 Angle Grinder, showcasing its red and black housing, grinding disc, and auxiliary handle.
Technical Specifications
| Specification | Value |
|---|---|
| Brand | Einhell |
| Model Number | 4430850 |
| Power Source | Corded Electric |
| Wattage | 720 watts |
| Voltage | 230 Volts |
| Maximum Rotational Speed | 11,000 RPM |
| Item Weight | 1.88 Kilograms (4.14 pounds) |
| Product Dimensions | 12.8"L x 11.02"W x 4.72"H |
| Material | Plastic Metal |
| Color | Red |
Setup
Unpacking
Carefully remove all components from the packaging. Inspect the tool for any signs of damage during transit. Ensure all parts listed in the packing contents are present before proceeding with assembly.
Attaching the Auxiliary Handle
The auxiliary handle provides additional control and stability during operation. It can be attached to three different positions on the grinder head to suit various working angles and user preferences.
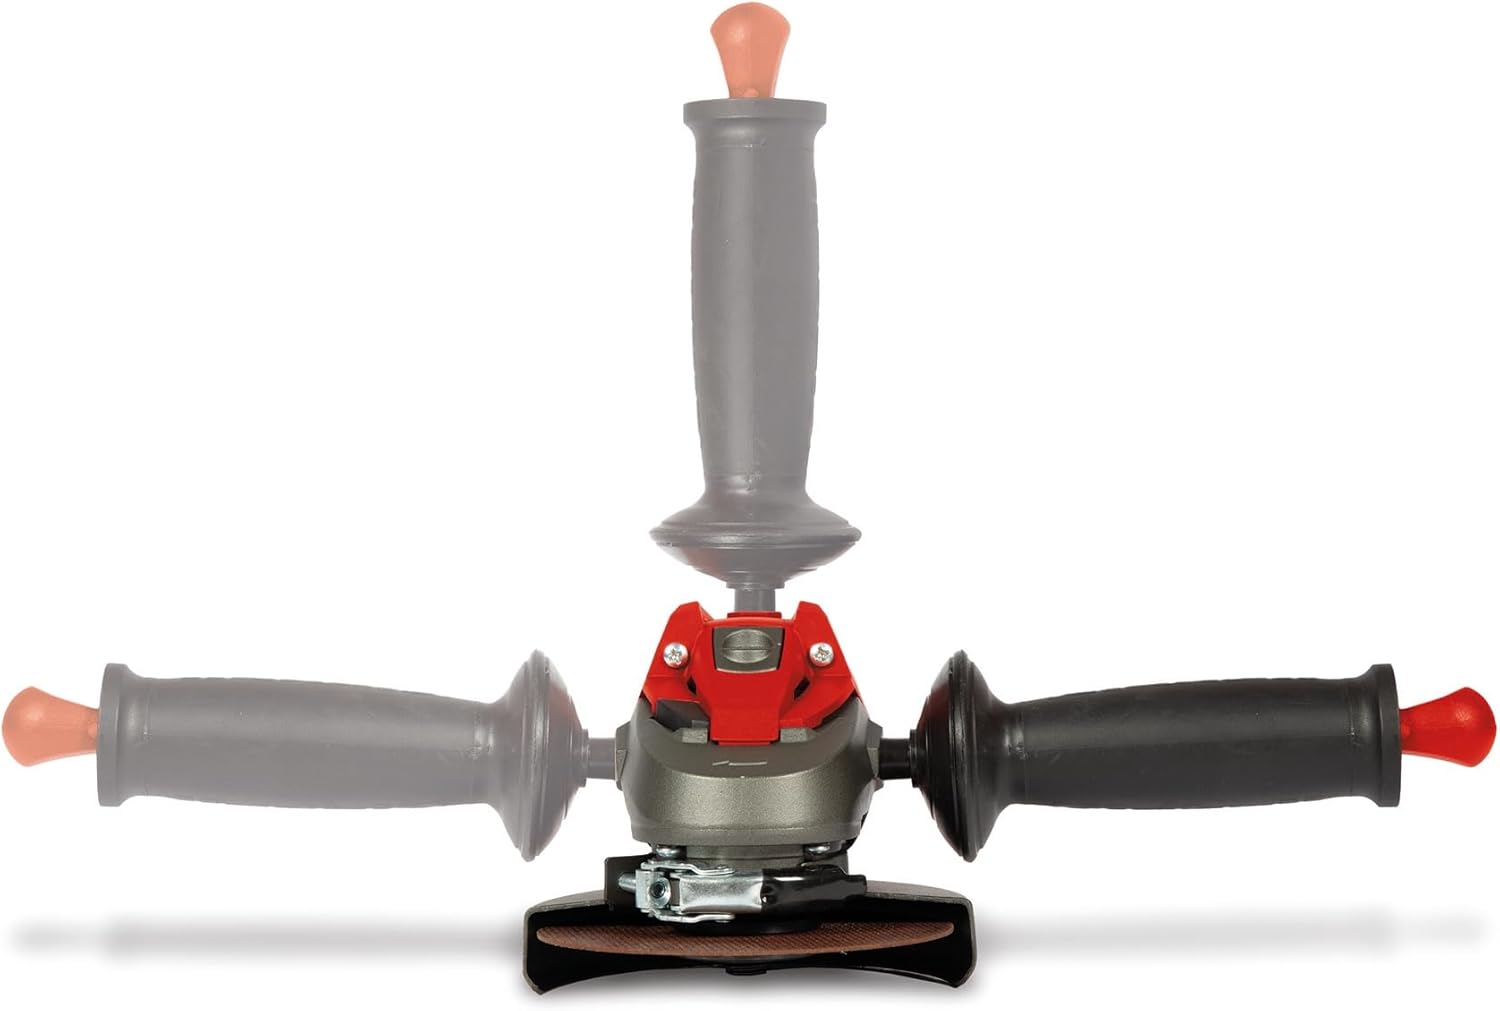
Image: Diagram showing the three possible attachment points for the auxiliary handle on the angle grinder, allowing for left-handed, right-handed, or top-mounted operation.
- Screw the auxiliary handle firmly into one of the designated threaded holes on the gear head.
- Ensure it is securely tightened before operating the tool.
Mounting the Grinding Guard
The grinding guard is a critical safety component and must always be fitted when working with the angle grinder to protect against sparks, debris, and accidental contact with the rotating disc.

Image: Close-up view of the grinding guard securely attached to the angle grinder, positioned to protect the user from debris.
- Place the grinding guard onto the collar of the gear head.
- Rotate the guard until it clicks into position.
- Tighten the clamping screw to secure the guard firmly.
- Adjust the guard to ensure maximum protection for the user, directing sparks and debris away from your body.
Installing the Grinding Disc
Always ensure the tool is disconnected from the power supply before attempting to change or install any discs.

Image: Detailed view of an angle grinder's spindle and flange, ready for disc installation, with the locking button visible.
- Press and hold the spindle lock button to prevent the spindle from rotating.
- Place the lower flange onto the spindle.
- Position the grinding disc onto the lower flange, ensuring it sits flat and centered.
- Screw the clamping nut onto the spindle and tighten it firmly using the supplied spanner.
- Release the spindle lock button.
Operating Instructions
Powering On/Off
To switch on the angle grinder, slide the ON/OFF switch forward until it locks into place. To switch off, press the rear part of the ON/OFF switch to release it.

Image: Close-up of the angle grinder's power switch, showing its ergonomic design for easy operation.
General Operation
Always hold the angle grinder firmly with both hands, using the main handle and the auxiliary handle. Apply light, even pressure and allow the tool to do the work. Do not force the tool, as this can lead to kickback or damage.

Image: A person wearing safety glasses and gloves operating the Einhell angle grinder on a metal cage outdoors, demonstrating proper handling and safety precautions.
Image: A person using the angle grinder to remove rust or paint from a metal bench leg, with sparks visible, highlighting its application for surface preparation.
- Ensure the workpiece is securely clamped or stable to prevent movement during grinding or cutting.
- Allow the disc to reach full operating speed before making contact with the workpiece.
- Move the tool smoothly and consistently across the surface or through the material.
- Avoid applying excessive side pressure to the disc, especially with cutting discs, as this can cause the disc to break.
- For cutting applications, always use a cutting disc and ensure the cutting guard is correctly positioned for maximum safety.
Maintenance
Cleaning
Regular cleaning helps maintain the tool's performance and extends its lifespan. Keep the ventilation slots clean and free of obstructions to prevent overheating. Regularly clean the tool housing with a soft, damp cloth. Do not use harsh solvents or abrasive cleaners, as they can damage the plastic components.
Disc Replacement
Replace worn, chipped, or damaged grinding and cutting discs immediately. Always use discs that are compatible with the tool's specifications (e.g., diameter, bore size, maximum RPM) and suitable for the material being worked on.
Carbon Brushes
The carbon brushes are wear components. If the motor sparks excessively or the tool stops working intermittently, the carbon brushes may be worn out and require replacement. This procedure should ideally be performed by a qualified service technician to ensure proper installation and tool function.
Troubleshooting
| Problem | Possible Cause | Solution |
|---|---|---|
| Tool does not start | No power supply; Faulty power cord; Worn carbon brushes; ON/OFF switch not fully engaged | Check power outlet and connection; Inspect power cord for damage; Have carbon brushes checked/replaced by technician; Ensure switch is fully locked in 'ON' position |
| Excessive sparking at motor | Worn carbon brushes; Dirty commutator | Have carbon brushes checked/replaced by technician; Have commutator cleaned by technician |
| Tool overheats | Blocked ventilation slots; Overloading the tool; Prolonged continuous use | Clean ventilation slots thoroughly; Reduce pressure and allow tool to cool; Take breaks during extended operation |
| Disc wobbles or vibrates excessively | Disc not properly installed; Damaged or unbalanced disc; Worn flanges; Bent spindle | Reinstall disc correctly and tighten clamping nut; Replace disc with a new, undamaged one; Inspect and replace flanges if worn; If spindle is bent, seek professional repair |
Warranty and Support
Einhell products are manufactured to high quality standards and are subject to strict quality controls. For detailed warranty information, including terms and conditions, please refer to the official Einhell website or the warranty card included with your product. Keep your purchase receipt as proof of purchase for any warranty claims.
For customer support, technical assistance, or to locate an authorized service center, please visit the official Einhell website or contact your local dealer.
For further assistance, visit: www.einhell.com


