
Introduction
This manual provides detailed instructions for the proper use and maintenance of your National Air Conditioner Remote Control, model A75C3129. Please read this manual thoroughly before operating the remote control to ensure correct usage and to prevent damage. Keep this manual for future reference.
Safety Information
To ensure safe operation and prevent damage, please observe the following precautions:
- Do not mix old and new batteries, or different types of batteries.
- Remove batteries if the remote control will not be used for an extended period to prevent leakage.
- Keep batteries out of reach of children.
- Do not expose the remote control to direct sunlight, high temperatures, or high humidity.
- Avoid dropping the remote control or subjecting it to strong impacts.
- Do not attempt to disassemble or modify the remote control.
Product Overview
The National Air Conditioner Remote Control A75C3129 is designed for intuitive control of your air conditioning unit. Below is an image of the remote control with a general description of its components.
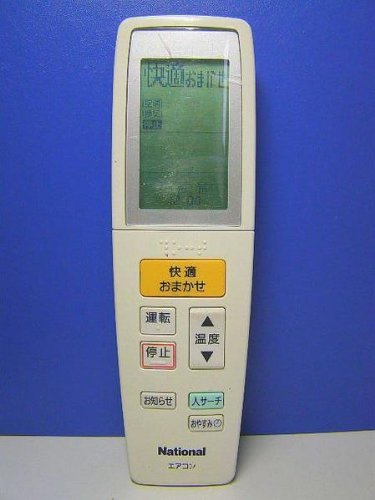
Image: National Air Conditioner Remote Control A75C3129. This image displays the front view of the remote control, showing its display screen and various control buttons. The remote is typically white or light gray.
Key Components:
- LCD Display: Shows current settings such as temperature, mode, fan speed, and timer.
- Power Button: Turns the air conditioner ON or OFF.
- Mode Button: Cycles through operating modes (e.g., Cool, Heat, Dry, Fan, Auto).
- Temperature Adjustment Buttons (▲/▼): Increases or decreases the set temperature.
- Fan Speed Button: Adjusts the fan speed (e.g., Low, Medium, High, Auto).
- Swing Button: Controls the louver swing function.
- Timer Button: Sets ON/OFF timers.
- Sleep Button: Activates or deactivates sleep mode.
Setup
Battery Installation:
The remote control requires two AAA alkaline batteries (not included).
- Open the battery compartment cover located on the back of the remote control.
- Insert two AAA alkaline batteries, ensuring the (+) and (-) terminals match the diagrams inside the compartment.
- Close the battery compartment cover securely.
Note: If the remote control does not respond after battery installation, check the battery orientation or replace with new batteries.
Operating Instructions
Basic Operation:
- Power ON/OFF: Press the Power button once to turn the unit ON, and again to turn it OFF.
- Select Mode: Press the Mode button repeatedly to cycle through available modes (e.g., Cool, Heat, Dry, Fan, Auto). The selected mode will be displayed on the LCD.
- Adjust Temperature: Use the ▲ (Up) or ▼ (Down) buttons to set your desired temperature.
- Adjust Fan Speed: Press the Fan Speed button to select the desired fan speed (e.g., Auto, Low, Medium, High).
Advanced Functions:
- Timer Function:
To set an ON timer:
- Press the Timer button. The timer indicator will flash.
- Use the ▲/▼ buttons to set the desired ON time.
- Press the Timer button again to confirm.
To set an OFF timer, follow similar steps, selecting the OFF timer option if available.
- Swing Function: Press the Swing button to activate or deactivate the automatic louver swing. Press again to stop the swing at a desired angle.
- Sleep Mode: Press the Sleep button to activate a comfortable sleep mode, which typically adjusts temperature gradually over time. Press again to cancel.
Maintenance
Cleaning the Remote Control:
- Wipe the surface of the remote control with a soft, dry cloth.
- For stubborn dirt, lightly dampen the cloth with water and a mild detergent, then wipe dry immediately.
- Do not use volatile liquids such as benzene, alcohol, or paint thinner, as they may damage the surface.
Battery Replacement:
Replace batteries when the remote control's display becomes dim or when the unit no longer responds to commands. Follow the battery installation steps in the "Setup" section.
Troubleshooting
| Problem | Possible Cause | Solution |
|---|---|---|
| Remote control does not operate the air conditioner. |
|
|
| LCD display is dim or blank. | Batteries are low. | Replace with new alkaline batteries. |
| Air conditioner does not respond to specific commands. | Incorrect mode selected or function not available on your AC unit. | Verify the selected mode and ensure the function is supported by your air conditioner model. |
Specifications
- Model: A75C3129
- Brand: National (Manufactured by Panasonic)
- Controller Type: Remote Control
- Number of Buttons: 10 (as per product specifications, though visual may vary slightly)
- Battery Type: AAA Alkaline (not included)
- Package Dimensions: Approximately 23 x 4.2 x 2 cm (9.06 x 1.65 x 0.79 inches)
- Package Weight: Approximately 0.1 kg (0.22 lbs)
- First Available Date on Amazon.co.jp: February 6, 2013
Warranty and Support
For warranty information or technical support, please refer to the documentation provided with your air conditioning unit or contact the manufacturer, Panasonic, directly.
You can often find support contact details on the official Panasonic website or through their customer service channels.


