
Fisher & Paykel HC325
Fisher & Paykel HC325 Heated Humidifier Chamber User Manual
Model: HC325
Introduction
This manual provides essential information for the proper use, maintenance, and care of your Fisher & Paykel HC325 Heated Humidifier Chamber. This chamber is designed as a replacement water chamber for use with compatible Fisher & Paykel HC100/150 Series Heated Humidifiers. Please read these instructions thoroughly before initial use.
Product Overview
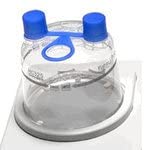
Figure 1: Fisher & Paykel HC325 Heated Humidifier Chamber. This image shows the clear plastic water chamber with two blue caps on top, designed to hold water for humidification.
The HC325 Heated Humidifier Chamber is a critical component of your humidification system, responsible for holding the water that is heated to create humidified air. It is designed for easy integration with specific Fisher & Paykel humidifier models.
Setup and Installation
Before installing the new chamber, ensure your humidifier is unplugged from the power outlet.
- Remove Old Chamber: Carefully remove the existing water chamber from your Fisher & Paykel HC100/150 Series Heated Humidifier. Refer to your humidifier's manual for specific removal instructions.
- Inspect New Chamber: Examine the new HC325 chamber for any visible damage or defects. Do not use if damaged.
- Fill with Water: Open the fill port (typically one of the blue caps) and fill the chamber with distilled water up to the maximum fill line. Do not overfill. Using distilled water helps prevent mineral buildup.
- Secure Chamber: Carefully insert the filled HC325 chamber into the humidifier unit, ensuring it is seated correctly and securely. Make sure all connections are firm.
- Connect Power: Once the chamber is securely in place, you may plug your humidifier back into the power outlet.
Operating Instructions
The HC325 chamber operates in conjunction with your Fisher & Paykel HC100/150 Series Heated Humidifier. Once installed and filled, the humidifier will heat the water in the chamber to produce humidified air.
- Daily Water Change: For optimal hygiene and performance, empty any remaining water from the chamber and refill with fresh distilled water daily.
- Monitor Water Level: Regularly check the water level in the chamber. If the water level drops below the minimum, the humidifier may not function effectively or could be damaged.
- Temperature Settings: Adjust the humidifier's temperature settings according to your comfort and the manufacturer's recommendations for the humidifier unit.
Maintenance and Cleaning
Regular cleaning of your HC325 Humidifier Chamber is essential to prevent mineral buildup and bacterial growth, ensuring hygienic and effective humidification. It is recommended to clean the chamber weekly, or more frequently if visible deposits appear.
Weekly Cleaning Procedure:
- Disconnect Power: Always unplug the humidifier from the power outlet before cleaning.
- Empty Water: Remove the chamber from the humidifier and empty any remaining water.
- Disassemble (if applicable): If your chamber has removable parts, disassemble them according to your humidifier's manual. The HC325 chamber is a sealed unit, limiting internal access for cleaning.
- Cleaning Solution: Prepare a cleaning solution using one part white vinegar to three parts distilled water. Alternatively, use a mild dish soap solution.
- Soak: Pour the cleaning solution into the chamber through the fill port. Allow it to soak for 30 minutes to an hour to loosen mineral deposits. For stubborn buildup, a longer soak may be necessary.
- Rinse Thoroughly: After soaking, empty the cleaning solution. Rinse the chamber thoroughly with fresh distilled water multiple times to remove all traces of the cleaning solution and loosened deposits. Due to the sealed design, vigorous rinsing is crucial.
- Air Dry: Allow the chamber to air dry completely before reassembling and placing it back into the humidifier. Ensure no moisture remains to prevent mold or bacterial growth.
Note on Cleaning Access: Due to the sealed design of the HC325 chamber, internal cleaning with brushes is not possible. Regular soaking and thorough rinsing with appropriate cleaning solutions are the primary methods for maintenance. If significant mineral buildup or discoloration persists internally, replacement of the chamber may be necessary for optimal performance and hygiene.
Troubleshooting
| Problem | Possible Cause | Solution |
|---|---|---|
| No humidification or low humidity output. | Chamber empty or low water level. Incorrectly seated chamber. Humidifier heating element issue. | Refill chamber with distilled water. Ensure chamber is securely seated in the humidifier. Consult your humidifier's manual for heating element troubleshooting. |
| Water leakage from chamber. | Chamber not sealed properly. Damaged chamber. Overfilling. | Ensure caps are tightly closed. Check for cracks or damage; replace chamber if damaged. Do not fill above the maximum line. |
| Visible mineral buildup inside chamber. | Use of tap water. Infrequent cleaning. | Always use distilled water. Perform regular weekly cleaning as described in the Maintenance section. If buildup is severe and cannot be removed, replace the chamber. |
| Unpleasant odor from humidifier. | Bacterial or mold growth due to stagnant water or insufficient cleaning. | Empty and refill chamber daily. Perform thorough weekly cleaning. Ensure chamber is completely dry before storage. |
Specifications
- Model: HC325
- Compatibility: Designed for Fisher & Paykel HC100/150 Series Heated Humidifiers
- Material: Medical-grade plastic
- Capacity: Standard water capacity for compatible humidifiers (specific volume not provided, refer to humidifier manual)
- ASIN: B00ADR7H2Y
Warranty and Support
For information regarding the warranty of your Fisher & Paykel HC325 Heated Humidifier Chamber, please refer to the documentation provided with your original humidifier unit or contact Fisher & Paykel customer support directly. Keep your proof of purchase for warranty claims.
For technical support or further assistance, please visit the official Fisher & Paykel Healthcare website or contact their customer service department. Contact details can typically be found on the manufacturer's website or in the original product packaging.
Related documentsHC325


Ask a question about this manual
Ask about setup, troubleshooting, compatibility, parts, safety, or missing instructions. Manuals+ will review the question and use this page’s manual context to help answer it.