
1. Safety Instructions
Always read and understand all safety warnings, instructions, illustrations, and specifications provided with this power tool. Failure to follow all instructions listed below may result in electric shock, fire, and/or serious injury.
1.1 General Power Tool Safety
- Work Area Safety: Keep the work area clean and well-lit. Cluttered or dark areas invite accidents. Do not operate power tools in explosive atmospheres, such as in the presence of flammable liquids, gases, or dust.
- Electrical Safety: Avoid body contact with earthed or grounded surfaces such as pipes, radiators, ranges, and refrigerators. There is an increased risk of electric shock if your body is earthed or grounded.
- Personal Safety: Always wear eye protection. Use personal protective equipment such as dust masks, non-skid safety shoes, hard hats, or hearing protection when appropriate.
- Tool Use and Care: Do not force the power tool. Use the correct power tool for your application. It will do the job better and safer at the rate for which it was designed.
1.2 Battery Tool Use and Care
- Recharge only with the charger specified by the manufacturer. A charger that is suitable for one type of battery pack may create a risk of fire when used with another battery pack.
- Use power tools only with specifically designated battery packs. Use of any other battery packs may create a risk of injury and fire.
- When the battery pack is not in use, keep it away from other metal objects, like paper clips, coins, keys, nails, screws or other small metal objects, that can make a connection from one terminal to another. Shorting the battery terminals together may cause burns or a fire.
- Under abusive conditions, liquid may be ejected from the battery; avoid contact. If contact accidentally occurs, flush with water. If liquid contacts eyes, additionally seek medical help. Liquid ejected from the battery may cause irritation or burns.
2. Package Contents
Carefully unpack all items and ensure you have received the following:
- Pro'sKit PT-1080A 10.8V Cordless Drill Driver
- 10.8V Li-ion Battery Pack
- Battery Charger (110V)
- Instruction Manual
3. Product Overview
The Pro'sKit PT-1080A is a versatile 10.8V cordless drill driver designed for various drilling and fastening tasks. It features a keyless chuck, variable speed control, and adjustable torque settings.
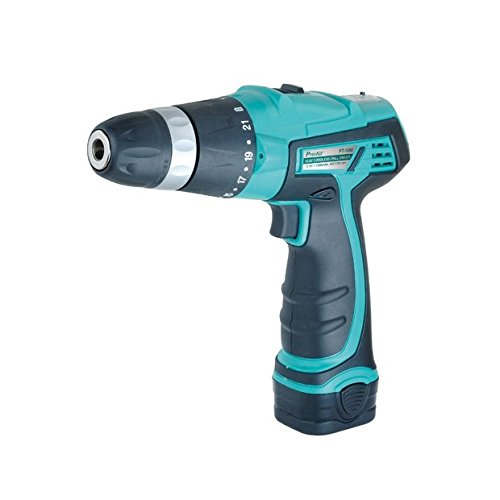
Figure 1: Pro'sKit PT-1080A 10.8V Cordless Drill Driver. This image shows the main body of the drill driver, highlighting its compact design and keyless chuck.
3.1 Key Components
- Keyless Chuck: For quick and easy bit changes.
- Torque Adjustment Ring: Selects the desired torque setting or drill mode.
- Gear Selector: Switches between high and low-speed ranges.
- Forward/Reverse Switch: Controls the direction of rotation.
- Variable Speed Trigger: Controls the operating speed based on pressure applied.
- Battery Pack: Removable 10.8V Li-ion battery.
4. Setup
4.1 Charging the Battery
- Ensure the battery charger is connected to a standard 110V power outlet.
- Slide the 10.8V Li-ion battery pack onto the charger until it clicks into place.
- The charger's indicator light will show the charging status (refer to charger manual for specific light patterns).
- Once fully charged, remove the battery pack from the charger. Do not overcharge.
4.2 Installing/Removing the Battery Pack
- To Install: Align the battery pack with the base of the drill handle and slide it in until it clicks securely into place.
- To Remove: Press the battery release buttons (usually on the sides of the battery pack) and slide the battery pack out of the drill handle.
4.3 Installing/Removing Drill Bits or Driver Bits
- Rotate the keyless chuck counter-clockwise to open the chuck jaws.
- Insert the desired drill bit or driver bit into the chuck, ensuring it is centered.
- Rotate the keyless chuck clockwise to tighten the jaws firmly around the bit. Ensure the bit is secure before operation.
- To Remove: Rotate the chuck counter-clockwise to loosen the jaws and pull the bit out.
5. Operating Instructions
5.1 Selecting Speed Range
The drill driver has two speed ranges, selected by the gear selector switch located on top of the tool:
- Position 1 (Low Speed): 0-350 RPM. Ideal for high torque applications like driving screws or drilling large diameter holes.
- Position 2 (High Speed): 0-1100 RPM. Suitable for fast drilling of small diameter holes.
Note: Always change the speed range when the tool is stopped to prevent gear damage.
5.2 Adjusting Torque Settings
The torque adjustment ring allows you to select from 21 torque settings for screwing applications, plus an additional position for drilling.
- Settings 1-21: For driving screws. Lower numbers are for smaller screws or softer materials, higher numbers for larger screws or harder materials. The clutch will disengage when the set torque is reached, preventing overtightening or stripping.
- Drill Symbol (⚒): For drilling applications. This setting provides maximum torque without clutch disengagement.
5.3 Forward/Reverse Rotation
The forward/reverse switch, located above the trigger, controls the direction of rotation:
- Pushing the switch to the left (when viewed from the rear) sets the drill to forward rotation for drilling and driving screws.
- Pushing the switch to the right sets the drill to reverse rotation for removing screws or backing out drill bits.
- When the switch is in the center position, the trigger is locked, preventing accidental starting.
5.4 Variable Speed Trigger
The variable speed trigger allows for precise control over the operating speed. Press the trigger lightly for slower speeds and increase pressure for higher speeds. This feature provides complete control for various tasks.
6. Maintenance
6.1 Cleaning
- Always disconnect the battery pack before performing any cleaning or maintenance.
- Keep the ventilation openings of the tool clean to prevent overheating.
- Use a soft, damp cloth to clean the exterior of the tool. Do not use harsh chemicals or abrasive cleaners.
- Never immerse the tool or battery in liquid.
6.2 Storage
- Store the tool and battery pack in a cool, dry place, away from direct sunlight and moisture.
- Ensure the battery pack is partially charged before long-term storage to prolong its lifespan.
- Store out of reach of children.
6.3 Battery Care
- Do not store battery packs in temperatures above 120°F (50°C) or below 0°F (-18°C).
- Do not dispose of battery packs in fire or water.
- If the battery pack is damaged, do not attempt to repair it. Contact customer service for replacement.
7. Troubleshooting
| Problem | Possible Cause | Solution |
|---|---|---|
| Drill does not start | Battery not charged or improperly installed; Forward/Reverse switch in center (locked) position; Faulty battery or tool. | Charge battery and ensure it is securely installed; Move F/R switch to forward or reverse; Test with another charged battery if available; Contact support. |
| Battery not charging | Charger not plugged in; Faulty charger or battery; Temperature too extreme. | Ensure charger is plugged into a live outlet; Check charger indicator lights; Move to a moderate temperature environment; Contact support. |
| Loss of power during operation | Battery low; Overload protection activated. | Recharge battery; Reduce pressure on the tool or use a lower speed setting. |
| Bit slips in chuck | Chuck not tightened sufficiently; Bit shank is dirty or damaged. | Retighten chuck firmly; Clean or replace bit. |
8. Specifications
| Feature | Specification |
|---|---|
| Model Number | PT-1080A |
| Brand | Pro'sKit |
| Voltage | 10.8 Volts |
| Power Source | Battery Powered |
| No-load Speed (Low) | 0-350 RPM |
| No-load Speed (High) | 0-1100 RPM |
| Maximum Output Torque | 14 Nm |
| Chuck Size | 3/8 inch (10mm) Keyless |
| Torque Settings | 21 + 1 (Drill Mode) |
| Amperage | 1300 Milliamps |
9. Warranty & Support
For information regarding warranty coverage, terms, and conditions, please refer to the warranty card included with your product or contact Pro'sKit customer support directly.
If you encounter any issues or require technical assistance, please contact the retailer where you purchased the product or visit the official Pro'sKit website for support contact information.