
1. Introduction
This manual provides detailed instructions for the setup, operation, and maintenance of your BenQ W1070 DLP HD 1080p Projector. The W1070 is designed to deliver a Full HD 1080p image projection experience, suitable for home entertainment with features like 3D capability, lens shift technology, and an RGBRGB color wheel.

Figure 1.1: BenQ W1070 DLP HD 1080p Projector (Angled View)
This image shows the BenQ W1070 projector from an angled perspective, highlighting its compact design and the main lens. The top panel features control buttons and indicators, while the side has ventilation grilles.
2. Setup
2.1 Unboxing and Package Contents
Carefully remove all components from the packaging. Ensure the following items are present:
- BenQ W1070 Projector Unit
- Power cord
- Remote control (requires 2 AA batteries, not included)
- User Manual (this document)
- Video source connection cable (specific type may vary based on purchase)
2.2 Physical Placement
Position the projector on a stable, flat surface or mount it securely to the ceiling. Ensure adequate ventilation around the projector to prevent overheating. Maintain a clear path between the projector lens and the projection screen or wall.

Figure 2.1: BenQ W1070 Projector (Front View)
This image displays the front of the BenQ W1070 projector, showing the main projection lens and the front ventilation grille. The BenQ logo is visible below the lens.

Figure 2.2: BenQ W1070 Projector (Side View)
This image shows the side of the BenQ W1070 projector, highlighting the extensive ventilation grilles designed for heat dissipation. Proper airflow around these vents is crucial for optimal performance.
2.3 Connecting Devices
The BenQ W1070 offers various input options. Connect your video sources (e.g., Blu-ray player, gaming console, PC) to the appropriate ports on the rear of the projector.

Figure 2.3: BenQ W1070 Projector (Rear View with Ports)
This image displays the rear panel of the BenQ W1070 projector, showing all available input and output ports. These include HDMI 1, HDMI 2, 12V Trigger, Component (YPbPr), Mini-B USB, PC (VGA), RS-232, S-Video, Video (Composite), Audio-In (RCA and 3.5mm), and Audio-Out (3.5mm). The AC power input is also visible.
- HDMI (HDMI-1, HDMI-2): For high-definition digital video and audio.
- Component (YPbPr): For high-definition analog video.
- PC (VGA): For connecting to a computer.
- S-Video: For standard definition video.
- Video (Composite): For standard definition video.
- Audio In/Out: For connecting external audio devices.
- 12V Trigger: For automated screen control.
- RS-232: For projector control via a computer system.
After connecting all necessary cables, plug the power cord into the projector and then into a power outlet.
2.4 Powering On
Press the power button on the projector's control panel or the remote control to turn on the unit. The power indicator light will change to indicate the projector is operational.

Figure 2.4: BenQ W1070 Projector (Top View with Controls)
This image displays the top panel of the BenQ W1070 projector, featuring the manual focus and zoom rings, the lens shift adjustment, and the integrated control panel with buttons for power, menu navigation, source selection, and Eco Blank mode.
3. Operating the Projector
3.1 Basic Operation and Remote Control
Use the remote control for convenient operation of the projector. Ensure batteries are correctly inserted.

Figure 3.1: BenQ W1070 Projector Remote Control
This image displays the remote control for the BenQ W1070 projector, showing its various buttons for power, menu navigation, source selection, volume, brightness, contrast, aspect ratio, 3D settings, and SmartEco mode.
- Power Button: Turns the projector on or off.
- Source Button: Cycles through available input sources.
- Menu/Exit Button: Accesses or exits the on-screen display (OSD) menu.
- Arrow Buttons: Navigate through menu options.
- Mode/Enter Button: Confirms selections.
3.2 Picture Adjustments
Optimize your viewing experience by adjusting picture settings.
- Focus Ring: Rotate the ring around the lens to sharpen the image.
- Zoom Ring: Adjust the image size without moving the projector.
- Lens Shift: Use the lens shift mechanism (located on top of the projector) to vertically adjust the image position without distorting the picture. This is useful for fine-tuning image placement after initial setup.
- Keystone Correction: If the image appears trapezoidal, use the keystone correction feature in the OSD menu to square the image. Note that digital keystone correction can slightly reduce image quality.
- Brightness, Contrast, Color: Adjust these settings via the remote control or OSD menu to suit your viewing environment and content.
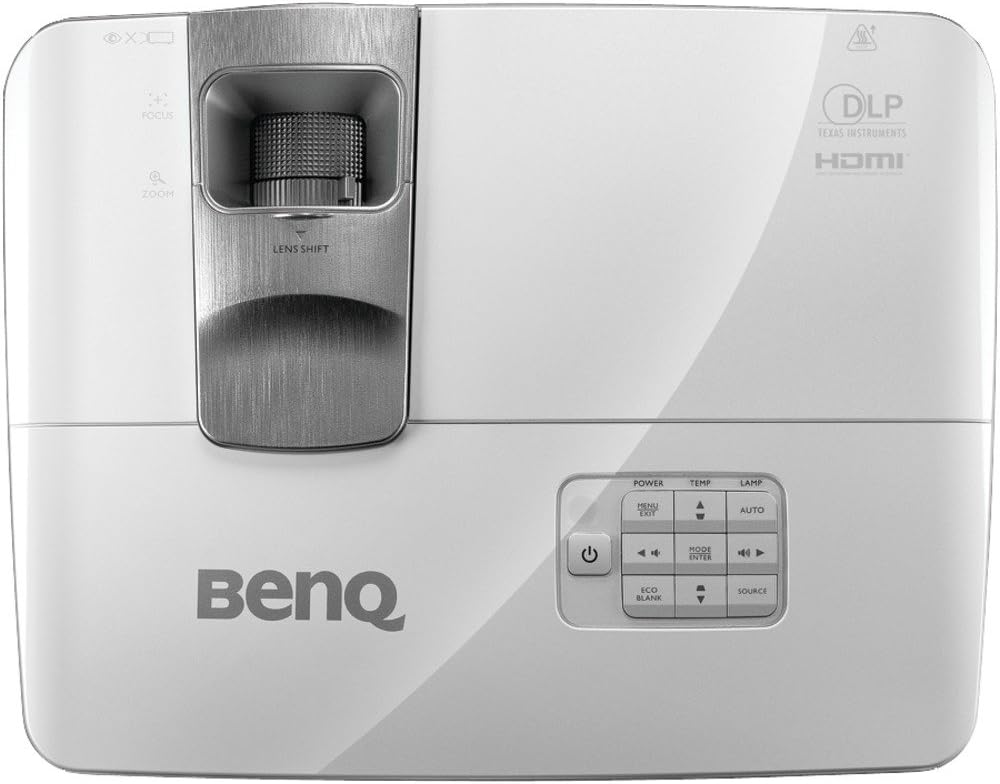
Figure 3.2: BenQ W1070 Projector (Top View with Lens Shift Mechanism)
This image provides a closer look at the top of the BenQ W1070 projector, specifically highlighting the lens shift adjustment mechanism. This feature allows for vertical image positioning without digital distortion.
3.3 Audio Settings
The projector has built-in speakers. Adjust volume using the remote control. For enhanced audio, connect external speakers to the Audio Out port.
3.4 3D Functionality
The W1070 supports 3D content. To view 3D, you will need compatible 3D glasses (DLP-Link type) and 3D source material. Activate 3D mode through the projector's menu or dedicated 3D button on the remote.
3.5 SmartEco Technology
The projector features SmartEco technology, which dynamically adjusts lamp power based on content to save energy and extend lamp life. This mode can be activated via the remote control.
4. Maintenance
4.1 Lamp Life and Replacement
The lamp in your BenQ W1070 projector has a lifespan of up to 6,000 hours in SmartEco mode. When the lamp approaches its end of life, a warning message may appear, or the image brightness may significantly decrease. Refer to the full user manual for detailed lamp replacement instructions.
Warning: Do not attempt to replace the lamp while the projector is hot or immediately after use. Allow the projector to cool down completely.
4.2 Cleaning the Projector
- Exterior: Use a soft, lint-free cloth slightly dampened with water to clean the projector's exterior. Avoid abrasive cleaners.
- Lens: Use a professional lens cleaning kit or a soft, dry microfiber cloth specifically designed for optical lenses. Do not use liquid cleaners directly on the lens.
- Vents: Periodically check and clean the ventilation grilles to ensure unobstructed airflow. Use a soft brush or compressed air to remove dust.
5. Troubleshooting
This section addresses common issues you might encounter. For more complex problems, consult the comprehensive user manual or contact BenQ customer support.
| Problem | Possible Cause | Solution |
|---|---|---|
| No image on screen |
|
|
| Image is blurry |
|
|
| Fan noise is loud |
|
|
| Light leakage from projector body |
|
|
6. Specifications
| Feature | Detail |
|---|---|
| Brand | BenQ |
| Model Number | W1070 |
| Display Resolution | 1920 x 1080 (Full HD) |
| Connectivity Technology | HDMI |
| Special Features | 3D-ready, Built-in speakers |
| Recommended Uses | Home Cinema |
| Item Weight | 6.06 pounds |
| Product Dimensions | 9.6 x 12.28 x 4.09 inches |
| Output Wattage | 10 Watts (speakers) |
| Color | White/Silver |
| Visible Screen Diagonal | Up to 200" / 508 cm |
7. Warranty and Support
Your BenQ W1070 projector is covered by a manufacturer's warranty. Please refer to the warranty card included with your product or visit the official BenQ website for detailed warranty terms and conditions specific to your region.
For technical assistance, troubleshooting beyond this manual, or warranty claims, please contact BenQ customer support. Contact information can typically be found on the BenQ website or in your product's packaging.
Legal Disclaimer: In most cases, returns may not be accepted unless a technical issue occurs. If a return is accepted due to a technical issue, a deduction of 25% of the total price may apply. Please review all terms and conditions before placing an order.


