
Introduction
Thank you for choosing the Yato YT-8302 Digital Battery Charger. This manual provides essential information for the safe and efficient operation, maintenance, and troubleshooting of your new battery charger. Please read these instructions carefully before use and retain them for future reference.
The Yato YT-8302 is a microprocessor-controlled battery charger designed for 12V batteries, offering charging currents of 12A, 6A, and 2A. It features optimized programs for Wet, AGM, and GE battery types, along with safety features like overload protection and error code display.
Safety Instructions
WARNING: Failure to follow these safety instructions may result in electric shock, fire, or serious injury.
- Always connect the charger to a properly grounded outlet.
- Ensure adequate ventilation when charging batteries. Batteries can produce explosive gases.
- Do not charge frozen batteries. Allow them to warm up to room temperature first.
- Avoid sparks or flames near the battery during charging.
- Wear eye protection and gloves when working with batteries.
- Keep the charger away from water, rain, and excessive moisture.
- Disconnect the AC power before making or breaking connections to the battery.
- This appliance is not intended for use by persons (including children) with reduced physical, sensory or mental capabilities, or lack of experience and knowledge, unless they have been given supervision or instruction concerning use of the appliance by a person responsible for their safety.
Product Overview
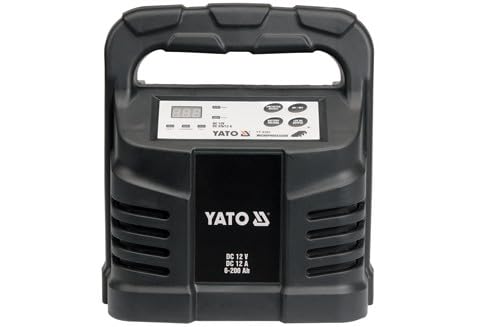
Image showing the front view of the Yato YT-8302 Digital Battery Charger, highlighting its display and control buttons.
The Yato YT-8302 features a clear LED display for status and error codes, control buttons for mode selection, and robust connection clamps for secure battery attachment.
Setup
- Prepare the Battery: Ensure the battery terminals are clean and free of corrosion. If the battery has removable caps, check the electrolyte level and top up with distilled water if necessary (for Wet batteries).
- Connect to Battery:
- Connect the RED (+) charger clamp to the POSITIVE (+) battery terminal.
- Connect the BLACK (-) charger clamp to the NEGATIVE (-) battery terminal. For vehicles, connect the black clamp to the vehicle chassis away from the battery and fuel line if the battery is installed in the vehicle.
- Connect to Power: Plug the charger's AC power cord into a standard 230V AC wall outlet. The charger will power on and display its current status.
Operating Instructions
Once connected, the charger will automatically detect the battery voltage. Use the mode selection button to choose the appropriate charging program and current.
Selecting Charging Mode:
- Press the "MODE" button to cycle through the available charging currents: 12A, 6A, 2A.
- The charger also offers optimized programs for different battery types: Wet, AGM, and GE (Gel/GEL). Select the program that matches your battery type for optimal charging. The display will indicate the selected mode.
- The 12A setting is for fast charging larger batteries.
- The 6A setting is for standard charging of medium-sized batteries.
- The 2A setting is for trickle charging or maintaining smaller batteries.
Charging Process:
The charger will automatically begin charging once a mode is selected. The LED display will show the charging status, voltage, and current. The microprocessor control ensures a multi-stage charging process for efficient and safe battery charging.
When charging is complete, the charger will typically indicate a "FULL" status or switch to a maintenance/float charge mode. Disconnect the AC power first, then disconnect the battery clamps (black first, then red).
Error Codes and Indicators:
The charger is equipped with LED indicators and can display error codes (RGE) to alert you to potential issues such as reverse polarity, short circuit, or overload. Refer to the troubleshooting section for specific error code meanings.
The 12V cigarette lighter output can be used for powering compatible 12V accessories when the charger is connected to AC power.
Maintenance
- Cleaning: Disconnect the charger from all power sources before cleaning. Wipe the exterior with a soft, damp cloth. Do not use harsh chemicals or abrasive cleaners.
- Storage: Store the charger in a cool, dry place when not in use. Keep cables neatly coiled and avoid kinks or damage.
- Cable Inspection: Regularly inspect the power cord and battery clamps for any signs of damage, wear, or corrosion. Replace damaged components immediately.
Troubleshooting
| Problem | Possible Cause | Solution |
|---|---|---|
| Charger does not turn on. | No AC power, faulty outlet, damaged power cord. | Check AC power connection and outlet. Inspect power cord for damage. |
| Charger not charging battery. | Incorrect battery connection, deeply discharged battery, incorrect mode selected. | Ensure clamps are correctly connected (+ to +, - to -). Check battery voltage; very low voltage batteries may not be detected. Select appropriate charging mode. |
| Error code displayed (e.g., RGE). | Reverse polarity, short circuit, overload, faulty battery. | Disconnect and re-connect clamps correctly. Check for short circuits. Reduce charging current if overload persists. Have battery tested. |
| Overload protection activated. | Excessive current draw, internal fault. | Ensure battery is not short-circuited. Try a lower charging current. If issue persists, discontinue use. |
Specifications
- Model: YT-8302
- Input Voltage: 230V AC, 50Hz (typical for EU market)
- Output Voltage: 12V DC
- Charging Current: 12A / 6A / 2A (selectable)
- Battery Types: Wet, AGM, GE (Gel)
- Control: Microprocessor Controlled
- Features: LED Display, Error Codes (RGE), 12V Cigarette Lighter Output, Overload Protection
- Weight: 1.24 Kilograms
- Brand: Yato
Warranty Information
Yato products are manufactured to high-quality standards. This product comes with a standard manufacturer's warranty against defects in materials and workmanship. Please retain your proof of purchase for warranty claims. For specific warranty terms and conditions, refer to the documentation provided with your purchase or contact Yato customer support.
Customer Support
For technical assistance, spare parts, or service, please contact your local Yato dealer or visit the official Yato website. Have your product model number (YT-8302) and purchase details ready when contacting support.
Note: Information regarding spare parts availability and software updates is not available at this time.