
1. Introduction
Thank you for choosing the Yato YT-8301 Digital Battery Charger. This professional device is designed for charging 6V and 12V batteries commonly found in motorcycles, tractors, passenger cars, delivery vans, and motor boats. It supports various battery types including traditional lead-acid (wet), lead-gel, and AGM batteries. This manual provides essential information for safe and efficient operation, setup, maintenance, and troubleshooting.
2. Important Safety Instructions
Read all instructions before using this product. Failure to follow these instructions may result in electric shock, fire, or serious injury.
- Ventilation: Always operate the charger in a well-ventilated area. Batteries can produce explosive gases.
- Eye and Skin Protection: Wear appropriate eye protection and clothing when working with batteries. Battery acid is corrosive.
- Flammable Materials: Keep sparks, flames, and smoking materials away from batteries and the charging area.
- Connection Order: Connect the charger output clips to the battery terminals in the correct order: positive (+) to positive (+), and negative (-) to negative (-). Connect the negative clip to the chassis away from the battery if charging a battery installed in a vehicle.
- Disconnection Order: Disconnect in the reverse order of connection.
- Power Source: Ensure the charger is connected to an AC power source with the correct voltage and frequency (50 Hz).
- Damage: Do not operate the charger if it has been dropped, damaged, or exposed to moisture.
- Children: Keep the charger and batteries out of reach of children.
- Short-Circuit Protection: The device includes short-circuit protection. However, avoid intentionally short-circuiting the terminals.
- Overcharging Protection: The device includes protection against overcharging. Do not leave the charger unattended for extended periods beyond the recommended charging time.
3. Product Overview
The Yato YT-8301 Digital Battery Charger features a robust metal construction and a digital display for monitoring charging status. It is equipped with a microprocessor for high-frequency operation, ensuring efficient and safe charging.
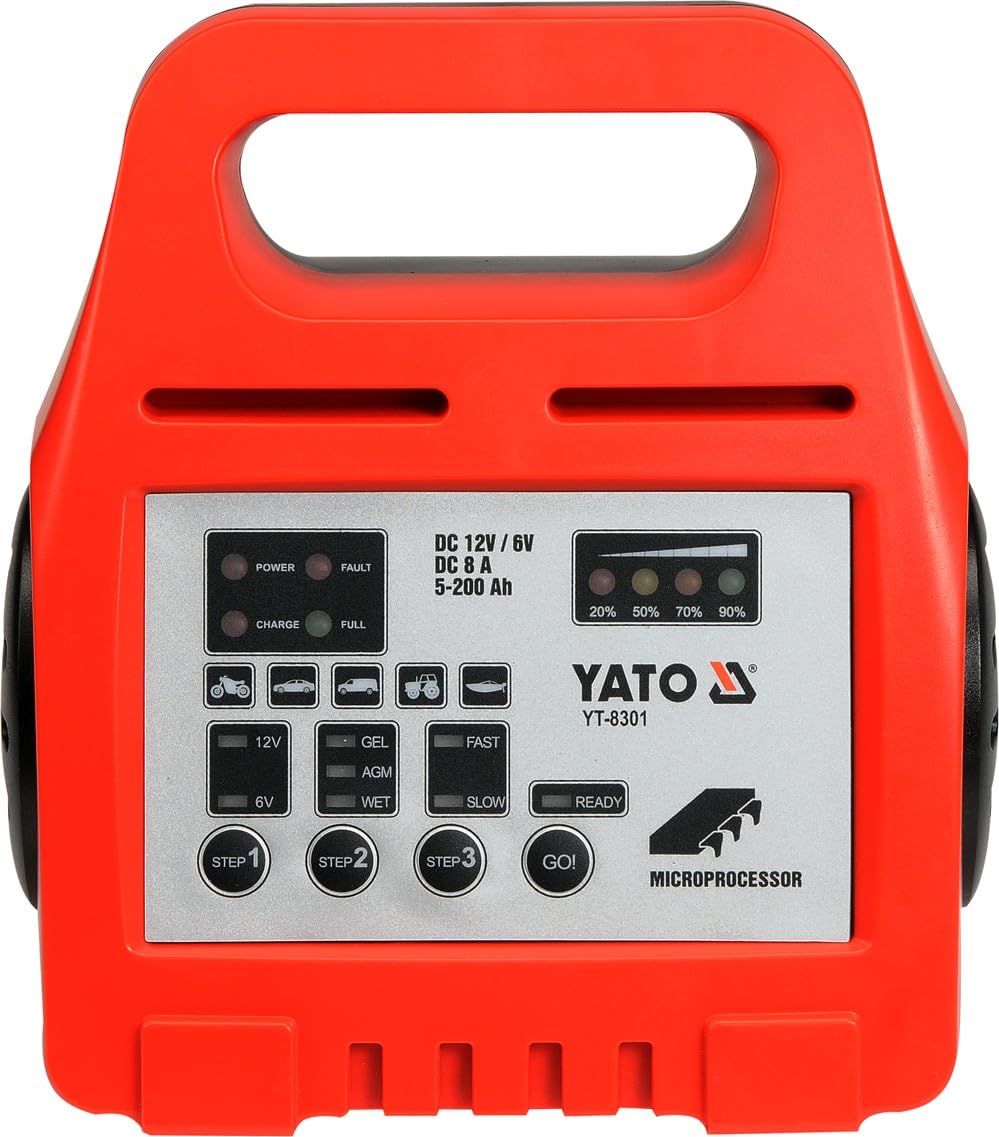
Figure 1: Yato YT-8301 Digital Battery Charger. This image shows the front view of the charger, highlighting its digital display, control buttons, and the attached charging cables with clamps.
Components:
- Main Unit: The charger housing with digital display and controls.
- Charging Cables: Red (positive) and Black (negative) cables with battery clamps.
- Power Cord: For connecting to an AC power outlet.
4. Setup Instructions
- Unpack: Carefully remove the Yato YT-8301 Digital Battery Charger from its packaging.
- Inspect: Check the charger and all cables for any signs of damage. Do not use if damaged.
- Ventilation: Place the charger in a well-ventilated area, away from direct sunlight, heat sources, and moisture.
- Battery Preparation:
- Ensure the battery terminals are clean and free of corrosion.
- If charging a battery in a vehicle, ensure the vehicle's ignition is off and all accessories are disconnected.
- For wet lead-acid batteries, check the electrolyte level and top up with distilled water if necessary, ensuring the caps are securely replaced.
5. Operating Instructions
5.1 Connecting the Charger to the Battery
- Identify Polarity: Locate the positive (+) and negative (-) terminals on your battery. The positive terminal is usually larger and marked with a plus sign.
- Connect Positive: Attach the red (+) charging clamp to the positive (+) terminal of the battery.
- Connect Negative: Attach the black (-) charging clamp to the negative (-) terminal of the battery. If the battery is in a vehicle, connect the black (-) clamp to a metal part of the vehicle chassis away from the battery and fuel lines.
- Connect to Power: Plug the charger's power cord into a standard AC power outlet (220-240V, 50 Hz). The charger will power on and display the current battery voltage or charging status.
5.2 Selecting Charging Mode (if applicable)
The YT-8301 automatically detects 6V or 12V batteries and selects the appropriate charging voltage. It is compatible with traditional lead-acid (wet), lead-gel, and AGM battery types. The digital display will indicate the selected mode or charging progress.
5.3 Charging Process
- Once connected and powered, the charger will begin the charging process. The digital display will show information such as battery voltage, charging current, or charging stage.
- The charger features a maintenance charging function, which automatically maintains the correct voltage in batteries operating in rest mode. This prevents overcharging and keeps the battery optimally charged.
- Monitor the charging process periodically. The charger will indicate when the battery is fully charged.
5.4 Disconnecting the Charger
- Disconnect Power: Unplug the charger's power cord from the AC power outlet.
- Disconnect Negative: Remove the black (-) charging clamp from the battery's negative terminal or vehicle chassis.
- Disconnect Positive: Remove the red (+) charging clamp from the battery's positive terminal.
- Store: Store the charger and cables in a dry, safe place.
6. Maintenance
- Cleaning: Disconnect the charger from power and the battery before cleaning. Wipe the exterior of the charger with a soft, dry cloth. Do not use abrasive cleaners or solvents.
- Cable Inspection: Regularly inspect the charging cables and clamps for any signs of wear, cuts, or damage. Replace damaged cables immediately.
- Storage: Store the charger in a cool, dry place, away from dust and moisture, when not in use. Ensure cables are neatly coiled to prevent damage.
- No User-Serviceable Parts: The Yato YT-8301 contains no user-serviceable parts. Do not attempt to open or repair the charger yourself. Refer to qualified service personnel for any repairs.
7. Troubleshooting
| Problem | Possible Cause | Solution |
|---|---|---|
| Charger does not turn on. | No power from AC outlet; faulty power cord; internal fault. | Check AC outlet with another device. Inspect power cord for damage. If problem persists, contact support. |
| Charger not charging battery. | Incorrect connection; battery deeply discharged or faulty; incorrect battery type selected (if manual selection). | Ensure clamps are correctly connected to battery terminals. Check battery voltage. The YT-8301 automatically detects voltage, but ensure battery is not severely damaged. |
| Charger displays an error code. | Short circuit; reverse polarity; over-temperature. | Disconnect charger, check connections for short circuits or reverse polarity. Allow charger to cool if hot. Reconnect correctly. |
| Battery not fully charged after extended time. | Battery capacity too large for charger; battery is old or damaged. | Ensure the battery capacity is within the charger's recommended range. Have the battery tested by a professional. |
8. Technical Specifications
- Model: Yato YT-8301
- Input Power: AC (50 Hz)
- Output Voltage: 6V / 12V (Automatic Detection)
- Compatible Battery Types: Lead-acid (wet), Lead-gel, AGM
- Protection Features: Short-circuit protection, Overcharging protection
- Technology: Microprocessor-controlled, High-frequency
- Material: Metal
- Product Dimensions: Approximately 5 x 5 x 4 cm
- Item Weight: Approximately 900 g
- Included: 1 YT-8301 Digital Battery Charger
9. Warranty and Support
Yato products are known for their durability and quality. For specific warranty terms and conditions, please refer to the warranty card included with your product or visit the official Yato website. For technical support, service, or inquiries, please contact your local Yato distributor or the manufacturer directly using the contact information provided with your purchase documentation.
Manufacturer: Yato Tools (Shanghai) Co. Ltd