
1. Introduction
This manual provides comprehensive instructions for the installation, operation, and maintenance of your Pyle PLCM7500 Rear View Backup Car Camera System. This system is designed to enhance driving safety by providing a clear view of the area behind your vehicle, assisting with parking and reversing maneuvers.

Figure 1: Pyle PLCM7500 Rear View Backup Car Camera System components.
2. What's in the Box
Carefully unpack all components and ensure the following items are included:
- 7-inch TFT/LCD Monitor
- Rear View Backup Camera
- Power & Wiring Harness
- RCA Video Cable
- Wireless Remote Control
- Mounting Hardware (for monitor and camera)
- User Manual (this document)

Figure 2: All components included in the Pyle PLCM7500 package.
3. Key Features
- Backup Camera: Rugged rear view camera with true color reproduction (656x492px), low lux performance, and a wide 170° viewing angle. Features an adjustable swivel angle.
- Widescreen Monitor: HD 7-inch TFT/LCD display with a 16:9 widescreen ratio. Supports PAL/NTSC video systems and connects via dual RCA jacks.
- Dashboard Mountable: Both the camera and monitor are designed for easy mounting. The camera can be mounted to the license plate with its slim bar-style housing.
- Waterproof & Night Vision: The camera is IP-67 marine grade waterproof and fog resistant, ensuring reliable performance in various weather conditions. Equipped with night vision capabilities for low-light visibility.
- Distance Scale Lines: Provides accurate distance scale lines on the monitor display to assist with precise parking and reversing.

Figure 3: Night Vision and Distance Scale Lines for enhanced safety.
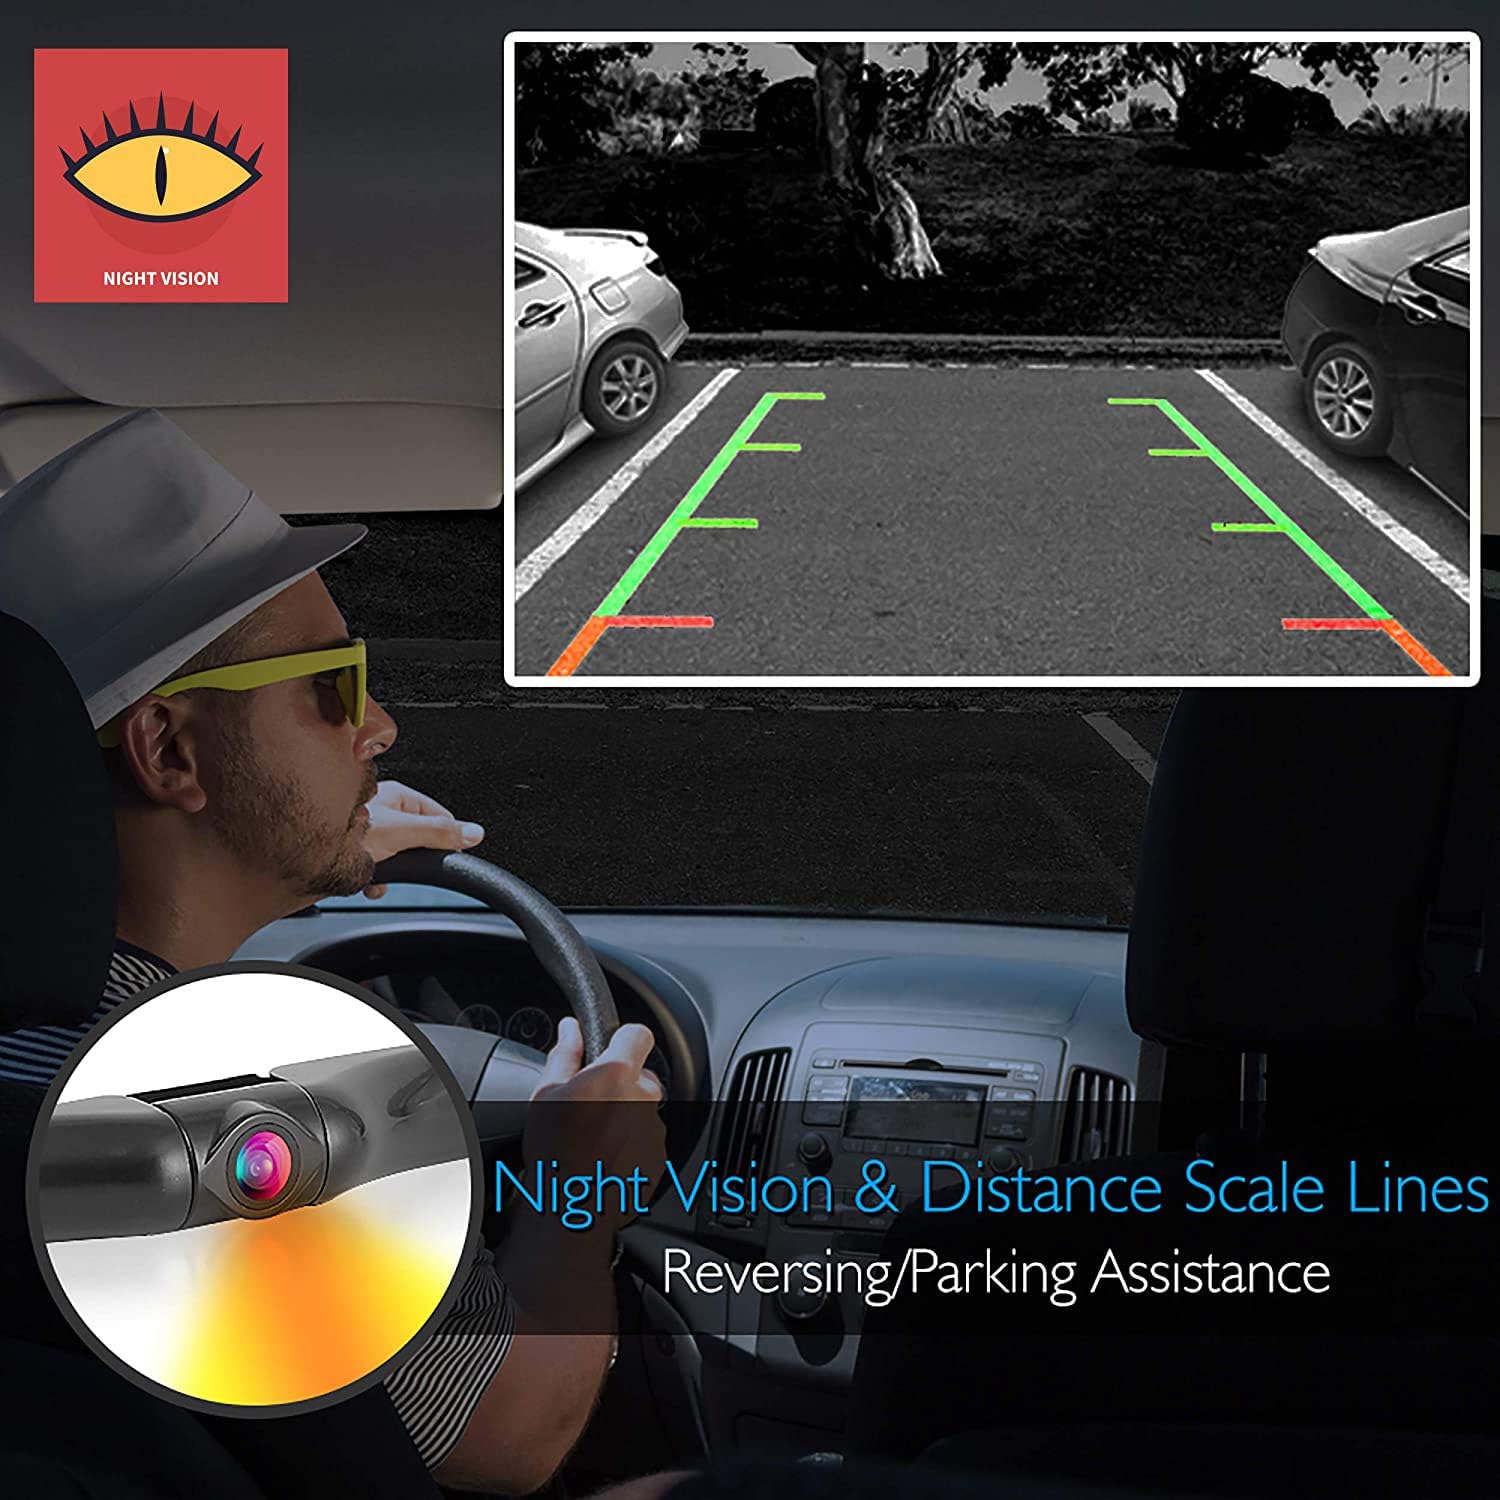
Figure 4: Marine Grade Camera Construction for durability in all weather.
4. Setup and Installation
Proper installation is crucial for optimal performance. It is recommended to have a basic understanding of automotive wiring or seek professional assistance if unsure.
4.1. Wiring Diagram Overview
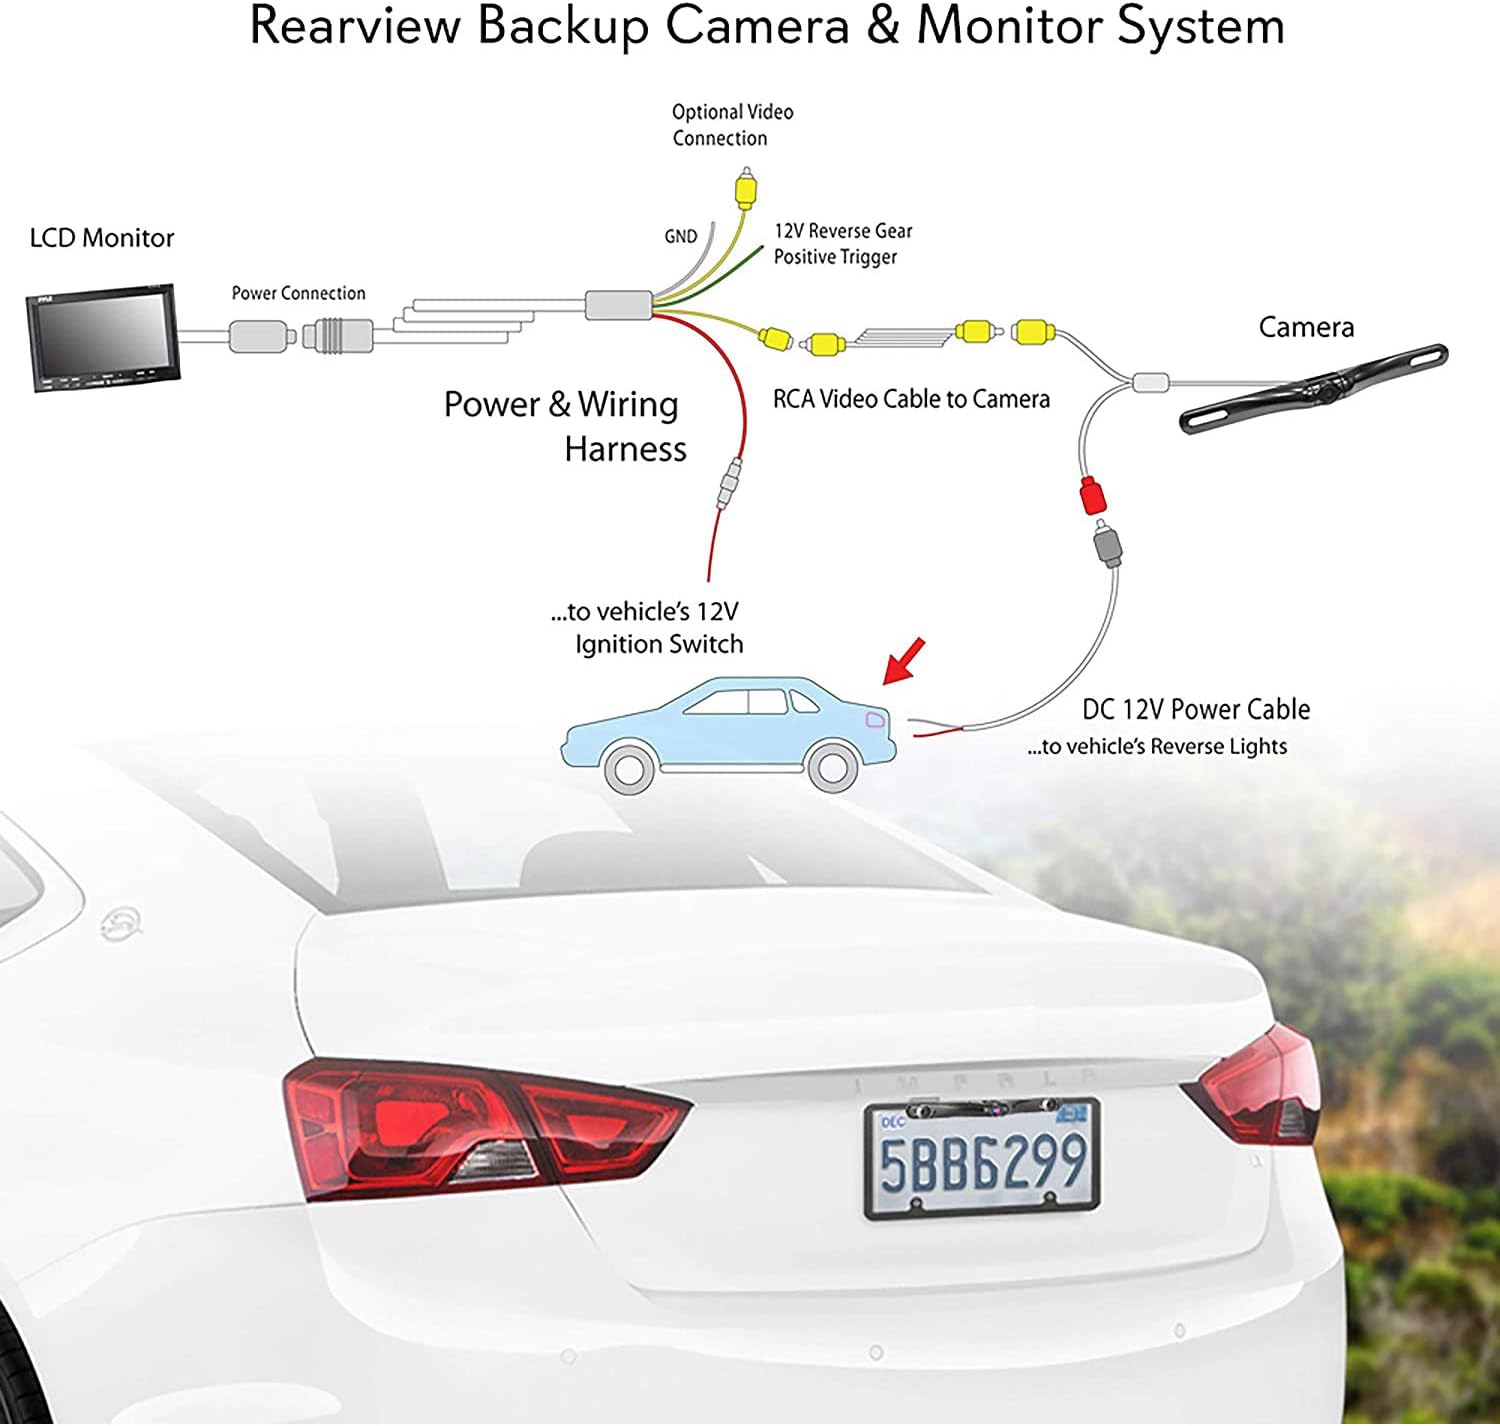
Figure 5: Wiring connections for the Pyle PLCM7500 system.
4.2. Installation Steps
- Camera Mounting: Mount the camera above your license plate. Ensure the adjustment screws are facing downwards for correct image orientation. You may need to drill a small hole near the license plate to route the camera cables into the vehicle's interior.
- Camera Power Connection: The camera has two leads: a yellow RCA video cable and a red power wire. Connect the red power wire to the 12V+ power lead of your vehicle's reverse light. Connect the black wire (ground) to a suitable ground source on your vehicle's frame.
- Video Cable Routing: Route the long RCA video cable from the camera to the front of the vehicle where the monitor will be placed. This can be done by tucking it under interior trim pieces, along cable channels in door frame sills, or under carpeting. A wire fisher tool may be helpful.
- Monitor Power Connection: The monitor can be powered via the included cigarette lighter adapter or by splicing into a 12V power lead (e.g., from the fuse box or behind the cigarette lighter socket).
- Reverse Trigger Connection: The RCA video cable has a thin red wire running alongside it. This wire is crucial for automatically activating the monitor when reverse gear is engaged. Connect one end of this red wire to the 12V+ power lead of the reverse light (the same point where the camera's red power wire is connected). Connect the other end of this red wire to the green wire from the monitor's wiring bundle. This ensures the monitor powers on only when reverse is selected.
- Monitor Mounting: Mount the monitor on your dashboard using the provided mounting hardware. Avoid overtightening the mounting screws to prevent damage to the monitor casing.
- Pre-Installation Test: Before final installation, it is highly recommended to connect all components on a table or floor to verify functionality and understand the wiring connections.
5. Operation
Once installed, the system operates primarily when the vehicle is in reverse gear. The monitor will automatically display the camera feed.
5.1. Monitor Controls

Figure 6: Front panel controls of the PLCM7500 monitor.
- 1. Power: Turns the monitor on/off.
- 2. V1/V2 Switch: Toggles between Video Input 1 and Video Input 2 (if a second video source is connected).
- 3. Menu: Accesses the monitor's settings menu.
- 4. Negative Adjustment (-): Decreases selected setting value in menu.
- 5. Remote Sensor: Receives signals from the wireless remote control.
- 6. Positive Adjustment (+): Increases selected setting value in menu.
- 7. Mode (16:9 / 4:3 Display Switch): Changes the display aspect ratio.
- 8. SYS (Image Rotation): Rotates the image display.
5.2. Using the Remote Control
The included wireless remote control provides convenient access to all monitor functions, mirroring the front panel buttons.
6. Maintenance
To ensure the longevity and optimal performance of your Pyle PLCM7500 system, follow these maintenance guidelines:
- Cleaning: Use a soft, damp cloth to clean the monitor screen and camera lens. Avoid abrasive cleaners or solvents.
- Camera Lens: Periodically check the camera lens for dirt, mud, or snow, especially after driving in adverse conditions. A clear lens ensures a clear image.
- Connections: Ensure all wiring connections remain secure and free from corrosion.
- Weather Protection: While the camera is waterproof, extreme temperatures or prolonged exposure to harsh elements can affect performance.
7. Troubleshooting
If you encounter issues with your Pyle PLCM7500 system, refer to the following common problems and solutions:
| Problem | Possible Cause | Solution |
|---|---|---|
| Monitor does not power on or shows no image when in reverse. | Incorrect wiring, no power to monitor, faulty reverse trigger connection, loose cables. |
|
| Image is blurry or distorted. | Dirty camera lens, damaged video cable, incorrect monitor settings. |
|
| No distance scale lines displayed. | Feature not enabled or specific model variation. | Consult the monitor's menu settings to see if there's an option to enable/disable distance lines. |
If problems persist after attempting these solutions, please contact Pyle customer support.
8. Specifications
| Feature | Specification |
|---|---|
| Product Dimensions | 5.75 x 11 x 3.5 inches |
| Item Weight | 0.029 ounces |
| Model Number | PLCM7500 |
| Display Technology | LCD |
| Screen Size | 7 Inches |
| Color | Black |
| Lux Rating | 0.2 |
| Voltage | 12 Volts |
| Video Capture Resolution | 656p |
| Optical Sensor Technology | CMOS |
| Waterproof Rating | IP-67 Marine Grade |
9. Warranty and Support
Pyle products are designed for reliability and performance. For specific warranty information, please refer to the documentation included with your purchase or visit the official Pyle website.
For technical support, troubleshooting assistance, or to inquire about replacement parts, please contact Pyle customer service. You may also find additional resources, including a Certificate of Compliance, on the product's support page.
Important Note: This product contains chemicals known to the State of California to cause cancer and birth defects or other reproductive harm.


