1. Introduction
Thank you for purchasing the Lexibook RL2000 Radio Alarm Clock with Humidifier. This device combines a digital alarm clock, an FM radio, and a humidifier to enhance your comfort. It also displays indoor temperature and humidity levels, helping you monitor your environment. Please read this manual carefully before use to ensure proper operation and maintenance.
2. Safety Information
- Always use distilled water in the humidifier reservoir to prevent mineral buildup and ensure optimal performance.
- Do not immerse the device in water or other liquids.
- Keep the device away from direct sunlight, heat sources, and extreme temperatures.
- Ensure proper ventilation around the device.
- Do not attempt to disassemble or repair the unit yourself. Contact qualified service personnel.
- Dispose of batteries responsibly according to local regulations.
3. Product Overview
Familiarize yourself with the components and controls of your Lexibook RL2000.
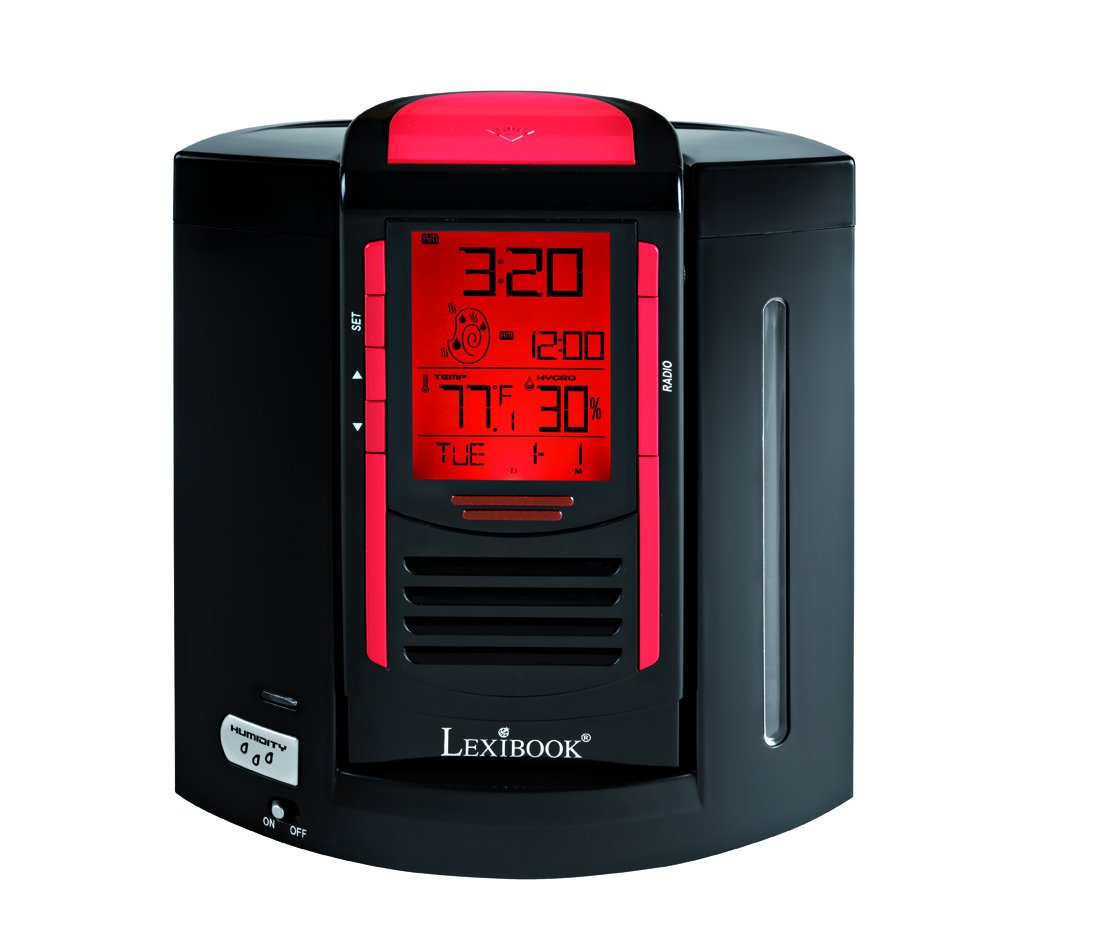
This image shows the front of the Lexibook RL2000, highlighting the digital display, control buttons (SET, Up/Down arrows), and the radio speaker grille. The display shows time, date, indoor temperature, and humidity.

This image illustrates the two main components of the RL2000: the clock/radio unit and the humidifier base. The humidifier base includes the water reservoir and the 'HUMIDITY ON/OFF' switch.
Controls and Display:
- Digital Display: Shows time, date, day of the week, indoor temperature, and humidity.
- SET Button: Used to enter and confirm settings for time, date, and alarm.
- Up/Down Arrows: Used to adjust values during setting modes and for radio tuning.
- RADIO Button: Activates and controls the FM radio function.
- HUMIDITY ON/OFF Switch: Located on the humidifier base, controls the humidifier function.
4. Setup
4.1 Battery Installation
- Locate the battery compartment on the back of the clock/radio unit.
- Open the battery compartment cover.
- Insert 4 AA batteries (not included), ensuring correct polarity (+/-).
- Close the battery compartment cover securely.
4.2 Assembling the Unit
- Place the humidifier base on a stable, flat surface.
- Carefully align the clock/radio unit with the humidifier base and gently push it into place until it is securely seated.
4.3 Filling the Humidifier Reservoir
- Separate the clock/radio unit from the humidifier base.
- Locate the water filling port on the humidifier base.
- Fill the 0.4-liter reservoir with distilled water only. Do not overfill.
- Reattach the clock/radio unit to the humidifier base.
5. Operating Instructions
5.1 Setting Time and Date
- Press and hold the SET button until the time display flashes.
- Use the Up/Down arrows to adjust the hour, then press SET to confirm.
- Repeat this process for minutes, year, month, and day.
- The device will automatically display the day of the week based on the date set.
5.2 Setting the Alarm
- Press the SET button briefly to cycle through display modes until the alarm time flashes.
- While the alarm time is flashing, press and hold SET to enter alarm setting mode.
- Use the Up/Down arrows to set the desired alarm hour and minutes, pressing SET to confirm each.
- To activate/deactivate the alarm, press the Up arrow when the alarm time is displayed (not flashing). An alarm icon will appear/disappear.
- When the alarm sounds, press any button to activate the snooze function. The alarm will sound again after a few minutes. To turn off the alarm completely, press and hold the SET button.
5.3 Radio Operation
- Press the RADIO button to turn on the FM radio.
- Use the Up/Down arrows to manually tune to a desired station.
- To scan for and save stations, press and hold the RADIO button. The device will automatically scan and store up to 20 pre-recorded stations.
- To cycle through saved stations, press the RADIO button briefly.
- To adjust volume, use the Up/Down arrows when not in tuning mode.
5.4 Humidifier Function
- Ensure the humidifier reservoir is filled with distilled water.
- Locate the HUMIDITY ON/OFF switch on the humidifier base.
- Slide the switch to ON to activate the humidifier. A mist will begin to emit from the top of the unit.
- Slide the switch to OFF to deactivate the humidifier.
5.5 Temperature and Humidity Display
The digital display continuously shows the indoor temperature and relative humidity. This allows you to monitor your room's environment and maintain an ideal comfort zone.
6. Maintenance
6.1 Cleaning the Humidifier
- Regularly clean the humidifier reservoir to prevent mold and bacteria growth.
- Separate the clock/radio unit from the humidifier base.
- Empty any remaining water from the reservoir.
- Wipe the interior of the reservoir with a soft cloth and a mild cleaning solution, then rinse thoroughly with clean water.
- Ensure all parts are dry before reassembling and refilling with distilled water.
6.2 General Cleaning
Wipe the exterior of the device with a soft, dry cloth. Do not use abrasive cleaners or solvents.
7. Troubleshooting
| Problem | Possible Cause | Solution |
|---|---|---|
| Device does not power on. | Batteries are dead or incorrectly inserted. | Replace batteries with new AA batteries, ensuring correct polarity. |
| Humidifier not producing mist. | Reservoir is empty; Humidifier switch is OFF. | Fill reservoir with distilled water; Ensure HUMIDITY switch is ON. |
| Poor radio reception. | Weak signal; Interference. | Adjust the position of the device; Try scanning for stations again. |
| Display is dim or unreadable. | Low battery power. | Replace batteries. |
8. Specifications
- Model: RL2000
- Brand: Lexibook
- Product Dimensions: 12 x 3.81 x 17 cm
- Item Weight: 1 Kilogram
- Power Source: 4 x AA Batteries (not included)
- Humidifier Capacity: 0.4 Liters
- Special Features: FM Radio, Alarm Clock, Humidity Display, Temperature Display, Calendar
- Material: Plastic, Acrylonitrile Butadiene Styrene
9. Warranty and Support
For warranty information or technical support, please refer to the warranty card included with your purchase or visit the official Lexibook website. Do not attempt to repair the device yourself, as this may void your warranty.


