
1. Introduction
The Nitecore i2 Intellicharge Charger is a universal, automatic smart-charger compatible with almost all types of rechargeable batteries, eliminating the need for multiple chargers. The i2 automatically detects Li-ion, Ni-MH, and Ni-Cd batteries, and through intelligent circuitry, selects the optimal charging mode (Constant Charge Current (CC), Constant Charge Voltage (CV), or Trickle Charge). Each of the two battery slots is micro-computer controlled, capable of monitoring and charging batteries independently.

Image 1.1: The Nitecore i2 Intellicharge Charger, a two-slot universal battery charger.

Image 1.2: The Nitecore i2 features a microprocessor for automatic identification of battery types and selection of appropriate charging voltage.
2. Safety Instructions
- Use the charger only for rechargeable batteries specified in this manual. Charging other battery types may cause explosion, battery rupture, or leakage, leading to property damage and/or personal injury.
- Do not disassemble, modify, or short-circuit the charger.
- Keep the charger away from water, high humidity, and high temperatures.
- Do not operate the charger if it appears damaged.
- Always unplug the charger from the power source when not in use.
- Keep out of reach of children.
3. Setup
- Connect the charger to a power source. The i2 supports two types of power input:
- AC Power: Plug the AC power cord into the charger's AC input port and then into a standard wall outlet (AC 100-240V).
- DC Power: Plug the DC car adapter (not included) into the charger's DC input port and then into a vehicle's 12V power outlet.
- Upon successful connection, all three LED indicators above each slot will briefly illuminate, then the bottom LED will remain lit, indicating standby mode.

Image 3.1: Side view of the Nitecore i2 charger showing the AC and DC power input ports.
4. Operating Instructions
- Insert Batteries: Place one or two rechargeable batteries into the charging slots. Ensure correct polarity (+/-) is observed. The charger's spring-loaded contacts will adjust to fit various battery sizes.
- Automatic Detection: The i2 will automatically detect the battery type (Li-ion, Ni-MH, or Ni-Cd) and select the appropriate charging voltage and mode.
- Charging Process: The three LED indicators above each slot will illuminate sequentially from bottom to top, indicating the charging progress.
- Charging Completion: Once charging is complete, all three LED indicators for that slot will stop flashing and remain steadily lit. The charger will automatically cease charging to prevent overcharging.
- Remove Batteries: Carefully remove the charged batteries from the slots.
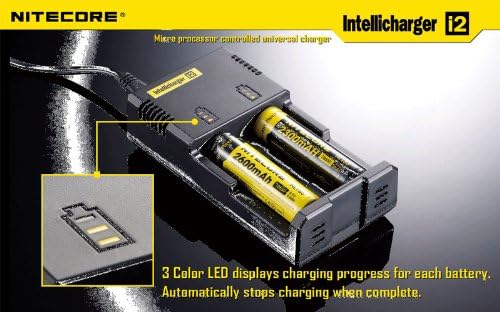
Image 4.1: The Nitecore i2 charger with batteries inserted, showing the 3-color LED indicators displaying charging progress.
5. Battery Compatibility
The Nitecore i2 Intellicharge Charger is compatible with a wide range of rechargeable battery types and sizes:
- Li-ion Batteries: 26650, 22650, 18650, 17670, 18490, 17500, 17335, 16340 (RCR123), 14500
- Ni-MH / Ni-Cd Batteries: AA, AAA, A, SC, C

Image 5.1: Visual representation of the Nitecore i2's compatibility with various Li-ion, Ni-MH, and Ni-Cd rechargeable batteries.
6. LED Indicators
The Nitecore i2 features three LED indicators per charging slot to display the charging status:
- All LEDs Off: No battery inserted or charger not connected to power.
- Bottom LED Solid: Charger in standby mode (no battery inserted).
- LEDs Flashing Sequentially (Bottom to Top): Battery is currently charging. The number of lit LEDs indicates the approximate charge level.
- All LEDs Solid: Charging complete.
- All LEDs Flashing Rapidly: Error condition (e.g., incorrect battery type, short circuit, or damaged battery). Remove the battery and inspect.
7. Maintenance
- Ensure the charger is unplugged before cleaning.
- Clean the charger and charging contacts with a soft, dry cloth. Do not use abrasive cleaners or solvents.
- Store the charger in a cool, dry place away from direct sunlight and extreme temperatures.
- Periodically check the power cord for any signs of damage.

Image 7.1: Close-up of the Nitecore i2 charger's ventilation slots, designed for optimal heat dissipation during operation.
8. Troubleshooting
| Problem | Possible Cause | Solution |
|---|---|---|
| Charger not powering on. | No power connection or faulty power cord. | Ensure power cord is securely plugged into both the charger and the outlet. Try a different outlet. |
| Battery not charging (LEDs not flashing). | Incorrect battery insertion, battery is fully charged, or battery is damaged. | Re-insert battery ensuring correct polarity. Check if LEDs are solid (fully charged). Try a different battery. |
| All LEDs flashing rapidly. | Error condition (e.g., short circuit, incompatible battery, or severely damaged battery). | Remove the battery immediately. Inspect the battery for damage. Do not attempt to charge damaged batteries. |
9. Specifications
- Input Voltage: AC 100-240V 50/60Hz, DC 12V
- Input Power: 10W
- Output Voltage: 4.2V ±1% / 1.48V ±1%
- Output Current: 0.5A x 2
- Dimensions: 131.5mm (Length) × 70mm (Width) × 35mm (Height)
- Weight: 103g (without batteries and power cord)

Image 9.1: Detailed specifications for the Nitecore i2 Intellicharge Charger.
10. Warranty and Support
Nitecore products are backed by a warranty. For specific warranty terms and conditions, please refer to the warranty card included with your product or visit the official Nitecore website. For technical support, troubleshooting assistance, or warranty claims, please contact your authorized Nitecore dealer or Nitecore customer service directly.
Official Nitecore Website: www.nitecore.com


