
NIX X08D
NIX 8 inch Hi-Res Digital Photo Frame with Motion Sensor (X08D)
User Instruction Manual
Introduction
This manual provides comprehensive instructions for the setup, operation, and maintenance of your NIX 8 inch Hi-Res Digital Photo Frame with Motion Sensor (Model X08D). Please read this manual thoroughly before using the device to ensure proper functionality and longevity.

Figure 1: NIX 8 inch Digital Photo Frame (Model X08D) - Front View
This image shows the front of the NIX digital photo frame, featuring an 8-inch screen displaying a vibrant image of a father and child. The frame has a black finish and a small motion sensor visible at the bottom left.
Product Features
- Hu-Motion Sensor: Automatically turns the frame on when motion is detected in the room and off when no motion is sensed for a set period.
- Versatile Media Playback: Supports JPEG photos and MPEG-4/AVI videos.
- High Resolution Display: 800x600 (4:3) LED Backlit Display for clear and vibrant images.
- Multiple Input Options: Compatible with USB drives and SD/SDHC memory cards for easy content transfer.
- Auto Rotate Sensor: Automatically adjusts photo orientation based on the frame's position.
- Split Screen Image Option: Allows for various display configurations.
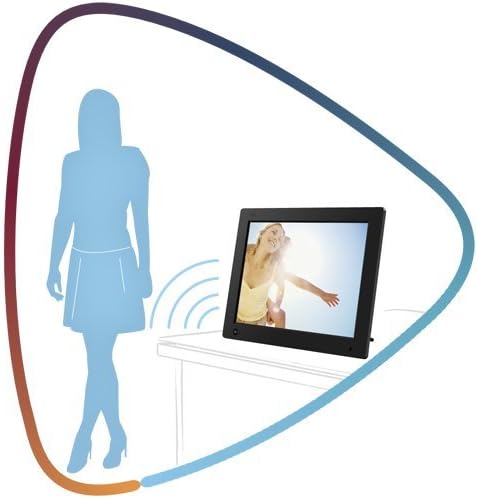
Figure 2: Hu-Motion Sensor in Operation
This diagram illustrates how the Hu-Motion sensor works. A silhouette of a person is shown entering a room, and the digital frame, placed on a surface, is depicted emitting signals, indicating it has detected motion and is active.
Package Contents
Upon opening the package, please verify that all the following items are included:
- NIX 8 inch Digital Photo Frame (Model X08D)
- Power Adapter
- Remote Control
- User Manual (this document)
Setup
1. Identifying Ports and Controls

Figure 3: Rear View with Ports and Controls
This image displays the back of the NIX digital photo frame. Visible features include the SD/SDHC card slot, USB ports, earphone jack, DC In port, and control buttons for navigation and menu access.

Figure 4: Technical Diagram with Port Labels and Dimensions
This detailed technical diagram provides various views of the NIX digital photo frame, including front, side, and rear. It labels key components such as the motion sensor, infrared sensor, SD card slot, earphone jack, USB ports, DC In port, power button, navigation buttons (Up, Right, Down, Left), Menu/Exit button, Play/Enter/Pause button, and speaker. Dimensions are also indicated.
2. Power Connection
- Connect the provided power adapter to the "DC In" port on the back of the frame.
- Plug the other end of the power adapter into a standard electrical outlet.
- The frame will typically power on automatically or enter standby mode.
3. Inserting Media
The frame supports USB flash drives and SD/SDHC memory cards.
- For SD/SDHC Card: Insert the memory card into the "SD" slot on the side of the frame until it clicks into place. Ensure the card is inserted with the correct orientation.
- For USB Drive: Insert your USB flash drive into one of the "USB" ports on the side of the frame.
The frame should automatically detect the inserted media and begin playing content (photos or videos) if configured to do so.
Operating Instructions
Basic Navigation
The frame can be controlled using the buttons on the back or the included remote control.
- Power Button: Turns the frame on or off.
- Navigation Buttons (Up, Down, Left, Right): Used to navigate through menus and select options.
- Play/Enter/Pause Button: Confirms selections or plays/pauses media.
- Menu/Exit Button: Accesses the main menu or exits the current menu/playback.
Photo Playback
- Ensure your photos are in JPEG format.
- Insert your USB drive or SD/SDHC card containing the photos.
- The frame will typically start a slideshow automatically.
- To manually browse photos, press the "Menu/Exit" button and navigate to the photo browsing option.
Video Playback
- Ensure your videos are in MPEG-4 or AVI format.
- Insert your USB drive or SD/SDHC card containing the videos.
- Navigate to the video playback section via the main menu.
- Select the desired video to play.
Hu-Motion Sensor Settings
The Hu-Motion sensor can be configured to optimize power saving and convenience.
- Press the "Menu/Exit" button to access the main menu.
- Navigate to "Settings" or "Motion Sensor Settings."
- You can adjust the sensitivity and the duration after which the frame turns off when no motion is detected (e.g., 5 minutes to 1 hour).
Display and Slideshow Settings
Customize your viewing experience through the settings menu.
- Auto-Fit/Full/Optimal: Adjust how images are scaled to fit the screen. "Auto-fit" is recommended for maintaining aspect ratio.
- Slideshow Interval: Set the duration each photo is displayed.
- Transition Effects: Choose from various transition styles between photos or set to random.
- Brightness/Contrast/Saturation: Fine-tune display quality.
Maintenance
Cleaning the Frame
- Always unplug the frame before cleaning.
- Use a soft, dry, lint-free cloth to gently wipe the screen and frame.
- For stubborn smudges on the screen, slightly dampen the cloth with water or a screen-safe cleaning solution (do not spray directly onto the screen).
- Avoid using abrasive cleaners, solvents, or strong chemicals, as they may damage the surface.
Storage
When not in use for extended periods, store the frame in a cool, dry place, away from direct sunlight and extreme temperatures. It is recommended to keep the original packaging for storage and transport.
Troubleshooting
| Problem | Possible Cause | Solution |
|---|---|---|
| Frame does not power on. | Power adapter not connected or faulty outlet. | Ensure power adapter is securely connected to the frame and a working electrical outlet. Try a different outlet. |
| No photos/videos displayed. | No media inserted, unsupported file format, or corrupted files. | Ensure USB drive/SD card is properly inserted. Verify files are JPEG (photos) or MPEG-4/AVI (videos). Try reformatting the media or using different files. |
| Hu-Motion sensor not working. | Sensor blocked, incorrect settings, or insufficient movement. | Ensure the sensor area is clear. Check motion sensor settings in the menu. Ensure there is sufficient movement within the detection range. |
| Images appear distorted or stretched. | Incorrect display aspect ratio setting. | Adjust the display setting (e.g., "Auto-fit") in the menu to match the image aspect ratio. |
Specifications
| Feature | Detail |
|---|---|
| Model Number | X08D |
| Screen Size | 8 Inches |
| Resolution | 800x600 (SVGA) |
| Aspect Ratio | 4:3 |
| Display Type | LED Backlit |
| Supported Photo Formats | JPEG |
| Supported Video Formats | MPEG-4, AVI |
| Supported Media | USB Flash Drive, SD/SDHC Card |
| Motion Sensor | Hu-Motion Sensor |
| Connectivity | Wired |
| Item Weight | 1 pound |
| Package Dimensions | 12.68 x 8.27 x 2.28 inches |
Warranty and Support
Warranty Information
Your NIX Digital Photo Frame (Model X08D) comes with a Full 1 Year Parts & Labor Warranty from the date of purchase. This warranty covers manufacturing defects and ensures that your frame functions as intended under normal use. Please retain your proof of purchase for warranty claims.
Customer Support
For technical assistance, troubleshooting, or warranty inquiries, please visit the official NIX website or contact their customer service team. Refer to the product packaging or the NIX brand store on Amazon for the most current contact information.
NIX Brand Store: Visit the NIX Store on Amazon
Related documentsX08D

Ask a question about this manual
Ask about setup, troubleshooting, compatibility, parts, safety, or missing instructions. Manuals+ will review the question and use this page’s manual context to help answer it.