
1. Introduction
This manual provides detailed instructions for the installation, operation, and maintenance of your Soundstream PN1.650D Monoblock Picasso Nano Class-D Amplifier. Please read this manual thoroughly before installation and use to ensure proper function and to prevent damage to the unit or your vehicle's audio system. Keep this manual for future reference.

Figure 1.1: Soundstream PN1.650D Monoblock Picasso Nano Class-D Amplifier, top view.
This image displays the compact black and silver chassis of the Soundstream PN1.650D amplifier, featuring the Picasso Nano branding and the Soundstream logo. Power and Protection indicator LEDs are visible on the top surface.
2. Safety Information
Always observe the following safety precautions during installation and operation:
- Disconnect the vehicle's negative battery terminal before beginning any installation.
- Ensure proper grounding to the vehicle chassis.
- Use appropriate gauge wiring for power, ground, and speaker connections to prevent overheating and damage.
- Do not mount the amplifier in locations exposed to direct sunlight, excessive heat, moisture, or dust.
- Avoid running wires near moving parts or sharp edges. Secure all wiring.
- If you are unsure about any part of the installation process, consult a qualified professional.
- This product contains chemicals known to the State of California to cause cancer and birth defects or other reproductive harm.
3. Product Features
The Soundstream PN1.650D amplifier is designed to deliver powerful and clear audio performance. Key features include:
- Picasso Nano Series Monoblock Class D Car Amplifier: Compact design with high efficiency.
- RMS Power Rating: 400 watts x 1 channel at 4 ohms, 650 watts x 1 channel at 2 ohms.
- Max Power Output: 650 watts x 1 channel.
- Variable Bass Boost: 0 to +12 dB bass boost at 45 Hz for enhanced low-frequency response.
- Variable Low-Pass Filter (LPF): 50-250 Hz, 24 dB/octave for precise subwoofer integration.
- Subsonic Filter: 12 dB at 10-50 Hz to protect subwoofers from ultra-low frequencies.
- 180° Phase Switch: Allows for phase alignment with other speakers in the system.
- Pulse Width Modulated (PWM) MOSFET Power Supply: Ensures stable and efficient power delivery.
4. Setup and Installation
4.1 Mounting the Amplifier
Choose a mounting location that is dry, well-ventilated, and secure. Ensure there is sufficient space around the amplifier for air circulation. Avoid mounting on carpeted surfaces as this can impede airflow. Use the provided mounting hardware to secure the amplifier firmly to a solid surface in your vehicle.
4.2 Wiring Connections
Refer to the diagrams below for proper wiring connections. Ensure all connections are secure and insulated to prevent short circuits.

Figure 4.1: Rear view showing Power and Speaker Connections.
This image highlights the power input terminals (BATT+, REM, GROUND) and speaker output terminals (+/-) on the Soundstream PN1.650D amplifier. Two 25A fuses are also visible between the power and speaker terminals.
Power Connections:
- BATT+ (12V Power): Connect directly to the positive terminal of the vehicle's battery using an appropriate gauge power cable. An inline fuse (not supplied) should be installed within 18 inches of the battery.
- REM (Remote Turn-On): Connect to the remote turn-on lead from your head unit. This wire turns the amplifier on and off with your stereo.
- GROUND: Connect to a clean, unpainted metal surface of the vehicle's chassis. Ensure a good electrical connection.
Speaker Connections:
- Connect your subwoofer(s) to the speaker output terminals. Observe correct polarity (+ to + and - to -). This is a monoblock amplifier, designed for a single channel output.
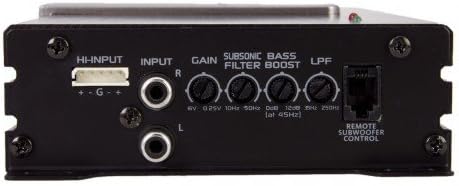
Figure 4.2: Front view showing Input and Control Panel.
This image displays the input and control side of the Soundstream PN1.650D amplifier, including HI-INPUT, RCA INPUT (L/R), GAIN, SUBSONIC FILTER, BASS BOOST, LPF (Low-Pass Filter) adjustment knobs, and the REMOTE SUBWOOFER CONTROL port.
Input Connections:
- RCA Input (INPUT L/R): Connect to the RCA pre-out jacks of your head unit. Use high-quality RCA cables for optimal signal transfer.
- High-Level Input (HI-INPUT): If your head unit does not have RCA outputs, use the high-level input. Connect the speaker wires from your head unit directly to this input.
- Remote Subwoofer Control: Connect the wired remote bass knob (if included) to this port for convenient bass level adjustment from the driver's seat.
5. Operating and Tuning
Once all connections are made, you can power on your system and begin tuning the amplifier for optimal sound performance.
5.1 Control Adjustments
- GAIN: This control matches the amplifier's input sensitivity to the output level of your head unit. Start with the gain set to minimum. Gradually increase the gain until you hear distortion, then back off slightly.
- SUBSONIC FILTER: Adjust this filter to remove extremely low frequencies (below the audible range or the resonant frequency of your subwoofer enclosure) that can waste amplifier power and potentially damage your subwoofer. Typically set between 20-30 Hz.
- BASS BOOST: Provides an adjustable bass enhancement at 45 Hz. Use sparingly to avoid distortion and potential speaker damage.
- LPF (Low-Pass Filter): This filter allows only frequencies below the set point to pass through to the subwoofer. Adjust this to blend the subwoofer's output seamlessly with your main speakers. A common starting point is 80-100 Hz.
- PHASE SWITCH (180°): This switch allows you to invert the phase of the subwoofer's output. Experiment with both 0° and 180° settings to find the one that provides the most impactful and coherent bass response in your vehicle.
5.2 Initial Tuning Steps
- Set all amplifier controls (Gain, filters, bass boost) to their minimum or off positions.
- Play a familiar piece of music with a wide dynamic range.
- Increase the volume on your head unit to about 75% of its maximum.
- Slowly increase the GAIN control on the amplifier until you hear slight distortion, then reduce it slightly until the sound is clear.
- Adjust the LPF to blend the subwoofer with your main speakers.
- Adjust the SUBSONIC FILTER to protect your subwoofer and improve sound quality.
- Use the BASS BOOST sparingly if desired.
- Experiment with the PHASE SWITCH to find the best bass impact.
6. Maintenance
Your Soundstream amplifier requires minimal maintenance to ensure long-lasting performance:
- Keep the amplifier clean and free of dust. Use a soft, dry cloth for cleaning.
- Ensure proper ventilation around the amplifier. Do not block cooling fins or vents.
- Periodically check all wiring connections for tightness and corrosion.
- If fuses blow, replace them only with fuses of the same type and rating (25A).
7. Troubleshooting
| Problem | Possible Cause | Solution |
|---|---|---|
| No Power / Power LED Off | Blown fuse (inline or on amplifier), poor power/ground connection, no remote turn-on signal. | Check and replace fuses. Verify all power, ground, and remote connections are secure and have proper voltage. |
| Protection LED On | Speaker short circuit, impedance too low, overheating, DC offset. | Check speaker wiring for shorts. Ensure speaker impedance matches amplifier's capabilities. Allow amplifier to cool down. Consult a professional if DC offset is suspected. |
| No Sound | No input signal, incorrect gain setting, speaker wires disconnected, head unit issues. | Verify RCA or high-level input connections. Adjust gain. Check speaker connections. Test head unit functionality. |
| Distorted Sound | Gain set too high, improper filter settings, poor ground connection, damaged speakers. | Reduce gain. Adjust LPF and Subsonic Filter settings. Verify ground connection. Inspect speakers for damage. |
| Engine Noise / Whine | Poor grounding, RCA cables too close to power wires, faulty RCA cables, ground loop. | Improve ground connection. Reroute RCA cables away from power wires. Try different RCA cables. Install a ground loop isolator if necessary. |
8. Specifications
| Feature | Specification |
|---|---|
| Model Number | PN1.650D |
| RMS Power (4 Ohms) | 400 watts x 1 channel |
| RMS Power (2 Ohms) | 650 watts x 1 channel |
| Max Power Output | 650 watts x 1 channel |
| Number of Channels | 1 (Monoblock) |
| Amplifier Class | Class D |
| Low-Pass Filter (LPF) | 50-250 Hz, 24 dB/octave |
| Subsonic Filter | 10-50 Hz, 12 dB |
| Bass Boost | 0 to +12 dB at 45 Hz |
| Phase Switch | 0° / 180° |
| Voltage | 6 Volts (Min) |
| Maximum Supply Voltage | 16 Volts (DC) |
| Item Dimensions (L x W x H) | 9 x 4.75 x 2 inches |
| Item Weight | 5 pounds |
| Mounting Type | Surface Mount |
| UPC | 709483043206 |
9. Warranty and Support
Soundstream products are designed for reliability and performance. For warranty information and technical support, please refer to the warranty card included with your product or visit the official Soundstream website. Keep your proof of purchase for warranty claims.
For further assistance, you may contact Soundstream customer service or an authorized dealer. Always provide your product model number (PN1.650D) and serial number when seeking support.


