
1. Introduction
This manual provides detailed instructions for the installation, operation, and maintenance of the Emtek 2103 Solid Brass Keyed Entry Pocket Door Mortise Lock. Designed for durability and security, this lock is suitable for pocket doors requiring keyed access from one side and a pull/latch mechanism from the other. Please read all instructions carefully before proceeding with installation or use.
2. Product Overview
The Emtek 2103 Mortise Lock is a robust locking mechanism crafted from solid brass, designed to integrate seamlessly into pocket doors. It features a keyed cylinder for external access and a flush pull with an integrated latch for internal operation.
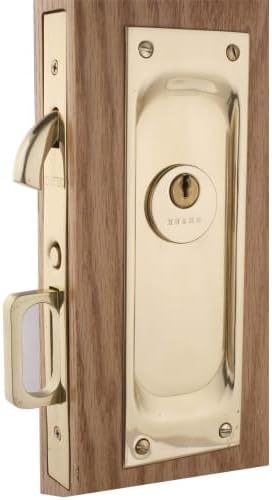
Image 1: Emtek 2103 Keyed Entry Pocket Door Mortise Lock. This image displays the lock's exterior faceplate with the key cylinder and the edge of the door showing the mortise body with the latch and a recessed pull handle.
Key Components:
- Mortise Lock Body: The internal mechanism housed within the door.
- Faceplate: The visible trim on the edge of the door, covering the mortise body.
- Key Cylinder: Located on the exterior side, allowing the door to be locked and unlocked with a key.
- Flush Pull/Latch: Integrated into the interior side, providing a recessed handle for opening/closing and a thumb-turn or similar mechanism for engaging the latch.
- Strike Plate: Mounted on the door jamb, receiving the latch bolt when the door is closed.
3. Specifications
| Feature | Detail |
|---|---|
| Brand | Emtek |
| Model Number | 2102SS |
| Part Number | 2103US10B |
| Lock Type | Keyed Entry Mortise Lock |
| Material | Solid Brass |
| Finish | Oil Rubbed Bronze |
| Height | 7-1/2 inches |
| Width | 2-1/2 inches |
| Door Thickness Compatibility | 1-3/8 inches to 1-3/4 inches (must specify when ordering) |
| Item Weight | 1.5 Pounds |
| UPC | 738505042682 |
4. Installation
Professional installation is recommended for optimal performance and security. Ensure the door thickness is within the specified range of 1-3/8 to 1-3/4 inches. Incorrect door thickness may prevent proper installation or operation.
Required Tools (Not Included):
- Drill
- Mortising Chisel and Mallet
- Measuring Tape and Pencil
- Screwdrivers (Phillips and Flathead)
- Safety Glasses
Installation Steps:
- Prepare the Door: Carefully mark the location for the mortise pocket on the edge of the pocket door, ensuring it aligns with the desired height and the strike plate on the door jamb.
- Mortise the Door: Using a drill and mortising chisel, create the recess (mortise pocket) in the door edge to accommodate the lock body. Ensure the depth and dimensions match the lock body precisely for a flush fit.
- Install Lock Body: Insert the mortise lock body into the prepared pocket. Secure it with the provided screws through the faceplate into the door edge.
- Prepare Door Faces: Mark and drill holes on both faces of the door for the key cylinder and the flush pull/latch mechanism. Ensure these holes align correctly with the lock body.
- Install Trim: Install the key cylinder on the exterior side and the flush pull/latch on the interior side. Secure these components according to the specific instructions provided with the lock packaging.
- Install Strike Plate: With the door closed and the latch extended, mark the position of the latch on the door jamb. Mortise the jamb and install the strike plate, ensuring the latch engages smoothly.
- Test Operation: Test the lock's functionality from both the keyed exterior and the interior latch mechanism to ensure smooth operation and proper engagement.
5. Operation
Locking and Unlocking from Exterior:
- Insert the key into the key cylinder on the exterior side of the door.
- Turn the key to engage or disengage the locking mechanism.
- Remove the key.
Operating from Interior:
- To open the door, use the integrated flush pull handle to slide the door.
- To engage the latch, operate the thumb-turn or lever mechanism on the interior flush pull. This will extend the latch bolt into the strike plate, securing the door.
- To disengage the latch, reverse the action of the thumb-turn or lever.
6. Maintenance
Regular maintenance ensures the longevity and smooth operation of your Emtek pocket door lock.
- Cleaning: Clean the visible surfaces of the lock with a soft, damp cloth. Avoid abrasive cleaners, solvents, or harsh chemicals, as these can damage the finish.
- Lubrication: Periodically apply a small amount of graphite lubricant or a silicone-based spray lubricant to the key cylinder and the internal moving parts of the latch mechanism. Do not use oil-based lubricants, as they can attract dust and grime.
- Inspection: Periodically check all screws for tightness. Ensure the lock operates smoothly and the latch engages fully with the strike plate.
7. Troubleshooting
If you encounter issues with your Emtek 2103 lock, refer to the following common problems and solutions:
- Key is difficult to turn or does not turn:
- Ensure the key is fully inserted.
- Apply graphite lubricant to the key cylinder.
- Check for any obstructions in the keyway.
- Latch does not engage or retract smoothly:
- Check if the strike plate is properly aligned with the latch bolt. Adjust if necessary.
- Ensure the door is not warped or binding in the pocket.
- Lubricate the latch mechanism.
- Door does not slide smoothly:
- This issue is typically related to the pocket door track and rollers, not the lock itself. Inspect and clean the track, and lubricate rollers if needed.
If problems persist after attempting these solutions, contact Emtek customer support or a qualified locksmith.
8. Warranty and Support
The Emtek 2103 Keyed Entry Pocket Door Mortise Lock is covered by Emtek's standard product warranty. For specific warranty terms and conditions, please refer to the warranty documentation included with your purchase or visit the official Emtek website.
For technical assistance, replacement parts, or further inquiries, please contact Emtek customer support through their official channels. You may find contact information on the Emtek website or within your product packaging.


