
1. Introduction
This manual provides comprehensive instructions for the safe and efficient installation, operation, and maintenance of your Acova Fassane Stock Vertical Hot Water Radiator, model SHX-200-074. Please read this manual thoroughly before installation and retain it for future reference.
2. Safety Instructions
Always observe the following safety precautions to prevent injury or damage to the product:
- Installation must be performed by a qualified professional in accordance with local building and plumbing codes.
- Ensure the radiator is securely mounted to a structurally sound wall capable of supporting its weight when filled with water.
- Do not cover the radiator with clothing or other materials, as this can impede heat dissipation and pose a fire hazard.
- The surface of the radiator can become very hot during operation. Avoid prolonged contact to prevent burns.
- Before any maintenance or repair, ensure the heating system is depressurized and the radiator is cool.
3. Package Contents
Verify that all components are present and undamaged:
- Acova Fassane Stock Vertical Radiator (1 unit)
- Mounting brackets and fixings
- Air vent plug
- Blanking plug
- Instruction Manual
4. Installation
Note: Installation should only be carried out by a qualified heating engineer.
4.1. Choosing a Location
Select a wall that is structurally sound and free from obstructions. Ensure adequate clearance around the radiator for heat circulation and maintenance. Avoid placing the radiator directly under windows if possible, to minimize heat loss.

Image 1: Acova Fassane Stock Vertical Radiator installed in a living space. This image illustrates the radiator's vertical design and how it integrates into a room's decor.
4.2. Mounting the Radiator
- Mark the desired position for the mounting brackets on the wall, ensuring the radiator is level. Refer to the diagram for recommended clearances.
- Drill holes and insert appropriate wall plugs suitable for your wall type.
- Securely fasten the mounting brackets to the wall.
- Carefully lift the radiator and hook it onto the installed brackets. Ensure it is stable and secure.
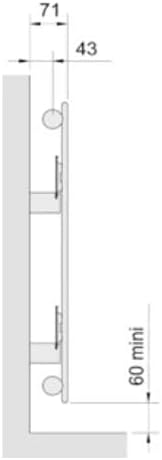
Image 2: Side view diagram illustrating the radiator's mounting depth and minimum clearance from the wall. Dimensions are provided in millimeters (e.g., 71mm total depth, 43mm from wall to radiator front, 60mm minimum clearance from floor).
4.3. Connecting to the Heating System
- Connect the flow and return pipes from your central heating system to the radiator's inlet and outlet connections. Use appropriate pipe fittings and sealants to ensure a watertight connection.
- Install the air vent plug at the top of the radiator and the blanking plug at the bottom (or vice versa, depending on system design).
- Once connections are complete, slowly refill the heating system, bleeding air from the radiator using the air vent key until water flows out.
- Check all connections for leaks.
5. Operating Instructions
The Acova Fassane Stock Vertical Radiator operates as part of your central heating system. Its heat output is controlled by the system's thermostat and individual thermostatic radiator valves (TRVs) if installed.
- Initial Start-up: After installation and filling, ensure the system is fully bled of air.
- Temperature Control: Adjust your central heating thermostat to the desired room temperature. If equipped with a TRV, set it to your preferred heat level for that specific room.
- Bleeding: If the radiator does not heat up evenly (cold spots at the top), it may contain air. Use a radiator key to open the air vent until water begins to escape, then close it.

Image 3: Front view of the Acova Fassane Stock Vertical Radiator. This image shows the full height and design of the radiator, highlighting its vertical panels.
6. Maintenance
- Cleaning: Clean the radiator regularly with a soft, damp cloth. Do not use abrasive cleaners or solvents, as these can damage the finish.
- Bleeding: Periodically check for air in the system by bleeding the radiator, especially at the start of the heating season.
- System Pressure: Ensure your central heating system maintains the correct operating pressure as specified by your boiler manufacturer.
7. Troubleshooting
| Problem | Possible Cause | Solution |
|---|---|---|
| Radiator cold at the top, warm at the bottom | Air trapped in the radiator | Bleed the radiator using a radiator key until water flows out. |
| Radiator completely cold |
|
|
| Water leak from connections | Loose or improperly sealed connections | Turn off heating system, drain radiator, tighten connections, or re-seal. Consult a professional if unsure. |
8. Specifications
| Feature | Detail |
|---|---|
| Brand | Acova |
| Model | SHX-200-074 |
| Reference Number | TRVC_1145513 |
| Type | Vertical Hot Water Radiator |
| Dimensions (L x W x H) | 1 x 1 x 1 cm (Note: These dimensions from product data may be indicative and not actual product size for a radiator of this weight.) |
| Weight | 32.9 Kilograms |
| ASIN | B008ET6EPO |
9. Warranty and Support
For warranty information and technical support, please refer to the documentation provided with your purchase or contact Acova customer service directly. Keep your proof of purchase for warranty claims.
Manufacturer: Acova
Contact: Please visit the official Acova website for contact details and support resources.
