1. Introduction
This manual provides essential information for the safe and efficient operation, maintenance, and troubleshooting of your Jura Giga X7 Professional super-automatic espresso machine. Please read all instructions carefully before initial use and retain this manual for future reference.
2. Safety Instructions
Observe the following safety precautions to prevent injury or damage to the appliance:
- Ensure the appliance is connected to a properly grounded power outlet.
- Do not immerse the appliance, power cord, or plug in water or other liquids.
- Keep hands and fingers away from moving parts, especially the grinder.
- Exercise caution when handling hot liquids and steam.
- Unplug the machine before cleaning or maintenance.
- Do not operate the machine with a damaged cord or plug.
3. Components Overview
Familiarize yourself with the main components of your Giga X7 Professional.

Figure 3.1: Front view of the Jura Giga X7 Professional, displaying the main unit with two cups of coffee prepared. This image highlights the dual spouts, drip tray, and the central display screen.

Figure 3.2: Top view of the Giga X7 Professional, illustrating the two bean hoppers with their covers and the integrated control panel with power and selection buttons.
- Bean Hoppers: Two separate containers for coffee beans, each with an airtight cover.
- TFT Color Display: Interactive screen for navigating menus and selecting beverages.
- Dual Spouts: Adjustable spouts for dispensing coffee and milk.
- Water Tank: Removable tank for water supply, located on the side.
- Drip Tray & Coffee Grounds Container: Collects excess water and spent coffee grounds.
4. Setup
Follow these steps for initial setup:
- Unpacking: Carefully remove all packaging materials.
- Placement: Place the machine on a stable, level surface. Ensure adequate clearance for the bean hoppers and water tank.
- Water Tank: Remove the water tank (refer to Figure 3.3 for location), rinse it, and fill it with fresh, cold water. Reinsert the tank securely.
- Bean Hoppers: Open the covers of the bean hoppers and fill them with whole coffee beans. Close the covers to maintain freshness.
- Power Connection: Plug the power cord into a suitable electrical outlet.
- Initial Rinse: The machine will prompt an initial rinse cycle. Follow the on-screen instructions.

Figure 3.3: Side view of the Jura Giga X7 Professional, highlighting the transparent water tank on the right side of the machine.
5. Operating Instructions
The Giga X7 Professional offers a variety of beverage options and customization.
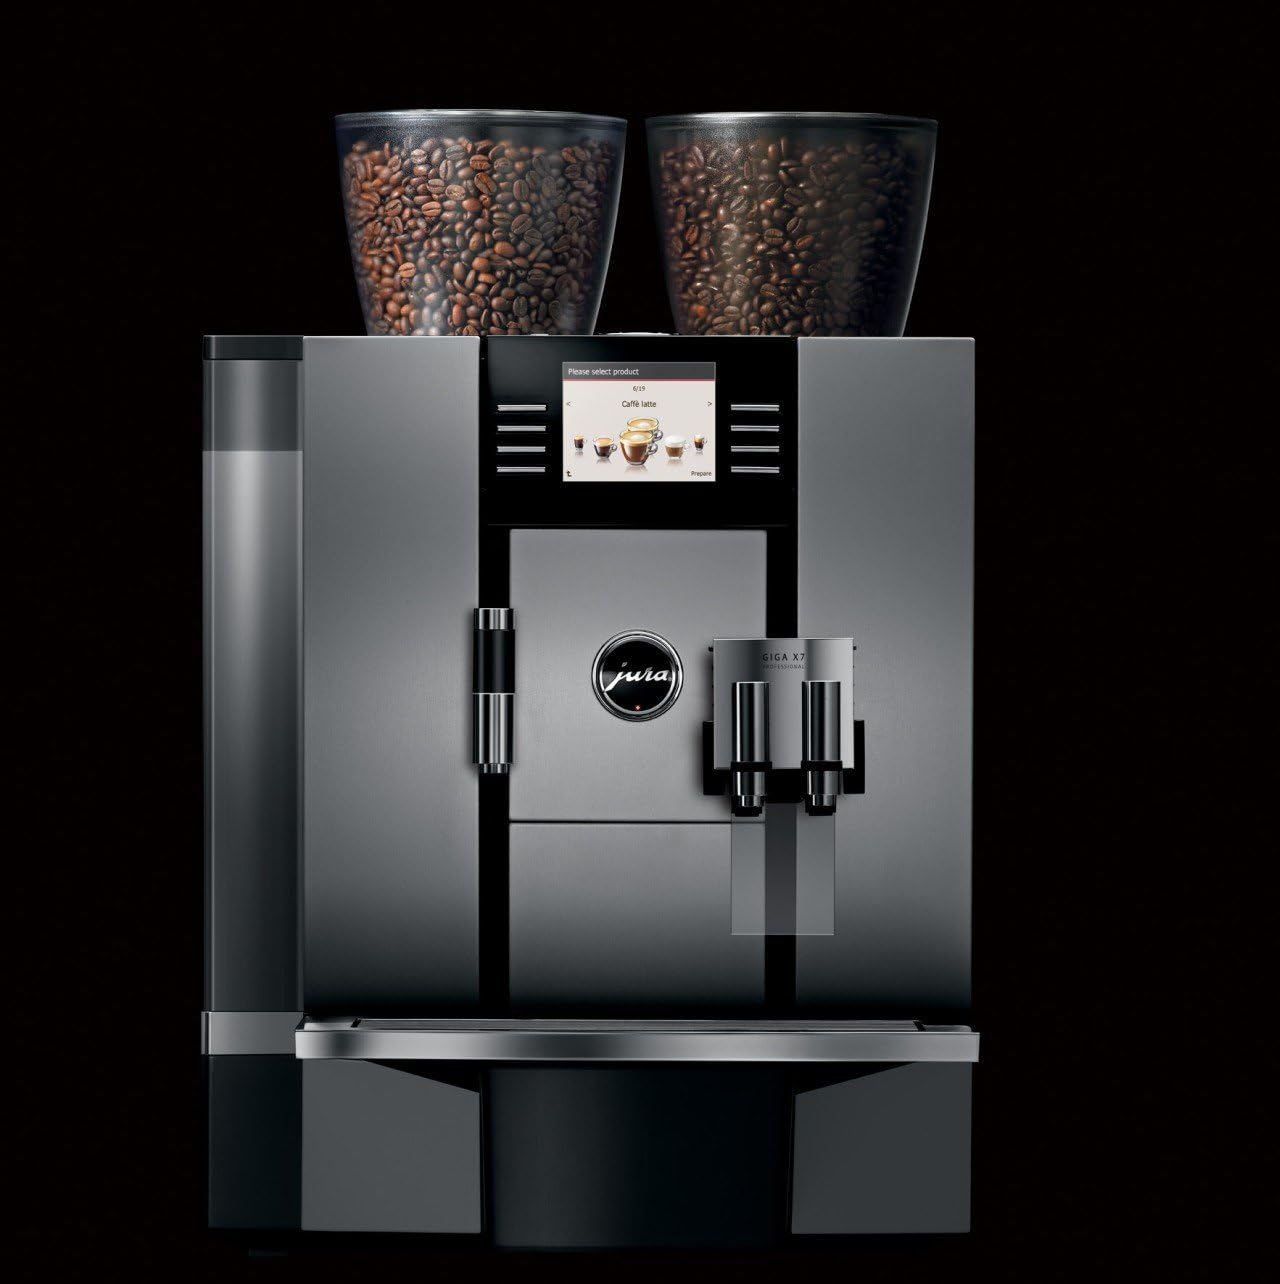
Figure 5.1: The TFT display of the Jura Giga X7 Professional, showing the selection menu with 'Caffè latte' highlighted, indicating beverage choice.
5.1 Making Coffee/Espresso
- Ensure the machine is turned on and has completed its rinse cycle.
- Place a cup under the coffee spouts.
- Select your desired beverage (e.g., Espresso, Coffee) from the TFT display.
- The machine will automatically grind the beans and brew the coffee.
5.2 Making Milk-Based Beverages

Figure 5.2: The Jura Giga X7 Professional dispensing milk and coffee into two tall glasses, illustrating the preparation of milk-based beverages like latte macchiato.
- Connect the milk pipe to the milk system and immerse the other end in a container of cold milk.
- Place a suitable glass under the dual spouts.
- Select your desired milk-based beverage (e.g., Cappuccino, Latte Macchiato) from the display.
- The machine will automatically froth the milk and dispense it, followed by the coffee.
5.3 Customizing Beverages
The Giga X7 Professional allows customization of various parameters:
- Coffee Strength: Adjust the amount of coffee grounds per serving (5 to 16 grams).
- Water Amount: Program the volume of water for each beverage.
- Temperature: Select desired brewing temperature.
- Milk Amount: Customize the volume of milk for milk-based drinks.
These settings can typically be adjusted via the TFT display before or during beverage preparation.
6. Maintenance
Regular maintenance ensures optimal performance and longevity of your machine.
6.1 Daily Cleaning
- Drip Tray and Coffee Grounds Container: Empty and rinse daily.
- Coffee Spouts: Wipe clean with a damp cloth.
6.2 Milk System Cleaning
The machine will prompt for milk system cleaning. Follow the on-screen instructions using Jura milk system cleaner.
6.3 Descaling
The machine will indicate when descaling is required. Use Jura descaling tablets and follow the guided program on the display.
6.4 Filter Replacement
If using a CLARIS water filter, the machine will prompt for replacement after a certain volume of water or time. Replace the filter as instructed.
7. Troubleshooting
Refer to this section for common issues and their solutions.
| Problem | Possible Cause | Solution |
|---|---|---|
| No coffee dispensed | No water in tank, no beans in hopper, brew unit blocked. | Fill water tank, fill bean hopper, run cleaning program. |
| Milk not frothing correctly | Milk system dirty, milk too warm, milk pipe blocked. | Clean milk system, use cold milk, check milk pipe for blockages. |
| Machine displays 'Descale' | Limescale buildup. | Perform descaling program as per instructions. |
| Error message on display | Specific internal issue. | Refer to the specific error code in the full user manual or contact customer support. |
8. Specifications
Technical details for the Jura Giga X7 Professional (Model 13624):
- Brand: Jura
- Model Number: 13624
- Dimensions (L x W x H): 14.57 x 19.57 x 22.24 inches
- Item Weight: 40.1 pounds
- Coffee Maker Type: Super-Automatic Espresso Machine
- Operation Mode: Fully Automatic
- Special Feature: Programmable
- Human Interface Input: Buttons, Mouse (referring to rotary dial/selector)
- Water Tank Capacity: Approximately 169 oz.
- Grinders: Dual electronically adjustable ceramic burr grinders
9. Warranty and Support
For warranty information, technical support, or service inquiries, please refer to the warranty card included with your product or visit the official Jura website. Keep your proof of purchase for warranty claims.


