
1. Introduction and Overview
This manual provides detailed instructions for the installation, maintenance, and troubleshooting of the EZ-FLO 35302 White S-Trap Drain Pipe. This S-trap is designed for tubular drain applications in both kitchen and bathroom sinks, ensuring efficient wastewater drainage and preventing sewer gases from entering your living space. It is constructed from durable polypropylene plastic and is certified by the Uniform Plumbing Code (UPC) for product safety.

Figure 1: Assembled EZ-FLO 35302 White S-Trap Drain Pipe. This image displays the complete S-trap unit, showing its characteristic S-shape and white polypropylene construction, ready for installation.
2. Product Features
- Versatile Application: Suitable for under-sink installation in kitchens and bathrooms.
- Durable Construction: Crafted from high-impact polypropylene plastic for long-lasting reliability.
- Easy Installation: Features a captive nut on the J-bend for quick and straightforward assembly.
- Standard Compatibility: Designed for compatibility with 1-1/2 inch pipes, fitting most standard sinks.
- Certified Safety: Certified by the Uniform Plumbing Code (UPC) for product safety standards.
3. Setup and Installation
Before beginning installation, ensure all necessary components are present and that the existing plumbing is compatible with a 1-1/2 inch S-trap system. Basic tools such as a wrench or pliers may be required.
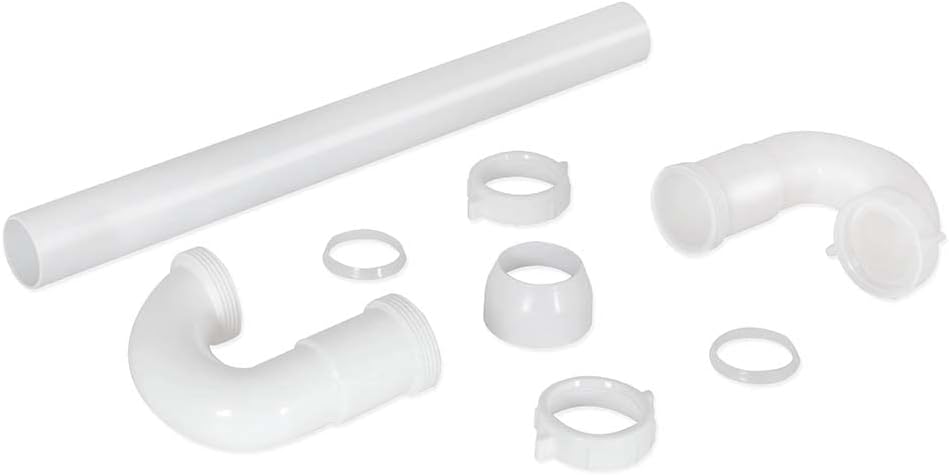
Figure 2: EZ-FLO S-Trap Drain Pipe components. This image shows the individual parts of the S-trap, including the straight pipe, J-bend, nuts, and washers, laid out before assembly.
Installation Steps:
- Preparation: Turn off the water supply to the sink. Place a bucket under the existing drain to catch any residual water.
- Remove Old Drain: Carefully disconnect and remove the old drain pipe assembly.
- Assemble Components: Attach the J-bend to the sink tailpiece using the provided nuts and washers. Ensure washers are correctly seated to prevent leaks. The captive nut design facilitates this step.
- Connect to Wall Drain: Connect the straight pipe section of the S-trap to the J-bend and then to the wall drain pipe. Adjust the length of the straight pipe if necessary by cutting it to fit.
- Tighten Connections: Hand-tighten all nuts, then use a wrench or pliers for a final snug turn. Avoid over-tightening, which can crack plastic components.
- Test for Leaks: Turn on the water supply and run water through the sink. Carefully inspect all connections for any signs of leaks. Tighten connections further if leaks are detected.

Figure 3: J-bend and nuts for EZ-FLO S-Trap. This image highlights the J-bend component along with the associated nuts and washers, demonstrating the captive nut feature for easier assembly.
4. Specifications
| Feature | Detail |
|---|---|
| Model Number | 35302 |
| Size | 1-1/2 inch |
| Material | High-impact Polypropylene Plastic |
| Color | White |
| Connector Type | Trap |
| Thread Size | 1.5 inch |
| Item Dimensions (L x W x H) | 7.87 x 20.87 x 1.06 inches |
| Item Weight | 0.01 Ounces |
| Certifications | UPC (Uniform Plumbing Code) |
5. Maintenance
Regular maintenance helps ensure the longevity and proper function of your S-trap drain pipe.
- Regular Cleaning: Periodically flush the drain with hot water to help prevent grease and soap buildup.
- Check for Leaks: Inspect all connections annually for any signs of drips or moisture. Tighten connections as needed.
- Avoid Harsh Chemicals: Do not use harsh chemical drain cleaners, as they can damage plastic pipes and seals. Use enzymatic cleaners or a plumber's snake for clogs.
- Clear Obstructions: If a clog occurs, disassemble the S-trap to manually remove the obstruction. The captive nut design makes this process easier.
6. Troubleshooting
| Problem | Possible Cause | Solution |
|---|---|---|
| Leaks at Connections | Loose nuts, improperly seated washers, damaged washers. | Ensure nuts are tightened securely (hand-tight plus a quarter turn with a wrench). Check that washers are correctly positioned and not damaged. Replace damaged washers if necessary. |
| Slow Drainage or Clog | Accumulation of hair, grease, or debris within the trap. | Disassemble the S-trap and manually remove any obstructions. Flush with hot water. Consider using a non-corrosive drain cleaner. |
| Sewer Gas Odor | Dry trap (water evaporated), loose connections, or improper installation. | Run water to refill the trap. Check all connections for tightness. Ensure the S-trap is installed correctly to maintain a water seal. |
7. Warranty and Support
For information regarding warranty coverage, product support, or replacement parts for your EZ-FLO 35302 White S-Trap Drain Pipe, please refer to the official EZ-FLO website or contact their customer service department directly. Keep your purchase receipt as proof of purchase.
EZ-FLO Customer Support: Visit the EZ-FLO Store on Amazon