
1. Introduction
This manual provides essential instructions for the installation, operation, and maintenance of your Oasis PSBF VersaFiller Drinking Fountain and Bottle Filler. This unit is designed to provide convenient access to drinking water and facilitate bottle refilling in a barrier-free, ADA-compliant, non-refrigerated configuration. Please read this manual thoroughly before installation and use to ensure proper function and safety.
2. Safety Information
- Electrical Safety: Ensure the unit is properly grounded. Disconnect power before performing any maintenance or service.
- Water Supply: Connect the unit to a potable water supply only. Ensure all water connections are secure to prevent leaks.
- Installation: Installation should be performed by a qualified professional in accordance with all local plumbing and electrical codes.
- Children: Supervise children when they are near the unit to prevent misuse or injury.
- Cleaning: Use only mild, non-abrasive cleaners. Avoid harsh chemicals that could damage surfaces or contaminate water.
3. Product Overview
The Oasis PSBF VersaFiller combines a traditional drinking fountain with a modern bottle filling station. It is constructed from durable stainless steel and designed for freestanding installation.
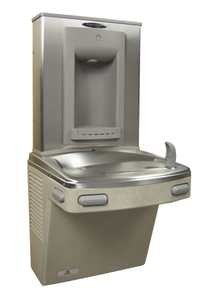
Figure 3.1: Front view of the Oasis PSBF VersaFiller Drinking Fountain and Bottle Filler. This image shows the stainless steel unit with both the drinking fountain basin and the bottle filler spout clearly visible, designed for easy access.
Key Components:
- Drinking Fountain: Standard bubbler for direct drinking.
- Bottle Filler: Sensor-activated or push-button activated spout for refilling water bottles.
- Basin: Collects excess water from both functions.
- Access Panels: For internal component access during installation and maintenance.
4. Setup and Installation
Proper installation is crucial for the safe and efficient operation of your VersaFiller. It is highly recommended that installation be performed by a licensed plumber and electrician.
4.1 Pre-Installation Checklist:
- Verify unit dimensions and ensure adequate space for installation and maintenance.
- Confirm availability of a potable cold water supply line (1/4" O.D. copper or plastic tubing recommended).
- Ensure a suitable drain connection is available.
- Confirm availability of a dedicated electrical outlet (if applicable, check local codes for specific requirements).
- Inspect the unit for any shipping damage.
4.2 Installation Steps (General):
- Positioning: Carefully place the unit in its desired location, ensuring it is level and stable.
- Water Connection: Connect the water supply line to the unit's inlet. Use appropriate fittings and ensure all connections are watertight.
- Drain Connection: Connect the unit's drain to the building's waste system. Ensure proper slope for drainage and secure connections.
- Electrical Connection: Plug the unit into a grounded electrical outlet.
- Flush System: Before first use, flush the water lines to remove any air or debris. Run water through both the drinking fountain and bottle filler for several minutes.
- Leak Check: Thoroughly inspect all water connections for leaks.
5. Operation
5.1 Using the Drinking Fountain:
- Press the push-button actuator located on the front of the unit.
- Water will flow from the bubbler. Release the button to stop the flow.
5.2 Using the Bottle Filler:
- Place your water bottle under the bottle filler spout.
- The bottle filler may activate automatically via a sensor, or you may need to press a dedicated button.
- Water will dispense into your bottle. Remove the bottle when full, and the water flow will stop.
6. Maintenance
Regular maintenance ensures optimal performance and hygiene of your VersaFiller unit.
6.1 Cleaning:
- Exterior Surfaces: Wipe down stainless steel surfaces regularly with a soft cloth and a mild, non-abrasive cleaner. Avoid steel wool or abrasive pads.
- Basin and Spouts: Clean the drinking fountain basin and bottle filler spout daily with a mild disinfectant solution. Rinse thoroughly with clean water after cleaning.
- Drain: Periodically check the drain for any obstructions and clear as necessary.
6.2 Filter Replacement (If Applicable):
While this specific model is non-refrigerated, some installations may include an inline water filter. Refer to the filter manufacturer's instructions for replacement schedules and procedures. Always turn off the water supply before replacing any filters.
7. Troubleshooting
| Problem | Possible Cause | Solution |
|---|---|---|
| No water flow from fountain/filler. | Water supply turned off; clogged inlet screen; faulty valve. | Check water supply valve; clean inlet screen; contact qualified service personnel. |
| Low water pressure. | Partially closed water supply valve; clogged filter (if installed); low building water pressure. | Ensure water supply valve is fully open; replace filter (if applicable); consult building maintenance. |
| Water leaks. | Loose connections; damaged seals/gaskets. | Tighten connections; replace damaged components. Turn off water supply immediately. |
| Bottle filler not activating. | Sensor obstructed or dirty; power issue; faulty sensor/switch. | Clean sensor area; check power connection; contact qualified service personnel. |
If you encounter issues not listed here or if solutions do not resolve the problem, please contact Oasis customer support or a qualified service technician.
8. Specifications
| Feature | Detail |
|---|---|
| Model | PSBF |
| Brand | Oasis |
| Type | Drinking Fountain and Bottle Filler |
| Refrigeration | Non-refrigerated |
| ADA Compliant | Yes (Barrier-Free) |
| Material | Stainless Steel |
| Color | Stainless Steel |
| Installation Type | Freestanding |
| Upper Temperature Rating | 190 Degrees Fahrenheit |
9. Warranty and Support
For specific warranty information, please refer to the documentation included with your product or visit the official Oasis website. For technical support, parts, or service inquiries, please contact Oasis customer service directly. Ensure you have your model number (PSBF) and date of purchase available when contacting support.
Oasis Contact Information: Please refer to the manufacturer's official website or product packaging for the most current contact details.


