
1. Introduction
This manual provides comprehensive instructions for the installation, operation, and maintenance of your ZENEC ZE-NC620DMH 2-DIN Navigation Receiver. Designed specifically for motorhomes and caravans, this device integrates advanced navigation with multimedia functionalities. Please read this manual thoroughly before using the product to ensure correct operation and to prevent damage.
2. Safety Information
- Installation: Ensure installation is performed by a qualified technician to avoid damage to the vehicle or the device. Incorrect installation can lead to malfunction or accidents.
- Power Supply: Connect the device only to a 12V DC vehicle power supply with a negative ground.
- Operation While Driving: Do not operate the device in a way that distracts you from driving. Always prioritize road safety.
- Cleaning: Use a soft, dry cloth for cleaning. Do not use abrasive cleaners or solvents.
- Temperature: Avoid exposing the device to extreme temperatures or direct sunlight for prolonged periods.
3. Product Overview
The ZENEC ZE-NC620DMH is a versatile 2-DIN navigation and multimedia system. It features a 6.2-inch touchscreen display and various input/output options.
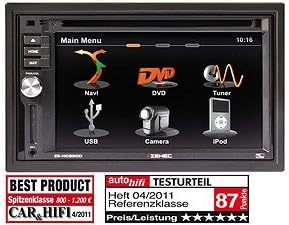
Figure 3.1: Main Menu Interface. This image displays the primary menu screen of the ZENEC ZE-NC620DMH. Key functions are accessible via touch icons, including Navigation (Navi), DVD playback, Radio Tuner, USB media, Camera input, and iPod connectivity. The top right corner shows the current time (10:16).
3.1 Main Menu Functions
- Navi: Access the integrated navigation system with specialized POIs for campers.
- DVD: Play DVDs and CDs via the built-in optical drive.
- Tuner: Select and listen to radio stations.
- USB: Connect USB storage devices for media playback.
- Camera: View input from a connected rearview or front camera.
- iPod: Connect and control compatible iPod/iPhone devices for audio playback.
4. Setup
4.1 Installation
The ZE-NC620DMH is designed for dashboard mounting in vehicles with a 2-DIN slot. Professional installation is highly recommended. Ensure all wiring connections (power, ground, speakers, antenna, GPS antenna, external microphone, camera inputs, USB) are secure and correctly polarized according to the wiring diagram provided in the separate installation guide.
4.2 Initial Configuration
- Power On: Turn on your vehicle's ignition. The device should power on automatically.
- Language Selection: Follow the on-screen prompts to select your preferred language.
- Time and Date: Set the correct time zone, date, and time.
- GPS Setup: Ensure the GPS antenna is installed in a location with a clear view of the sky. The system will acquire satellite signals automatically.
- Bluetooth Pairing: To pair your mobile phone, navigate to the Bluetooth menu, enable pairing mode on your phone, and select the ZE-NC620DMH from the list of available devices.
5. Operating Instructions
5.1 Navigation System
- Tap the "Navi" icon on the main menu to launch the navigation software.
- Enter your destination using the on-screen keyboard.
- Select route preferences (e.g., fastest, shortest, avoid tolls).
- The system provides turn-by-turn voice guidance and visual map display.
- Access specialized POIs (Points of Interest) for campers, such as campsites, service stations, and parking areas.
5.2 Multimedia Playback (DVD/CD, USB, iPod)
- DVD/CD: Insert a disc into the slot. The device will automatically switch to DVD/CD mode. Use the on-screen controls for playback.
- USB: Connect a USB flash drive to the designated USB port. Tap the "USB" icon to browse and play media files (audio, video, images).
- iPod: Connect your iPod/iPhone using a compatible cable. Tap the "iPod" icon to access your music library and control playback.
5.3 Radio Tuner
- Tap the "Tuner" icon to access the radio.
- Use the scan function to find available stations or manually tune to a frequency.
- Save your favorite stations as presets for quick access.
5.4 Camera Input
- If a rearview camera is connected, the display will automatically switch to the camera view when the vehicle is put into reverse.
- Tap the "Camera" icon to manually view the camera feed (if supported by your camera setup).
6. Maintenance
- Screen Cleaning: Gently wipe the touchscreen with a soft, lint-free cloth. For stubborn smudges, slightly dampen the cloth with water or a screen-safe cleaner. Do not spray liquids directly onto the screen.
- Software Updates: Periodically check the ZENEC website for available software and map updates to ensure optimal performance and the latest navigation data.
- Disc Drive: Keep the disc slot free from dust and debris. Avoid inserting damaged or dirty discs.
7. Troubleshooting
| Problem | Possible Cause | Solution |
|---|---|---|
| No power | Blown fuse, incorrect wiring, loose connection. | Check vehicle fuses. Verify power and ground connections. Consult an installer. |
| No GPS signal | GPS antenna obstructed or disconnected. | Ensure antenna has a clear view of the sky. Check antenna connection. |
| No audio | Volume too low, mute activated, speaker wiring issue. | Increase volume. Check mute status. Verify speaker connections. |
| Touchscreen unresponsive | Temporary software glitch. | Perform a soft reset (refer to installation guide for reset button location, usually a small pinhole). |
If problems persist after attempting these solutions, please contact ZENEC customer support or a qualified service center.
8. Specifications
- Brand: Zenec
- Model Name: ZENEC ZE-NC620DMH
- Vehicle Service Type: Truck (Note: Optimized for Motorhome/Caravan use)
- Screen Size: 6.2 Inches
- Special Feature: Adaptation for motorhomes and caravans
- Connectivity Technology: Bluetooth, USB
- Map Type: Europe
- Included Components: CD/DVD player, external microphone
- Audio Output Mode: Stereo
- Mounting Type: Dashboard Mount
9. Warranty and Support
For warranty information, please refer to the warranty card included with your product or visit the official ZENEC website. Technical support and service inquiries should be directed to your authorized ZENEC dealer or the ZENEC customer service department.
Please retain your proof of purchase for warranty claims.

