1. Important Safety Information
Read and understand all safety instructions before installing, operating, or servicing this heater. Failure to follow these instructions may result in electric shock, fire, property damage, or personal injury.
- Electrical Hazard: Disconnect power before installation or servicing. Ensure proper grounding.
- Fire Hazard: Do not place flammable materials near the heater. Maintain adequate clearance from walls and other objects.
- Burn Hazard: Heater surfaces can become hot during operation. Avoid direct contact.
- Installation: Install only in accordance with local and national electrical codes.
- Ventilation: Ensure proper ventilation around the heater to prevent overheating.
- Supervision: Do not leave the heater unattended during operation, especially around children or individuals with reduced physical, sensory, or mental capabilities.
2. Product Overview
The Dayton Electric Utility Heater, Model 3UG73, is designed for heating residential garage and workshop areas. It features automatic thermal protection and a built-in thermostat for efficient and safe operation. The unit's steel housing is finished with baked enamel for durability and corrosion resistance.
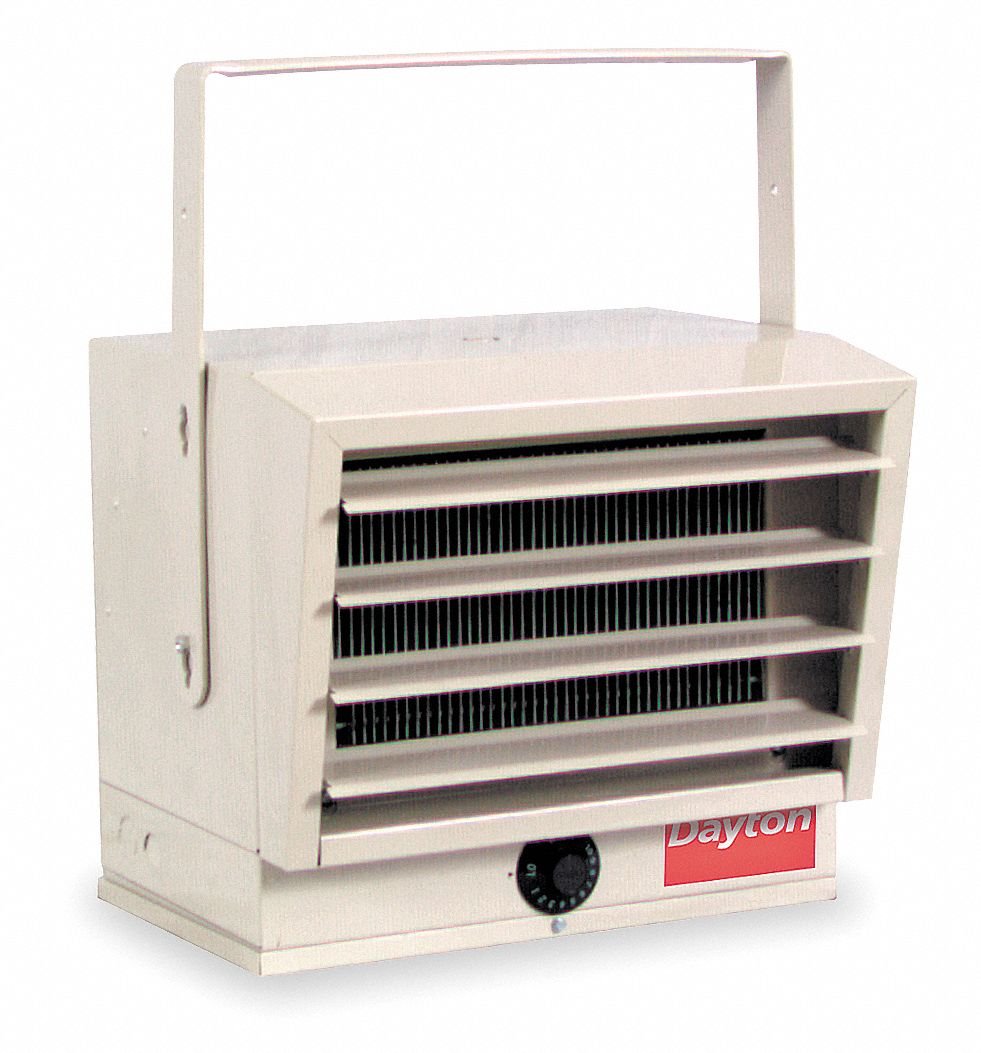
Figure 2.1: Front view of the Dayton Electric Utility Heater, showing the heating elements and control knob.
3. Technical Specifications
| Item | Electric Utility Heater |
| Model Number | 3UG73 (VE-HEYX-QN6P) |
| Voltage | 208/240VAC |
| kW (Kilowatts) | 5.0/2.5, 3.7/1.8 |
| BtuH (British Thermal Units per Hour) | 17,065/14,215, 12,800/6396 |
| Phase | 1 |
| Amps AC | 20.9/10.4 (at 240V), 18/9 (at 208V) |
| Frequency | 60 Hz |
| Temperature Rise | 60 Degrees F |
| Air Flow | 270 cfm |
| Width | 14 inches |
| Depth | 11-1/4 inches |
| Height | 12-1/2 inches |
| Housing Material | Steel |
| Housing Finish | Baked Enamel |
| Features | Thermostat, Automatic Fan Time Delay, Overheat Protection |
| Includes | Mounting Bracket, Bronze/Brown Adjustable Louvers |
| Standards | UL-CUL |
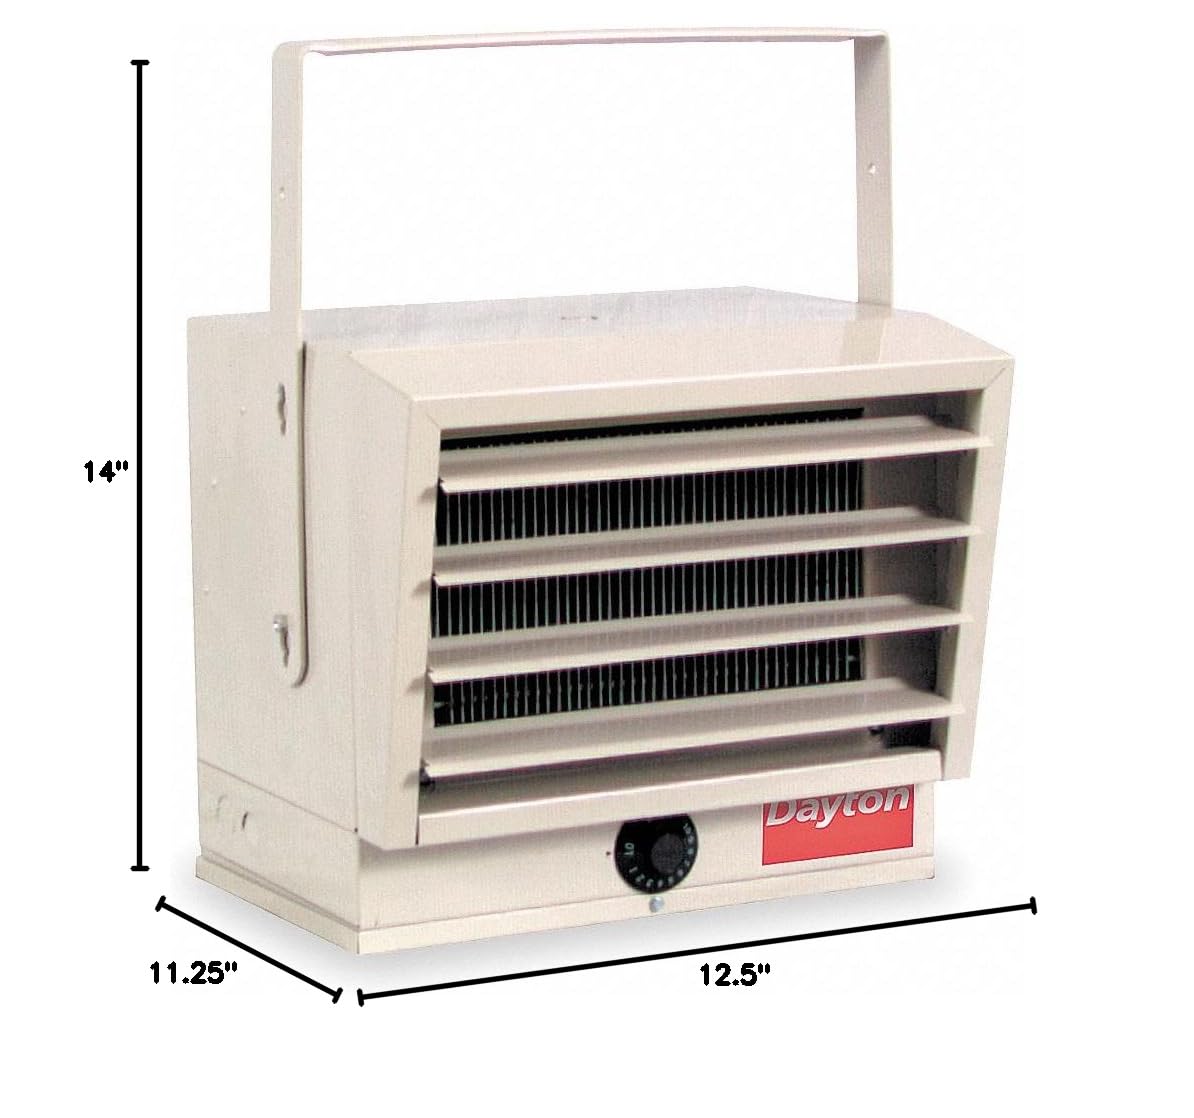
Figure 3.1: Dimensions of the Dayton Electric Utility Heater.
4. Setup and Installation
4.1 Unpacking
Carefully remove the heater from its packaging. Inspect the unit for any shipping damage. Retain packaging materials for future transport or storage.
4.2 Mounting
The heater is designed for wall mounting and includes a mounting bracket. Ensure the mounting surface is structurally sound and capable of supporting the heater's weight (approximately 28 pounds). Maintain minimum clearances as specified in local codes and the heater's safety labels.
- Select a suitable mounting location, ensuring adequate clearance from combustible materials.
- Securely attach the provided mounting bracket to the wall using appropriate fasteners (not included).
- Mount the heater onto the bracket, ensuring it is stable and level.
- Adjust the bronze/brown adjustable louvers to direct airflow as desired.
4.3 Electrical Connection
WARNING: All electrical wiring must be performed by a qualified electrician and comply with all national and local electrical codes. Ensure power is disconnected at the main circuit breaker before proceeding.
- This heater requires a 208VAC or 240VAC, single-phase power supply.
- Refer to the wiring diagram located inside the heater's access panel for specific connection details.
- Connect the heater to a dedicated circuit with appropriate overcurrent protection (circuit breaker) sized for the heater's amperage (20.9/10.4 Amps at 240V, 18/9 Amps at 208V).
- Ensure all connections are tight and secure.
5. Operating Instructions
5.1 Initial Startup
- After installation and electrical connection are complete, restore power to the heater at the main circuit breaker.
- Turn the thermostat knob (located on the front of the unit) to its highest setting. The fan should start, and the heating elements will activate.
- Allow the heater to operate for a few minutes to ensure proper function. A slight odor may be present during initial use as manufacturing oils burn off; this is normal and will dissipate.
5.2 Setting the Thermostat
The built-in thermostat controls the heater's output to maintain a desired room temperature.
- Turn the thermostat knob to the desired temperature setting.
- The heater will cycle on and off to maintain this temperature.
- For continuous heat, set the thermostat to its maximum position.
5.3 Automatic Fan Time Delay
This heater is equipped with an automatic fan time delay feature. When the heating elements turn off (either by thermostat or manual control), the fan will continue to run for a short period to dissipate residual heat from the elements, improving efficiency and extending component life.
6. Maintenance
Regular maintenance ensures optimal performance and longevity of your heater. Always disconnect power to the heater at the main circuit breaker before performing any maintenance.
6.1 Cleaning
- Exterior: Wipe the exterior surfaces with a soft, damp cloth. Do not use abrasive cleaners or solvents.
- Interior/Elements: Periodically, and at least once a year, inspect the heating elements and fan blades for dust and debris accumulation. Use a vacuum cleaner with a brush attachment to gently remove any buildup. Do not touch the heating elements directly.
6.2 Inspection
- Check for any loose wiring connections.
- Inspect the power cord (if applicable) for damage or fraying.
- Ensure the mounting bracket is secure.
7. Troubleshooting
Before contacting customer support, review the following common issues and solutions.
| Problem | Possible Cause | Solution |
|---|---|---|
| Heater does not turn on. | No power supply. Circuit breaker tripped. Thermostat set too low. Overheat protection activated. | Check power supply and circuit breaker. Increase thermostat setting. Allow heater to cool down if overheat protection was triggered. |
| Heater produces insufficient heat. | Thermostat set too low. Incorrect voltage connection. Airflow obstruction. | Increase thermostat setting. Verify correct 208V or 240V connection. Clear any obstructions from air intake/output. |
| Fan runs but no heat. | Heating elements failed. Overheat protection engaged (fan delay). | This may be normal if the fan delay is active. If no heat after several minutes, heating elements may require professional service. |
| Unusual noises or odors. | Initial burn-off odor (normal). Loose components. Debris in fan. | Initial odors will dissipate. Disconnect power and inspect for loose parts or debris. If persistent, seek professional service. |
8. Warranty and Support
8.1 Manufacturer's Warranty
This Dayton Electric Utility Heater (Model 3UG73) is covered by a manufacturer's warranty for a period of 1 year from the date of purchase. This warranty covers defects in materials and workmanship under normal use and service. It does not cover damage resulting from misuse, abuse, accident, unauthorized repairs, or improper installation.
Please retain your proof of purchase for warranty claims.
8.2 Customer Support
For technical assistance, warranty claims, or to inquire about replacement parts, please contact Dayton customer support. Refer to the product packaging or the manufacturer's official website for the most current contact information.


