Introduction
This manual provides instructions for the safe and effective use, setup, operation, and maintenance of the Porta Potti Curve portable toilet, Model 92360. This portable toilet is designed for use in various settings including RVs, boats, vans, trucks, camping, and healthcare environments. It features a comfortable design, a 4-gallon fresh water tank, and a 5.5-gallon waste water tank.

Figure 1: Porta Potti Curve portable toilet, closed view. This image displays the compact and modern design of the unit.
Safety Information
- Always read and understand all instructions before using the product.
- Use only recommended chemicals and toilet paper designed for portable toilets to prevent damage and ensure proper function.
- Do not overfill the fresh water or waste water tanks.
- Ensure the toilet is placed on a stable, level surface during use.
- Keep out of reach of children when not in use.
- Avoid sitting or standing on the lid.
Product Components
The Porta Potti Curve consists of two main sections:
- Upper Section: Contains the fresh water tank, flush pump, and toilet seat/cover.
- Lower Section: Contains the waste water holding tank, rotating pour-out spout, and tank level indicator.

Figure 2: Porta Potti Curve with the lid open, revealing the toilet bowl and seat. This view highlights the internal structure and comfortable design.
Setup
- Separate the Tanks: Disengage the latches on both sides of the toilet to separate the upper and lower sections. Lift the upper section off the lower section.

Figure 3: Demonstrates how to separate the upper and lower sections of the portable toilet for filling or emptying.
- Fill Fresh Water Tank: Open the fresh water fill cap on the upper section. Fill the tank with clean water. Close the cap securely.
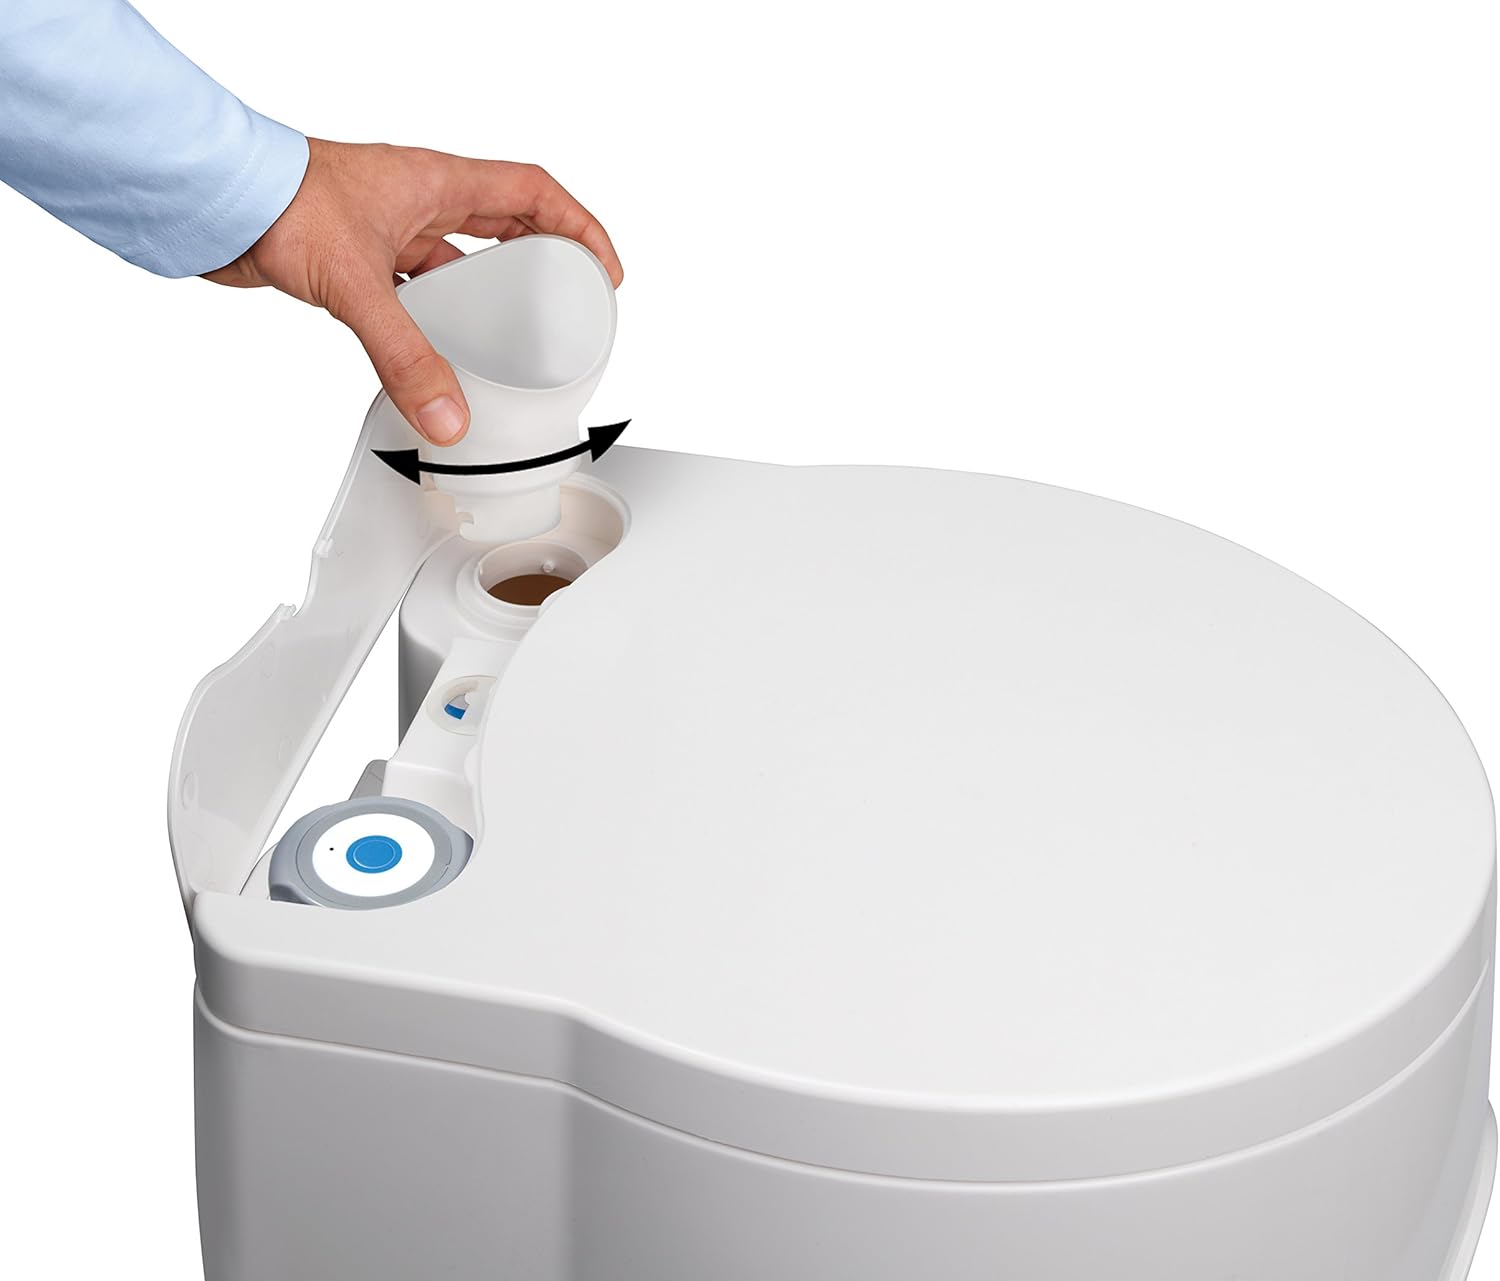
Figure 4: Illustrates the process of adding fresh water to the upper tank through the designated fill opening.
- Add Waste Tank Chemical: On the lower section, rotate the pour-out spout upwards. Add the recommended amount of waste tank chemical (e.g., Thetford Green) directly into the waste tank opening. Add a small amount of water (approximately 1 cup) to ensure the chemical is distributed. Close the pour-out spout.

Figure 5: Shows how to add the necessary waste tank chemical into the lower holding tank to control odors and aid decomposition.
- Reassemble: Carefully place the upper section back onto the lower section, ensuring the latches engage securely.
- Install Batteries (for electric flush): If your model features a battery-powered flush, locate the battery compartment (typically behind the seat) and insert the required batteries according to polarity markings.
Operation
- Using the Toilet: Ensure the waste tank valve (blade handle) is closed before use.
- Flushing: After use, open the waste tank valve by sliding the blade handle. Press the flush button (for electric flush models) or operate the manual pump (if applicable) to rinse the bowl. Close the waste tank valve completely after flushing to prevent odors. The fresh water tank level indicator is located near the flush mechanism.

Figure 6: A close-up of the top section, highlighting the flush button and the fresh water tank level indicator for easy monitoring.
- Toilet Paper Holder: The unit includes an integrated toilet paper holder for convenience.

Figure 7: Shows the integrated toilet paper holder, designed for easy access and storage.
Maintenance
- Monitoring Waste Tank Level: The waste tank has a level indicator to show when it is nearing full. Empty the tank before it becomes completely full.
- Emptying the Waste Tank:
- Separate the upper and lower sections as described in the Setup section.
- Carry the lower section to an approved disposal site (e.g., RV dump station, standard toilet).
- Rotate the pour-out spout upwards.
- Press the air vent button while emptying to ensure a smooth flow and prevent splashing.
- Rinse the waste tank thoroughly with water after emptying. You may add a small amount of fresh water and shake the tank to clean it.
- Close the pour-out spout and reassemble the toilet.

Figure 8: Depicts the process of emptying the lower waste tank into a suitable disposal facility.

Figure 9: A detailed view of the rotating pour-out spout, designed for controlled and splash-free emptying.
- Cleaning: Clean the toilet regularly with non-abrasive cleaners. Avoid harsh chemicals that can damage plastic components or seals.
- Winterization: If storing in freezing temperatures, ensure both fresh water and waste tanks are completely empty and dry to prevent damage from ice expansion.
Troubleshooting
- Odor Issues: Ensure the waste tank valve is fully closed after each use. Verify that the correct amount of waste tank chemical is used. Clean the toilet thoroughly.
- Flush Not Working (Electric Models): Check battery levels and replace if necessary. Ensure no obstructions are present in the flush mechanism.
- Leaking: Check that the upper and lower sections are securely latched. Inspect seals for damage or debris and clean if necessary.
- Slow Emptying: Ensure the air vent button is pressed during emptying to allow air to enter the tank.
Specifications
| Model | 92360 |
| Brand | Porta Potti |
| Manufacturer | Thetford |
| Color | Gray |
| Material | Plastic |
| Item Weight | 10 Pounds |
| Product Dimensions | 18 x 18 x 16 inches |
| Fresh Water Tank Capacity | 4 Gallons |
| Waste Water Tank Capacity | 5.5 Gallons |
| UPC | 028985923602, 781482339443 |
Warranty and Support
For specific warranty information and customer support, please refer to the documentation provided with your purchase or visit the official Porta Potti or Thetford website. Keep your purchase receipt for warranty claims.


