1. Introduction
This instruction manual provides detailed guidance for the installation, operation, and maintenance of the GROHE 46711000 Flow Control Replacement Part. This component is designed to regulate water flow in compatible GROHE bathroom sink faucets, contributing to water conservation and optimal performance. Please read these instructions thoroughly before proceeding with installation or maintenance.
2. Product Components
The GROHE 46711000 Flow Control Replacement Part kit typically includes the following items:
- Flow Control Aerator: The primary component responsible for shaping the water stream and regulating flow rate.
- Aerator Wrench: A specialized tool for safely removing and installing the aerator without damaging the faucet finish.
- O-Ring/Gasket: A rubber seal to ensure a watertight connection.
- Additional Aerator (Optional): Some kits may include an alternative aerator with different flow characteristics.

Image 2.1: Contents of the GROHE 46711000 Flow Control Replacement Part kit.
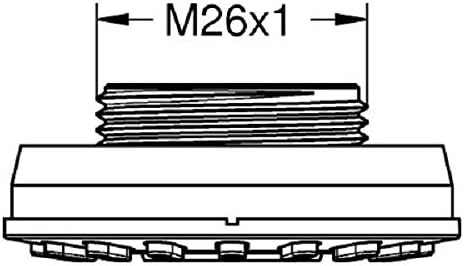
Image 2.2: Detailed view of the aerator and the removal/installation wrench.
3. Installation Instructions
Follow these steps to replace or install the GROHE 46711000 Flow Control aerator:
- Turn Off Water Supply: Locate the shut-off valves under your sink and turn them clockwise to stop the water flow to the faucet.
- Remove Existing Aerator:
- If your faucet has an exposed aerator, you may be able to unscrew it by hand or with a standard wrench.
- For recessed aerators, use the specialized aerator wrench provided in the kit. Insert the wrench into the aerator slots and turn counter-clockwise to loosen and remove the old aerator.
- Clean Faucet Spout: Inspect the inside of the faucet spout for any debris or mineral buildup. Clean as necessary to ensure a clear path for water flow.
- Insert New O-Ring: Place the new O-ring (gasket) into the aerator housing or onto the new aerator, ensuring it is seated correctly. This prevents leaks.
- Install New Aerator:
- Carefully insert the new GROHE 46711000 aerator into the faucet spout.
- Use the aerator wrench to gently tighten the aerator by turning it clockwise. Do not overtighten, as this can damage the aerator or faucet.
- Restore Water Supply: Slowly turn the shut-off valves counter-clockwise to restore water flow to the faucet.
- Check for Leaks: Turn on the faucet and inspect for any leaks around the newly installed aerator. If leaks occur, gently tighten the aerator further or re-seat the O-ring.

Image 3.1: Exploded diagram illustrating the aerator installation process, highlighting the M26x1 male thread.
4. Operating Instructions
The GROHE 46711000 Flow Control aerator is a passive component that regulates water flow. Once installed, it operates automatically with your faucet. Some aerator types may offer different spray patterns:
- Stream Flow: Provides a steady, aerated stream of water.
- Spray Flow: Some faucet heads, when equipped with specific aerators, can switch to a spray pattern by pressing a button on the faucet head. The behavior (defaulting to stream or retaining last setting) depends on the specific faucet head and aerator type (e.g., blue vs. gray aerators mentioned in user feedback).
The primary function is to ensure efficient water usage while maintaining a comfortable water pressure.
5. Maintenance
Regular maintenance of your aerator helps maintain optimal water flow and prevents mineral buildup:
- Periodic Cleaning: If water flow becomes weak or erratic, the aerator may be clogged with sediment or mineral deposits.
- Removal: Use the aerator wrench to carefully remove the aerator as described in the installation steps.
- Cleaning: Rinse the aerator under running water to remove loose debris. For stubborn mineral deposits, soak the aerator in a solution of equal parts white vinegar and water for 30 minutes to an hour. Use a soft brush (like an old toothbrush) to gently scrub away any remaining deposits.
- Reinstallation: Reinstall the clean aerator, ensuring the O-ring is properly seated, and tighten with the wrench.
6. Troubleshooting
If you encounter issues with your GROHE 46711000 Flow Control aerator, consider the following:
- Reduced Water Flow: This is typically caused by a clogged aerator. Refer to the "Maintenance" section for cleaning instructions.
- Leaking Around Aerator: Ensure the aerator is properly tightened and that the O-ring is correctly seated and not damaged. If the O-ring is worn, replace it.
- Unusual Noises (e.g., whistling): This could indicate a partially clogged aerator or an improperly seated aerator. Clean and re-install the aerator.
- Inconsistent Spray Pattern: If your faucet head offers different spray patterns, ensure the correct aerator type is installed for your desired function. Cleaning the aerator may also resolve inconsistencies.
If problems persist after following these steps, contact GROHE customer support or a qualified plumber.
7. Specifications
| Feature | Detail |
|---|---|
| Brand | GROHE |
| Model Number | 46711000 |
| Material | Lead (as per product specifications, though modern aerators are typically lead-free. User should verify current product composition.) |
| Finish Type | Unfinished (referring to the internal component, not external aesthetic) |
| Maximum Flow Rate | 34.8 Liters Per Minute (Note: This value seems high for a flow control aerator and might refer to the faucet's maximum capacity without restriction. The aerator's purpose is to restrict flow for water conservation. Actual restricted flow rate will be lower.) |
| Thread Size | M22 x 1 Male thread (implied by product context and diagram) |
| Item Weight | 1.76 ounces |
| Product Dimensions | 3.78 x 3.78 x 2.99 inches (packaging dimensions) |
Note: Specifications are based on available product data and may be subject to change.
8. Warranty and Support
Specific warranty information for the GROHE 46711000 Flow Control Replacement Part is not provided in the product details. For warranty claims, technical support, or further assistance, please refer to the official GROHE website or contact GROHE customer service directly.
You can also visit the GROHE Store on Amazon for additional product information and support resources.


