1. Product Overview
The Steinbach Bypass-Set is designed to provide flexible control over your pool's heating system. This kit allows you to seamlessly integrate or remove external heating devices, such as solar collectors or electric heat pumps, from your pool's water circulation system. This functionality is crucial for optimizing water temperature and energy efficiency.
Key benefits include:
- Temperature Control: Prevent overheating by bypassing the heating system once the desired pool temperature is reached.
- Heat Retention: Minimize heat loss from solar panels during cold periods or at night by diverting water flow.
- Simplified Installation: Facilitates the setup of solar panels and heat pumps, avoiding complex 'high-level' pump installations and energy-intensive open circuits.
2. Package Contents
Please verify that all components listed below are included in your package before beginning installation.

Image 2.1: Overview of all components included in the Steinbach Bypass-Set. This includes the main three-way valve, a T-connector, three hose nozzles, six hose clamps, and a roll of Teflon sealing tape.
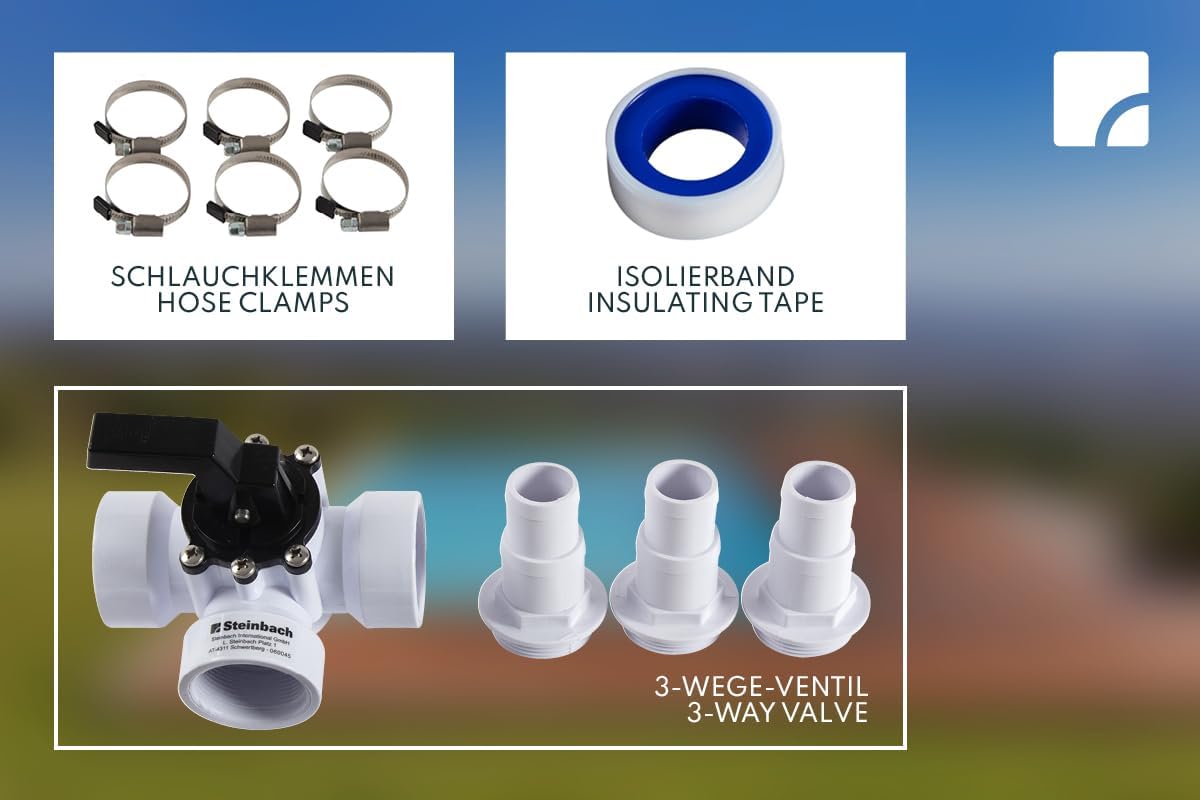
Image 2.2: Detailed view of specific components: six hose clamps, a roll of insulating (Teflon) tape, and the three-way valve assembly with three hose nozzles.
- 1 x Three-way valve
- 1 x T-connector
- 3 x Hose nozzles (compatible with 32/38 mm hoses)
- 6 x Hose clamps
- 1 x Teflon sealing tape
3. Setup and Installation
This section outlines the general steps for installing the bypass set with common pool heating systems. Always ensure your pump is turned off and disconnected from power before beginning any installation work.
3.1 General Connection Principles
- Identify Flow: Determine the direction of water flow from your pool pump to your filter and back to the pool. The bypass set should be installed in the return line to the pool, after the filter.
- Cut Hose: Carefully cut the existing return hose where you intend to install the bypass. Ensure clean, straight cuts.
- Assemble Components: Connect the T-connector and the three-way valve into the cut section of the hose. The T-connector typically diverts water to the heating system, and the three-way valve controls the flow through the heating system or directly back to the pool.
- Connect Heating System: Attach your solar collector or heat pump to the T-connector and the three-way valve using additional hoses (not included) and the provided hose nozzles and clamps.
- Secure Connections: Use the provided hose clamps to secure all hose connections tightly. Apply Teflon tape to threaded connections to prevent leaks.
3.2 Installation Diagrams

Image 3.1: Schematic for connecting the bypass set with a solar collector system. The blue dashed line indicates water flow from the pump, and the red dashed line indicates heated water returning from the solar collector.
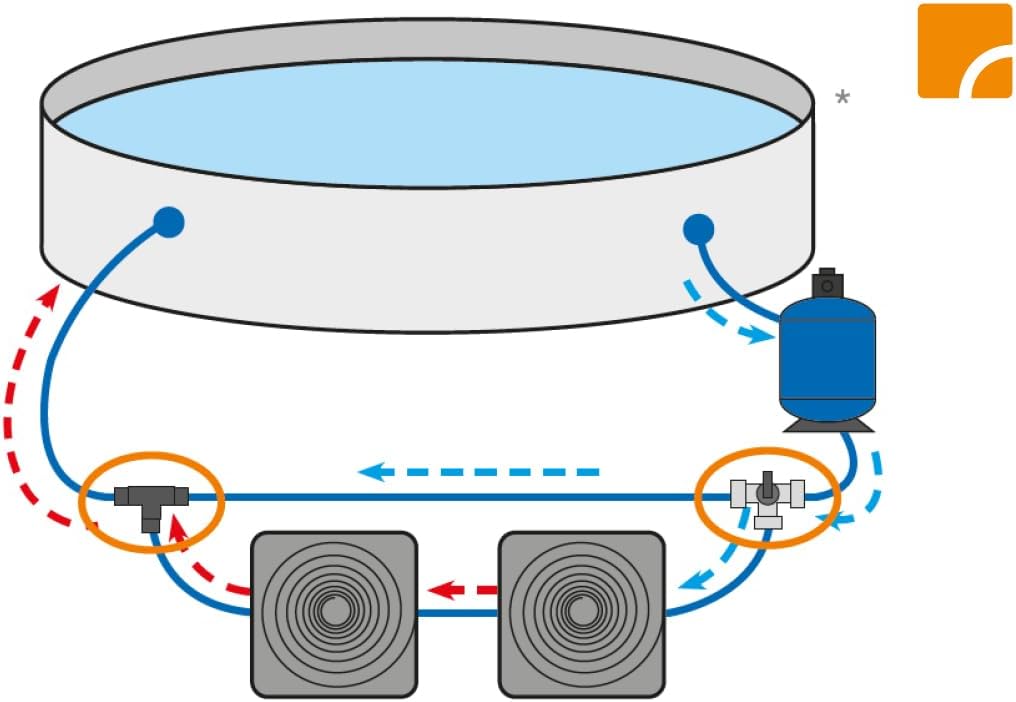
Image 3.2: Schematic for connecting the bypass set with a heat pump system. Water is diverted to the heat pump and then returned to the main circulation.

Image 3.3: Alternative schematic for connecting the bypass set with a solar collector system, illustrating the flow paths for heating and bypassing.
4. Operation
The three-way valve is the primary control for directing water flow through your heating system or bypassing it. Understanding its positions is key to efficient pool heating.
4.1 Valve Positions
- Heating Mode: When the valve is set to direct water through the heating system (e.g., solar collector or heat pump), water flows from the pool pump, through the heating device, and then back to the pool. This is used when you want to increase the pool temperature.
- Bypass Mode: When the valve is set to bypass the heating system, water flows directly from the pool pump back to the pool, without passing through the heating device. This mode is useful for maintaining temperature, preventing overheating, or during periods when heating is not desired (e.g., cold nights to prevent heat loss from solar panels).
- Flow Regulation: The valve can also be partially opened or closed to regulate the amount of water flowing through the heating system, allowing for fine-tuning of heating performance.
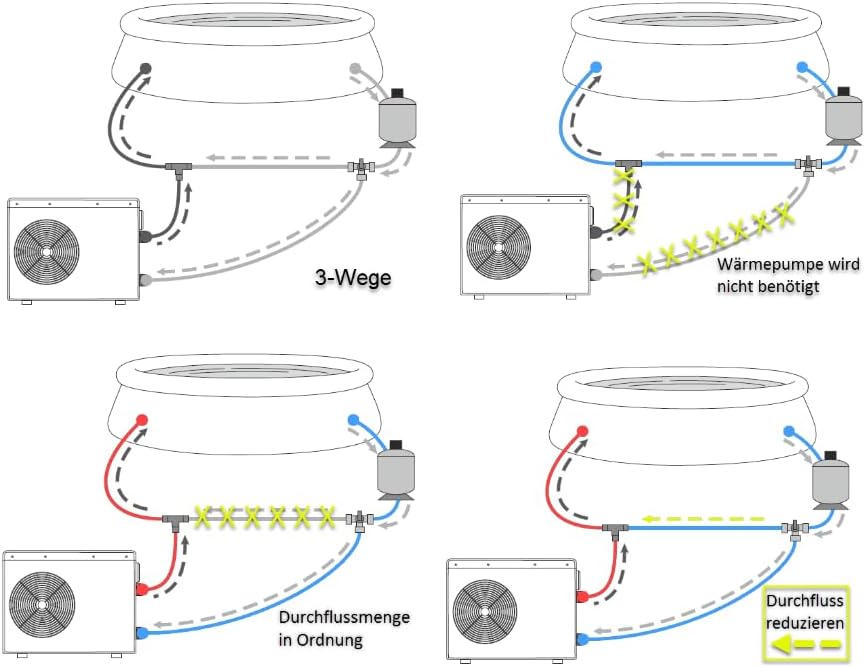
Image 4.1: This diagram illustrates various operational states of the bypass system with a heat pump. It shows configurations for full heating, complete bypass (heat pump not needed), and reduced flow through the heat pump for fine-tuned temperature control.
5. Maintenance
Regular maintenance ensures the longevity and optimal performance of your Steinbach Bypass-Set.
- Inspect Connections: Periodically check all hose connections and clamps for tightness. Ensure there are no leaks.
- Valve Operation: Operate the three-way valve periodically to ensure it moves freely and does not seize up.
- Winterization: During winter months or when the pool is not in use, ensure the bypass set is drained of water to prevent freezing and potential damage. Disconnect hoses and store components in a dry, frost-free location if necessary.
6. Troubleshooting
This section addresses common issues you might encounter with your bypass set.
6.1 Leaks at Hose Connections
If you observe water dripping from hose connections:
- Tighten Clamps: Ensure all hose clamps are securely tightened. Do not overtighten, as this can damage the hose or fitting.
- Apply Teflon Tape: For threaded connections, ensure sufficient Teflon sealing tape has been applied. If leaks persist, disassemble the connection, reapply Teflon tape generously, and reassemble.
- Check Hoses: Inspect hoses for cracks or damage that might be causing leaks. Replace damaged hoses as needed.
6.2 Reduced Water Flow
If water flow through your heating system or bypass seems restricted:
- Check Valve Position: Ensure the three-way valve is fully open in the desired direction (either to the heating system or bypass).
- Inspect for Obstructions: Check hoses and connections for any debris or blockages that might be impeding water flow.
- Pump Performance: Verify that your pool pump is operating correctly and providing adequate pressure.
7. Specifications
| Attribute | Specification |
|---|---|
| Model Number | 060045 |
| Brand | Steinbach |
| Hose Compatibility | 32 mm / 38 mm diameter |
| Product Dimensions (L x W x H) | 14 x 13.18 x 13.56 cm |
| Product Weight | 698.53 grams (1.54 lbs) |
| Material | Durable plastic and metal components |
| Included Components | 1 three-way valve, 1 T-connector, 3 hose nozzles, 6 hose clamps, 1 Teflon tape |
8. Warranty and Support
For warranty information or technical support regarding your Steinbach Bypass-Set, please refer to the documentation provided with your purchase or contact your retailer. You may also visit the official Steinbach website for further assistance.


