1. Introduction to TENS Therapy
The axion STIM PRO ECO is a compact and powerful Transcutaneous Electrical Nerve Stimulation (TENS) device designed for effective pain therapy. It utilizes electrical impulses to stimulate nerves, providing relief from acute and chronic pain without medication. This manual provides essential information for the safe and effective use of your device.
The device offers personalized pain therapy with individually adjustable parameters across 3 different TENS modes. It is suitable for various types of pain, including back pain, neck pain, headaches, joint pain, and muscle pain.

Image: The STIM PRO ECO device shown with various body areas where it can provide pain relief, such as the back, neck, and joints.
2. Safety Information and Warnings
The axion STIM PRO ECO is a CE-marked medical product, certified by a German manufacturer. Always read and understand all safety instructions before using the device. Improper use can lead to injury or device malfunction.
Important Safety Precautions:
- Do not use if you have a pacemaker, implanted defibrillator, or other metallic or electronic implanted devices.
- Do not use if you are pregnant.
- Do not use on areas of skin that are numb, broken, or have open wounds.
- Do not use near the heart, on the head, or over the carotid sinus nerves (front of the neck).
- Consult a physician before use if you have epilepsy, heart disease, or any other serious medical condition.
- Keep out of reach of children.
- Only use electrodes and accessories approved by axion.

Image: The STIM PRO ECO device highlighting its medical certification (Class IIa according to MDR (EU) 2017/745) and key features.
3. Package Contents
Your axion STIM PRO ECO package includes the following items:
- 1x axion STIM PRO ECO TENS Device
- 4x Self-adhesive Electrodes (5x5 cm)
- 2x Electrode Connection Cables
- 1x 9V Battery
- 1x Belt Clip
- 1x Storage Case
- 1x User Manual (this document)
- Electrode Placement Recommendation Cards

Image: All components of the axion STIM PRO ECO TENS device kit, neatly arranged.
4. Device Overview
Familiarize yourself with the different parts and controls of your STIM PRO ECO device.

Image: Front view of the STIM PRO ECO device with key controls labeled.
- Intensity Control (Channel 1 & 2 ON/OFF): Rotary knobs to adjust the intensity of the electrical impulses for each channel. Also serves as the ON/OFF switch.
- Activity Indicator (Channel 1 & 2 LED): Lights indicate active channels.
- Program Selection: Dial to select one of the three TENS modes (B: Burst, C: Normal, M: Modulation).
- Pulse Width (adjustable from 30 µs to 260 µs): Dial to set the duration of each electrical pulse.
- Frequency (adjustable from 2 Hz to 150 Hz): Dial to set the number of electrical pulses per second.
- Timer Setting (30 / 60 min, 'C' for continuous): Dial to set the treatment duration.
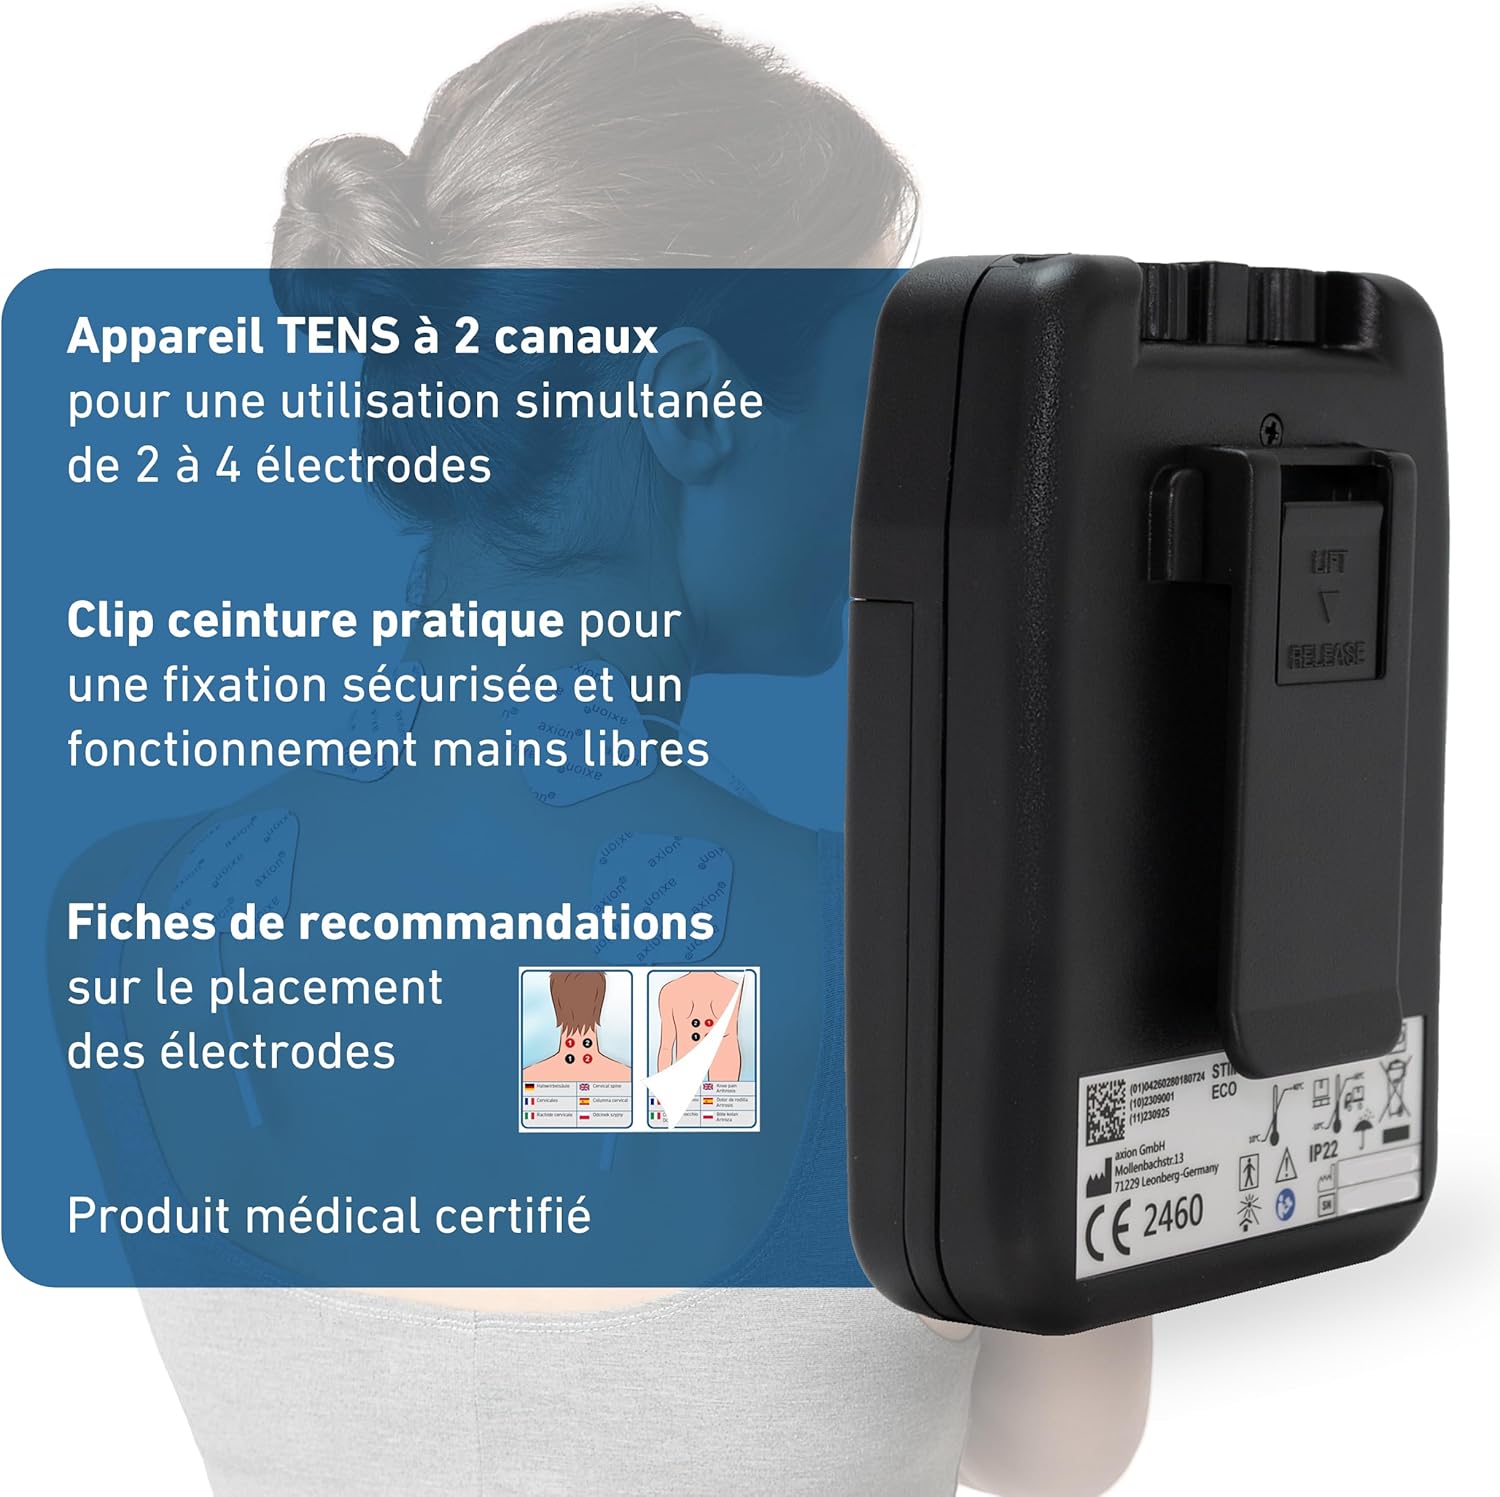
Image: Back view of the STIM PRO ECO device, illustrating the practical belt clip for hands-free operation.
5. Setup
5.1 Battery Installation
- Ensure the device is turned off (intensity knobs fully counter-clockwise).
- Open the battery compartment cover on the back of the device.
- Insert the 9V battery, matching the polarity (+/-) indicators.
- Close the battery compartment cover securely.
5.2 Connecting Electrodes
The STIM PRO ECO has 2 channels, allowing up to 4 electrodes to be used simultaneously.
- Connect the electrode cables to the output jacks at the top of the device.
- Attach the electrodes to the pins on the other end of the cables.
- Peel the electrodes from their protective film and apply them to clean, dry skin in the desired treatment area. Ensure good skin contact for optimal performance.

Image: The included 5x5 cm electrodes, highlighting their plug connection, suitability for various pain types, and reusability.
6. Operating Instructions
6.1 Turning On/Off
To turn on the device, slowly turn the intensity control knobs (1) clockwise until you hear a click. The activity indicator LEDs (2) will light up. To turn off, turn the intensity knobs fully counter-clockwise until they click off.
6.2 Mode Selection
Select your desired TENS mode using the Program Selection dial (3):
- C (Normal TENS): Continuous stimulation. This mode blocks pain signal transmission to the brain.
- B (Burst TENS): Intermittent bursts of stimulation. This mode stimulates the release of endorphins, the body's natural pain relievers.
- M (Modulation): The pulse width and/or frequency are varied automatically. This mode helps prevent the body from adapting to the stimulation, reducing the habituation effect.
6.3 Adjusting Pulse Width and Frequency
Use the Pulse Width dial (4) to set the duration of each electrical pulse (30 µs to 260 µs). Use the Frequency dial (5) to set the number of pulses per second (2 Hz to 150 Hz). These parameters allow for personalized treatment.
6.4 Adjusting Intensity
Slowly turn the intensity control knobs (1) clockwise to increase the intensity. Adjust until you feel a comfortable, strong, but not painful, tingling sensation. Each channel can be adjusted independently.
6.5 Setting the Timer
Use the Timer Setting dial (6) to choose the treatment duration:
- 30 min: Device will automatically turn off after 30 minutes.
- 60 min: Device will automatically turn off after 60 minutes.
- C (Continuous): Device will operate continuously until manually turned off.

Image: Visual representation of adjustable parameters (pulse width, intensity, frequency) and the three selectable TENS modes with their effects.
7. Electrode Placement
Correct electrode placement is crucial for effective TENS therapy. Always apply electrodes to clean, dry, intact skin. Avoid placing electrodes directly over joints, bony prominences, or areas with excessive hair.
For specific pain areas, refer to the included electrode placement recommendation cards. Generally, electrodes should be placed around the painful area, ensuring the electrical current passes through the affected region.
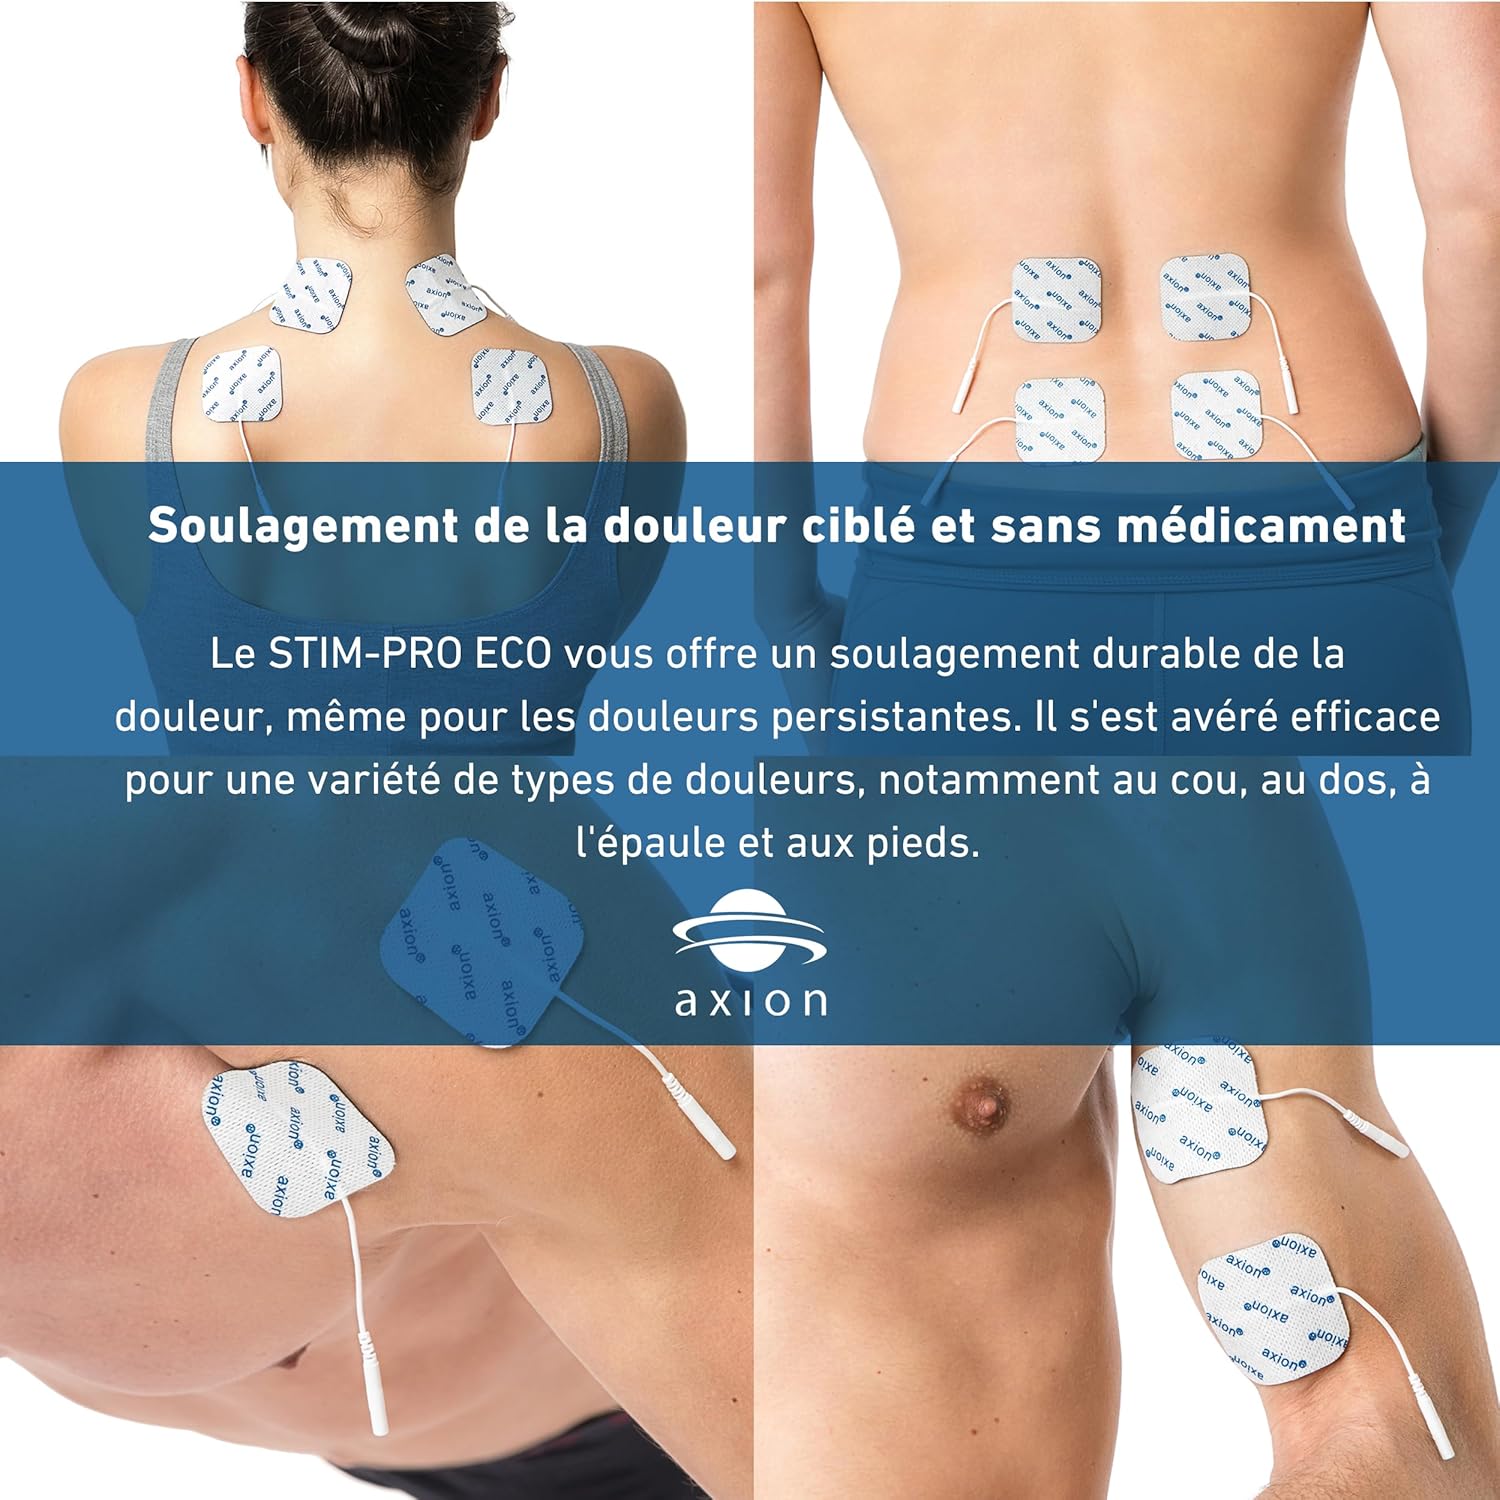
Image: Examples of electrode placement on various body parts for targeted pain relief, including the upper back, lower back, shoulder, and foot.

Image: A hand demonstrating how to peel an electrode from its backing. Electrodes are delivered in a sealed bag and can be stored on their backing between uses.
8. Maintenance
8.1 Cleaning the Device
Wipe the device with a soft, damp cloth. Do not use abrasive cleaners or immerse the device in water. Ensure the device is completely dry before storage or next use.
8.2 Electrode Care and Storage
After each use, carefully peel the electrodes from your skin and place them back onto their protective film. Store them in the sealed bag provided. If the electrodes lose their adhesiveness, they may need to be replaced. Replacement electrodes are available from axion.
8.3 Battery Replacement
When the device's performance diminishes or it fails to turn on, replace the 9V battery as described in Section 5.1. Dispose of used batteries according to local regulations.
9. Troubleshooting
| Problem | Possible Cause | Solution |
|---|---|---|
| No sensation or weak sensation |
|
|
| Device does not turn on |
|
|
| Skin irritation under electrodes |
|
|
10. Specifications
| Feature | Detail |
|---|---|
| Model Number | 1014 |
| Channels | 2 (for up to 4 electrodes) |
| TENS Modes | 3 (Normal, Burst, Modulation) |
| Pulse Width | Adjustable 30 µs - 260 µs |
| Frequency | Adjustable 2 Hz - 150 Hz |
| Intensity | Continuously adjustable 0 - 80 mA |
| Timer | 30 min, 60 min, Continuous |
| Power Source | 1x 9V Battery (included) |
| Manufacturer | axion GmbH |
| Medical Device Class | IIa (according to MDR (EU) 2017/745) |
| Package Dimensions | 23.1 x 20 x 5.6 cm |
| Weight | 570 grams (including packaging) |
11. Warranty and Support
The axion STIM PRO ECO device is manufactured by axion GmbH. For warranty information, please refer to the documentation included with your purchase or contact the manufacturer directly. As a certified medical product, it adheres to high quality standards.
If you have any questions regarding your TENS device, its operation, or need medical advice related to electrotherapy, axion's medical advisors are available to assist you via phone or chat. Please visit the official axion website for contact details.


