
1. Introduction
The Sewell WallBlade SW-33033 provides a clean and compliant solution for concealing power and audio/video cables behind wall-mounted televisions or other entertainment systems. This system allows for in-wall routing of power and low-voltage cables, enhancing the aesthetic of your installation while adhering to electrical safety standards.
2. Safety Information
- WARNING: Always turn off power at the circuit breaker before beginning any electrical installation. Failure to do so may result in serious injury or death.
- If you are unsure about any part of the installation process, consult a qualified electrician.
- Ensure all connections are secure and properly insulated.
- This product is designed for in-wall use with UL Listed NM-B cable, which is included.
- Adhere to all local electrical codes and regulations during installation.
- Do not exceed the electrical ratings of the product or connected devices.
3. Package Contents
Verify that all components are present before beginning installation:
- Top Wall Plate with Power Receptacle
- Bottom Wall Plate with Power Plug
- 10 Foot Extension Cable (for connecting the bottom plate to a wall outlet)
- 10 Foot In-Wall NM-B UL Listed Power Cable (for connecting the top and bottom plates)
4. Setup and Installation
Tools Required (Not Included):
- Stud Finder
- Drywall Saw or Utility Knife
- Measuring Tape
- Level
- Screwdriver (Phillips head)
- Wire Strippers
Installation Steps:
- Plan Placement: Determine the desired locations for the top and bottom wall plates. The top plate is typically placed behind the TV, and the bottom plate near an existing power outlet. Use a stud finder to ensure both locations are free of studs and other obstructions. Ensure the distance between the plates is within the length of the provided in-wall power cable (10 feet).
- Cut Wall Openings: Using the dimensions of the wall plates as a guide (or a template if provided with the physical product), carefully mark and cut two rectangular openings in the drywall. Ensure the openings are level and appropriately sized for the plates to fit snugly.
- Run In-Wall Power Cable: Feed the provided 10-foot NM-B UL Listed power cable through the wall cavity from the top opening to the bottom opening. Ensure the cable is not kinked or damaged during this process.
- Connect Power Plates:
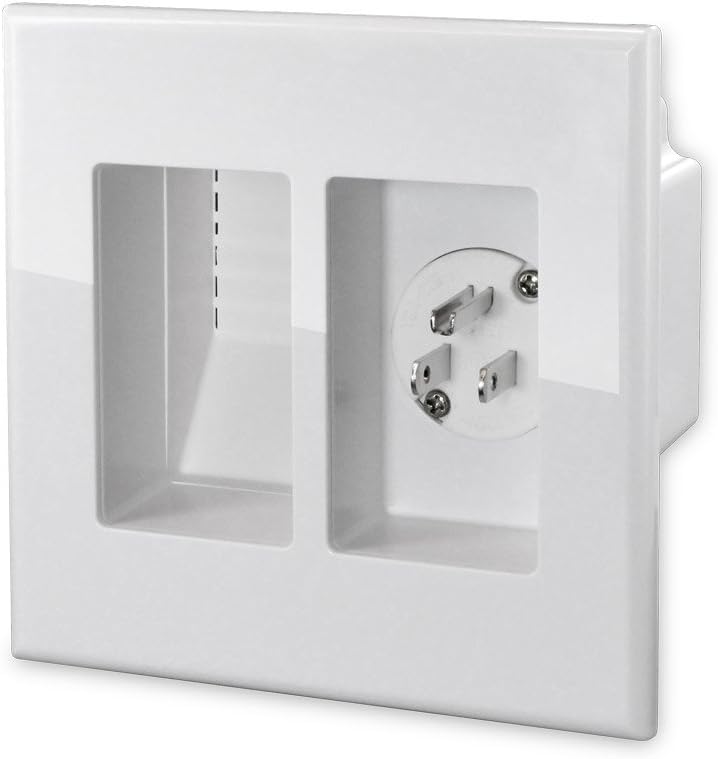
Figure 1: Rear view of the top wall plate with power receptacle.
- Carefully disassemble the cover plates from both the top and bottom units to access the wiring terminals.
- Strip approximately 1/2 inch of insulation from the ends of the black (hot), white (neutral), and bare copper (ground) wires of the in-wall NM-B cable.
- Connect the wires to the corresponding terminals on both the top (receptacle) and bottom (plug) plates. Typically, black connects to brass screws, white to silver screws, and bare copper to green ground screws. Ensure connections are tight and secure.
- Before reattaching the cover plates, ensure any low-voltage cables (HDMI, Ethernet, etc.) that will pass through the low-voltage opening are routed through the cover plate first. This prevents needing to remove the plate later.
- Secure Plates to Wall: Gently push the assembled top and bottom plates into their respective wall openings. Tighten the mounting screws on the plates. These screws will engage with tabs that secure the plate firmly against the drywall. Do not overtighten.
- Route Low-Voltage Cables: Feed your HDMI, Ethernet, or other low-voltage cables through the dedicated opening on both the top and bottom plates. This opening is designed to accommodate multiple cables.
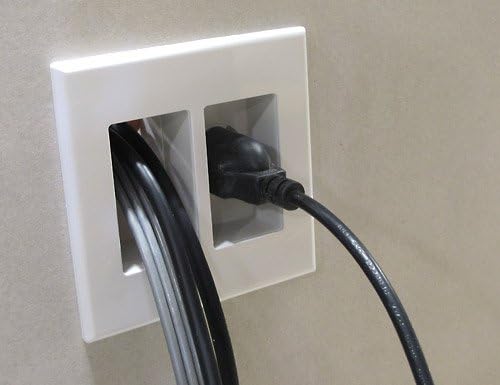
Figure 2: Installed WallBlade with power and low-voltage cables routed.
- Connect Extension Cable: Plug the provided 10-foot extension cable into the bottom wall plate's integrated plug, and then plug the other end into an existing wall outlet.
- Restore Power: Once all connections are secure and plates are mounted, restore power at the circuit breaker. Test the power receptacle on the top plate.
5. Operating Instructions
After successful installation, the Sewell WallBlade operates as a pass-through for both power and low-voltage cables.
- Plug your television or other powered device into the power receptacle on the top wall plate.
- Connect your HDMI, optical, Ethernet, or other low-voltage cables to their respective devices, routing them through the low-voltage opening in the wall plates.
- Ensure all cables are securely connected and not under excessive tension.
6. Maintenance
The Sewell WallBlade requires minimal maintenance.
- Periodically inspect the wall plates and cable connections for any signs of wear, damage, or looseness.
- Clean the surface of the wall plates with a soft, dry cloth. Avoid abrasive cleaners or solvents.
- Ensure the low-voltage cable opening remains clear of debris.
7. Troubleshooting
- No Power at Top Receptacle:
- Check that the circuit breaker for the wall outlet is ON.
- Ensure the 10-foot extension cable is securely plugged into both the bottom wall plate and the existing wall outlet.
- Verify that the in-wall NM-B cable connections to both the top and bottom plates are secure and correctly wired (black to brass, white to silver, ground to green).
- Cables Not Fitting Through Low-Voltage Opening:
- The low-voltage opening is designed for standard cable sizes. If a cable has an unusually large connector, it may not fit.
- Note that some flat-style power plugs may not fit optimally into the recessed simplex receptacle. Consider using a standard-shaped plug or an adapter if necessary.
- Wall Plates Feel Loose:
- Gently tighten the mounting screws on the wall plates until they are snug against the drywall. Do not overtighten, as this can damage the drywall or the plate.
8. Specifications
- Brand: Sewell
- Model Number: SW-33033
- Color: White
- Item Weight: 1.5 Pounds
- In-Wall Power Cable Length: 10 Feet
- Extension Cable Length: 10 Feet
- UL Listed: Yes
- Connector Gender: Male-to-Female (for extension cable)
- Plug Type: Type B (3-prong)
- Power Cord Prong Count: 3
9. Warranty and Support
For warranty information, technical assistance, or further inquiries regarding your Sewell WallBlade SW-33033, please contact Sewell customer support directly. Refer to the product packaging or the official Sewell website for current contact details.