Introduction
This manual provides comprehensive instructions for the setup, operation, and maintenance of your AT&T 1040 Corded Four-Line Expandable Telephone. This device is designed for small business environments, offering multi-line capabilities, conferencing, and intercom features to enhance communication efficiency.
Key features include:
- Four-line operation for managing multiple calls simultaneously.
- Integrated speakerphone for hands-free communication.
- 3-party conferencing capability.
- 32-number speed dial for quick access to frequently called numbers.
- Intercom functionality for internal communication.
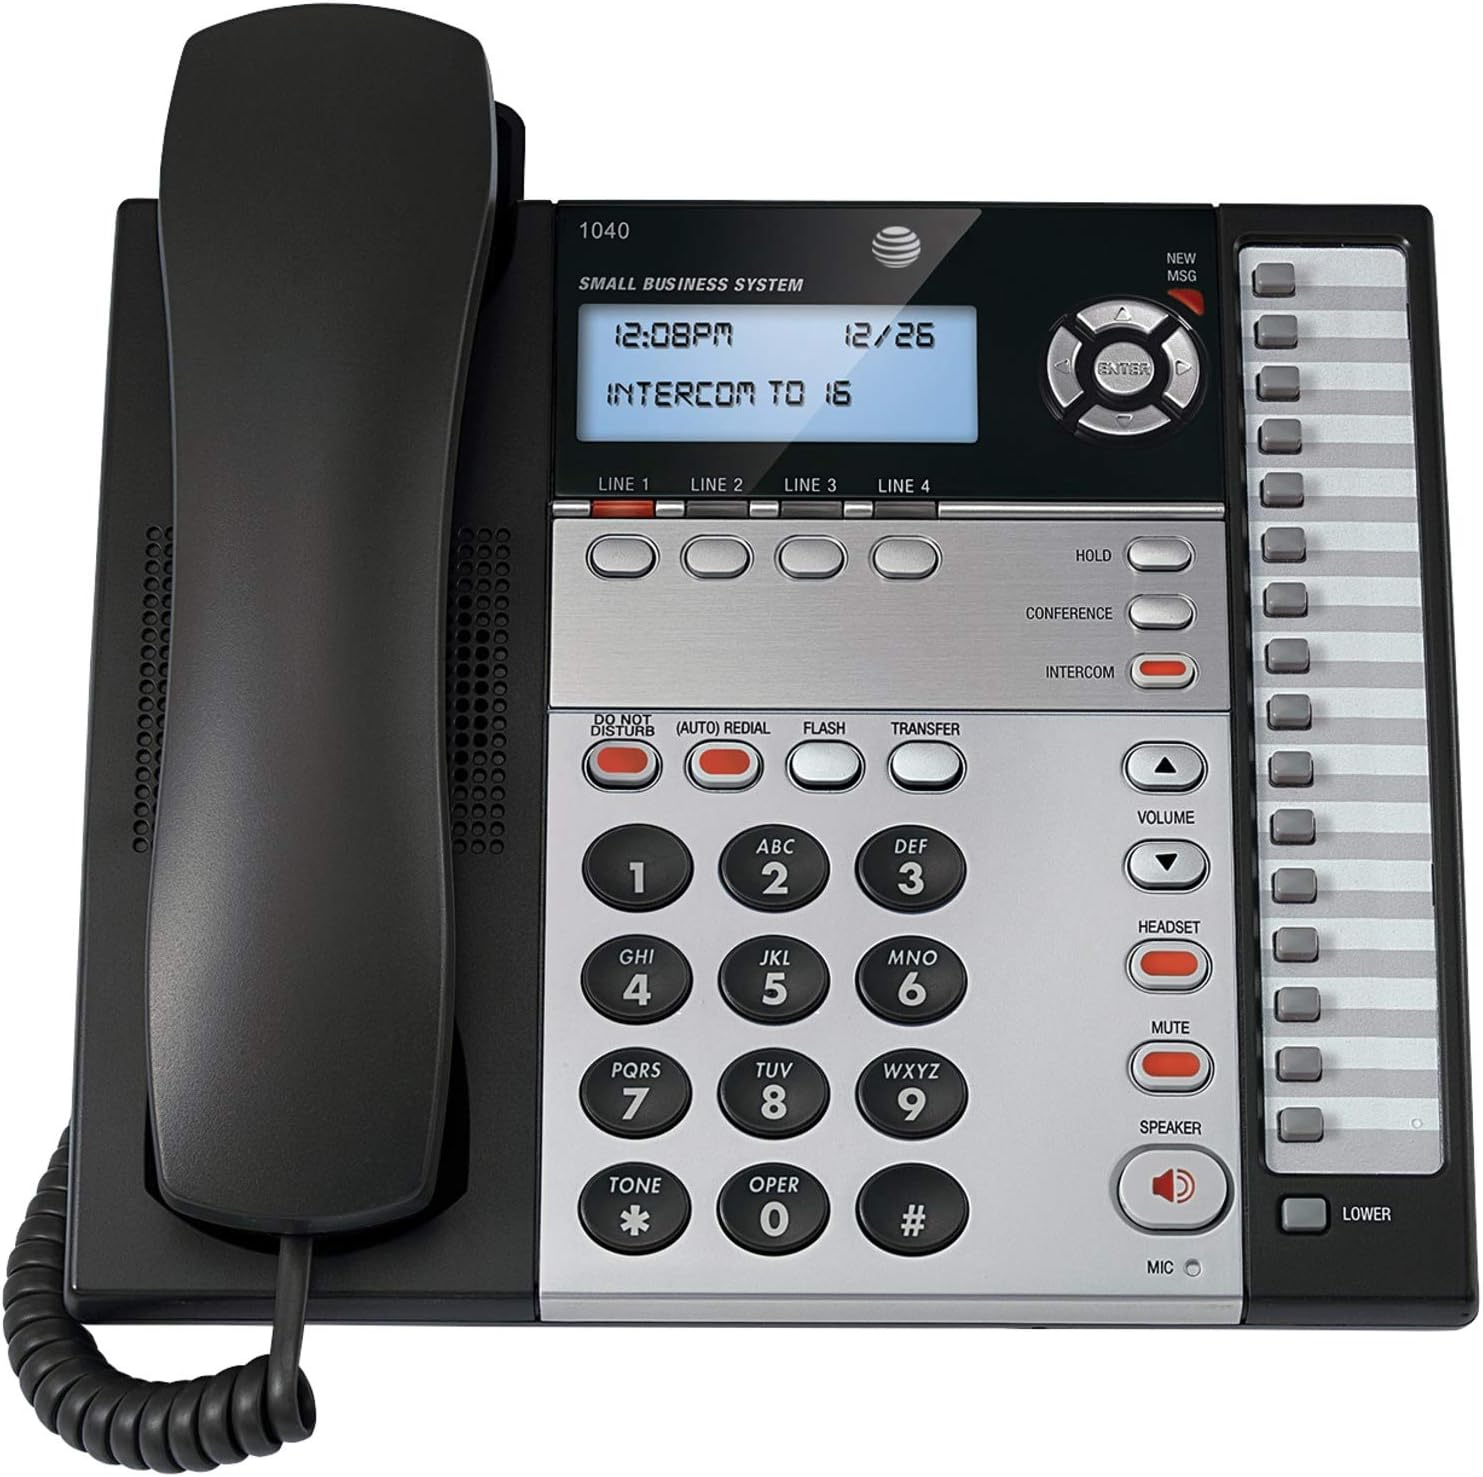
Figure 1: The AT&T 1040 Corded Four-Line Expandable Telephone. This image displays the main unit with its handset resting on the cradle, the digital display showing time and intercom status, the four line buttons, and the full keypad with function buttons like HOLD, CONFERENCE, INTERCOM, VOLUME, HEADSET, MUTE, and SPEAKER.
Setup
1. Unpacking and Component Check
Before beginning installation, ensure all components are present:
- AT&T 1040 Base Unit
- Handset
- Coiled Handset Cord
- Line Cords (up to 4, depending on configuration)
- AC Power Adapter
- 9V Battery (for backup, typically included or purchased separately)
2. Connecting the Telephone
- Connect the Handset: Plug one end of the coiled handset cord into the handset and the other end into the jack labeled HANDSET on the side of the telephone base.
- Connect the Line Cords: For each telephone line you wish to use, plug one end of a line cord into the jack labeled LINE 1, LINE 2, LINE 3, or LINE 4 on the back of the telephone base. Plug the other end of each line cord into a modular wall jack.
- Install the 9V Battery: Open the battery compartment on the bottom of the telephone base. Insert a 9V battery, observing the correct polarity (+/-). This battery provides backup power for settings during power outages. Close the compartment.
- Connect the AC Power Adapter: Plug the small end of the AC power adapter into the POWER jack on the back of the telephone base. Plug the larger end into a standard electrical outlet.
3. Initial Configuration (Date and Time)
Upon first power-up or after a power outage (if battery backup is not present or depleted), you may need to set the date and time. Refer to the display and use the navigation buttons (up/down arrows and ENTER) to adjust the settings. Press ENTER to confirm each setting.
Operating Instructions
1. Basic Call Functions
- Making a Call:
- Lift the handset or press the SPEAKER button.
- Select an available line by pressing one of the LINE 1-4 buttons.
- Dial the desired telephone number.
- Answering a Call:
- When the phone rings, lift the handset or press the SPEAKER button. The corresponding line button will flash.
- Ending a Call:
- Place the handset back in the cradle or press the SPEAKER button again if using speakerphone.
2. Multi-Line Operation
- Selecting a Line: Press the desired LINE 1-4 button to select an available line for making or receiving calls.
- Switching Between Lines: During an active call on one line, press another LINE button to switch to that line or answer an incoming call on it. The first call will automatically be placed on hold.
3. Speakerphone
To use the speakerphone, press the SPEAKER button. The indicator light will illuminate. You can then dial or speak hands-free. Press the SPEAKER button again to end the call or switch to the handset by lifting it.
4. Intercom
The intercom feature allows internal communication between connected AT&T 1040 units. To initiate an intercom call:
- Press the INTERCOM button.
- Dial the extension number of the desired internal unit (e.g., "16" as shown on the display).
- The other unit will ring, and you can speak when answered.
5. Hold Function
To place an active call on hold, press the HOLD button. The line indicator light will flash slowly. To retrieve the call, press the flashing LINE button.
6. Conference Call
To establish a 3-party conference call:
- Establish a call on LINE 1.
- Press the HOLD button to place the first call on hold.
- Select an available line (e.g., LINE 2) and dial the second party.
- Once the second party answers, press the CONFERENCE button. All three parties will now be connected.
7. Speed Dial
The AT&T 1040 supports 32-number speed dial entries.
- Programming Speed Dial: Consult the full manual for detailed programming steps, typically involving a PROGRAM or STORE button followed by a memory location and the number.
- Using Speed Dial: Lift the handset or press SPEAKER, select a line, then press the speed dial memory location button.
8. Volume Control
Use the VOLUME up (▲) and down (▼) buttons to adjust the listening volume during a call (handset or speakerphone). Ringer volume can typically be adjusted via a switch or menu setting on the base unit.
9. Mute
During a call, press the MUTE button to temporarily disable your microphone. The other party will not hear you, but you can still hear them. Press MUTE again to resume speaking.
10. Do Not Disturb
Press the DO NOT DISTURB button to silence incoming calls. The indicator light will illuminate. Press it again to deactivate.
11. Redial
Press the (AUTO) REDIAL button to automatically redial the last number called.
12. Flash / Transfer
The FLASH button is used for accessing network features such as call waiting or transferring calls, depending on your telephone service provider. The TRANSFER button is typically used in conjunction with intercom or other system features to transfer an external call to another internal extension.
13. Headset Operation
To use a headset (not included), plug it into the HEADSET jack on the side of the telephone base. Press the HEADSET button to activate headset mode. The indicator light will illuminate. Press it again to deactivate or switch to handset/speakerphone.
Maintenance
1. Cleaning
Wipe the telephone's exterior with a soft, slightly damp cloth. Do not use cleaning sprays or abrasive cleaners, as these can damage the finish or internal components. Ensure the phone is unplugged from power before cleaning.
2. Battery Replacement
The 9V battery provides backup for settings. If the display shows incorrect time/date after a power outage, the battery may need replacement. Open the battery compartment on the bottom of the unit, remove the old battery, and insert a new 9V alkaline battery, observing polarity. Dispose of old batteries responsibly.
3. General Care
Avoid exposing the telephone to extreme temperatures, direct sunlight, or moisture. Do not drop the unit or subject it to strong impacts. Keep it away from sources of electrical noise, such as motors or fluorescent lighting fixtures.
Troubleshooting
| Problem | Solution |
|---|---|
| No dial tone. |
|
| Cannot make or receive calls. |
|
| Display is blank or unreadable. |
|
| Intercom not working. |
|
Specifications
- Product Dimensions: 10.2 x 11.5 x 4.5 inches
- Item Weight: 0.16 ounces (4.54 g)
- Telephone Type: Corded
- Power Source: Corded Electric
- Dialer Type: Single Keypad
- Answering System Type: Digital
- Conference Call Capability: 3-way
- Multiline Operation: Multi-Line Operation (Four-Line)
- Speed Dial Capacity: 32 numbers
- Intercom: Yes
Warranty and Support
For warranty information and technical support, please refer to the official AT&T product website or contact AT&T customer service. Keep your purchase receipt as proof of purchase for warranty claims.
Online resources may include FAQs, additional troubleshooting guides, and contact information for support.


