
Introduction
The Zoom R8 is a versatile multi-track tabletop recorder, audio interface, and controller designed for musicians and producers. It features 2 XLR combo inputs, 8 tracks for simultaneous recording, a built-in stereo condenser microphone, a pad sampler, and a rhythm machine. This manual provides detailed instructions for setting up, operating, and maintaining your Zoom R8 to ensure optimal performance and longevity.

Figure 1: Top view of the Zoom R8 Multi-Track Tabletop Recorder, showing the main controls, faders, and display screen.
Setup
1. Powering the R8
The Zoom R8 can be powered by four AA batteries or via a USB power adapter (not included). For extended use, a USB power adapter is recommended.
- Battery Installation: Open the battery compartment on the bottom of the unit. Insert four AA batteries, ensuring correct polarity.
- USB Power: Connect a USB power adapter to the USB port on the side of the R8.

Figure 2: Underside of the Zoom R8, illustrating the battery compartment with four AA batteries installed.
2. Inserting an SD Card
The R8 records directly to an SD or SDHC card (up to 32GB). Ensure the card is properly formatted before use.
- Locate the SD card slot on the right side of the R8.
- Insert the SD card with the contacts facing down until it clicks into place.
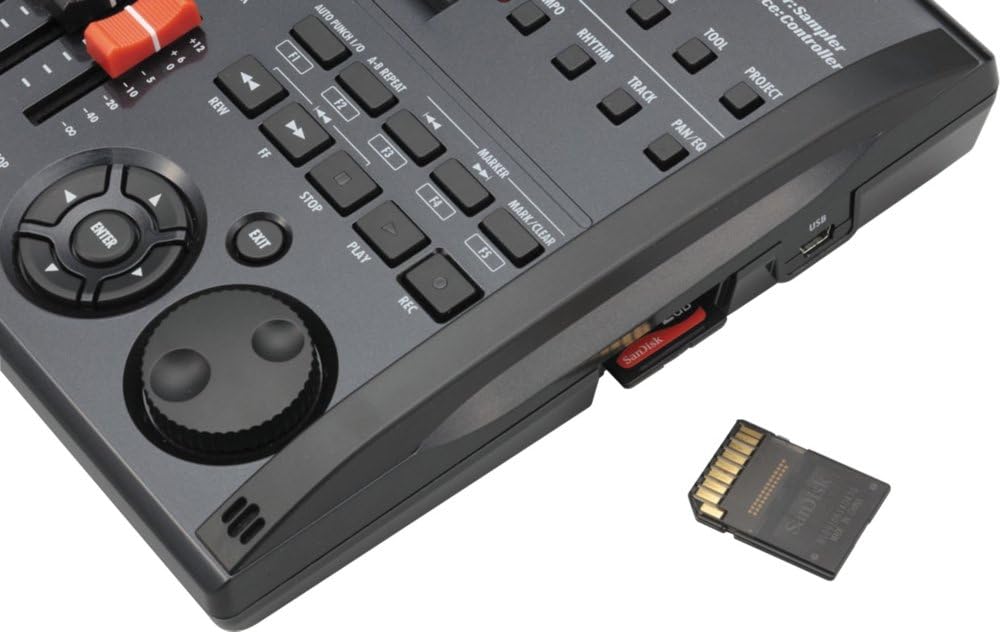
Figure 3: Close-up view of the Zoom R8's side, showing the SD card slot with an SD card partially inserted.
3. Connecting Inputs and Outputs
The R8 features 2 XLR/TRS combo inputs, allowing connection of microphones, guitars, basses, and line-level devices. Outputs include a stereo line out and a headphone jack.
- Inputs: Connect your microphones or instruments to INPUT 1 or INPUT 2 on the rear panel.
- Outputs: Connect your headphones to the PHONES jack or your monitors to the OUTPUT L/R jacks.
- Phantom Power: For condenser microphones, activate the PHANTOM power switch located above INPUT 2.

Figure 4: Rear panel of the Zoom R8, displaying the power switch, control input, phones output, main outputs (L/R), and two XLR/TRS combo inputs.
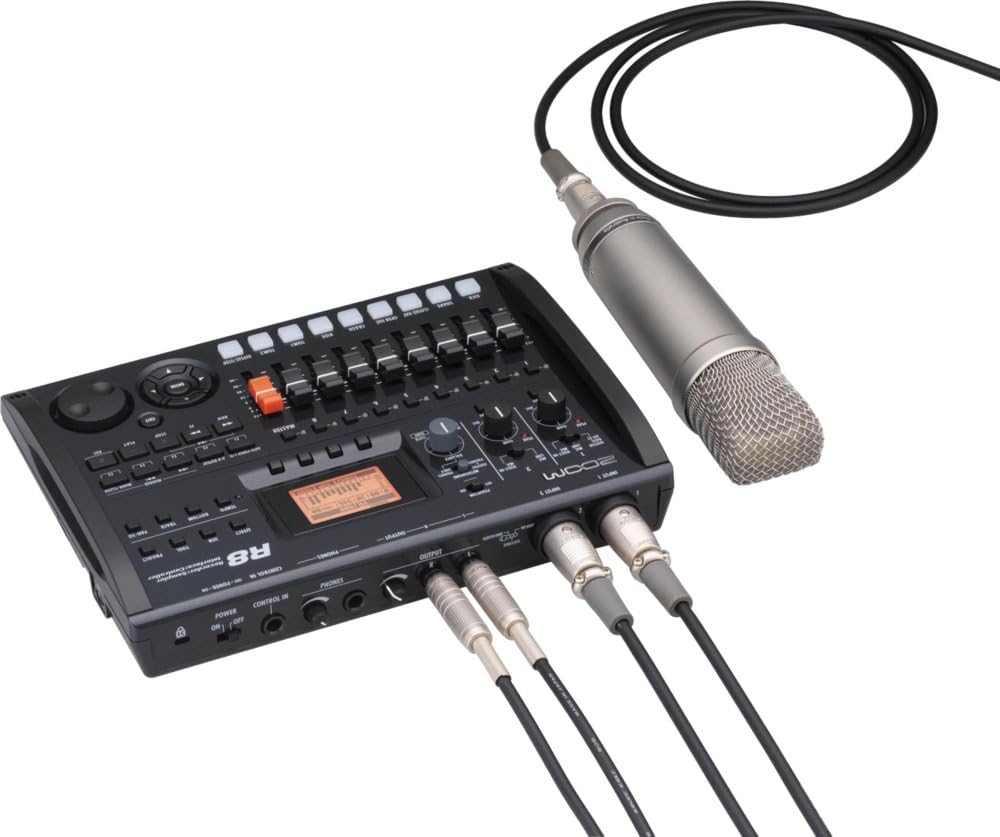
Figure 5: The Zoom R8 connected to an external condenser microphone via XLR and to studio monitors via TRS cables, demonstrating a typical recording setup.
Operating Instructions
1. Basic Recording
The R8 allows for 8-track simultaneous recording and 16-track playback. Follow these steps for basic recording:
- Power On: Flip the POWER switch on the rear panel to the ON position.
- Select Input Source: Use the INPUT 1/2 switches on the top panel to select between GUITAR/BASS (Hi-Z), MIC/LINE, or BUILT-IN MIC.
- Adjust Input Gain: Turn the GAIN knobs for INPUT 1 and INPUT 2 to set appropriate input levels. Monitor the PEAK indicators to avoid clipping.
- Arm Tracks: Press the REC (record) button for the desired track(s) (1-8) to arm them for recording. The track's LED will light red.
- Start Recording: Press the REC button (main transport control) followed by the PLAY button to begin recording.
- Stop Recording: Press the STOP button to end recording.
- Playback: Press the PLAY button to listen to your recorded tracks.

Figure 6: Top-down view of the Zoom R8, highlighting the input controls, faders for each track, master fader, and transport controls for recording and playback.
2. Using the Built-in Stereo Microphones
The R8 features built-in stereo condenser microphones for quick and convenient recording of ambient sounds, rehearsals, or acoustic instruments.
- Set the INPUT 1/2 switch to BUILT-IN MIC.
- Arm tracks 1 and 2 for stereo recording.
- Adjust the GAIN for both inputs.
- Proceed with recording as described in the "Basic Recording" section.
3. Pad Sampler and Rhythm Machine
The R8 includes a pad sampler and a rhythm machine for creating beats and triggering samples.
- Pad Sampler: Press the SAMPLER button to enter sampler mode. Use the 8 pads (KICK, SNARE, etc.) to trigger pre-loaded or user-recorded samples.
- Rhythm Machine: Press the RHYTHM button to access the rhythm machine. Select from various drum patterns and adjust tempo using the TEMPO knob.

Figure 7: The Zoom R8's LCD screen displaying a rhythm pattern grid, indicating the visual interface for the rhythm machine and sampler functions.
4. Using as an Audio Interface/Controller
The R8 can function as a 2-in/2-out USB audio interface and a control surface for your Digital Audio Workstation (DAW).
- Audio Interface: Connect the R8 to your computer via USB. Select the R8 as your audio input/output device in your DAW settings.
- Control Surface: Press the CONTROL IN button to activate controller mode. The R8's faders and transport controls can then be mapped to control your DAW.
Maintenance
Proper maintenance ensures the longevity and optimal performance of your Zoom R8.
- Cleaning: Use a soft, dry cloth to clean the exterior of the unit. Avoid abrasive cleaners or solvents.
- Storage: Store the R8 in a cool, dry place away from direct sunlight and extreme temperatures. If storing for an extended period, remove the batteries to prevent leakage.
- SD Card Care: Always safely eject the SD card from the R8 before removing it. Regularly back up your data from the SD card to a computer.
Troubleshooting
| Problem | Possible Cause | Solution |
|---|---|---|
| No power | Batteries drained or incorrectly inserted; USB power not connected or faulty. | Check battery polarity and charge/replace batteries. Ensure USB power adapter is working and connected securely. |
| No sound from outputs | Volume levels too low; incorrect input/output routing; headphones/monitors not connected or faulty. | Increase master volume and individual track faders. Verify input source selection and output connections. Test with different headphones/monitors. |
| Cannot record | Track not armed; SD card full or not inserted; input gain too low. | Press the REC button for the desired track. Insert/replace SD card. Adjust input gain. |
| Distorted audio | Input gain too high (clipping); incorrect input impedance (e.g., Hi-Z not selected for guitar). | Reduce input gain until PEAK indicator no longer lights. Ensure correct input type is selected (e.g., GUITAR/BASS for instruments). |
Specifications
- Recording Tracks: 8 simultaneous recording tracks, 16 playback tracks
- Recording Format: 16/24-bit/44.1kHz linear PCM in WAV format
- Inputs: 2 x XLR/TRS Combo Inputs (with phantom power on INPUT 2)
- Microphones: Built-in stereo condenser microphones
- Storage: Supports SD/SDHC cards up to 32GB
- Interface: USB Audio Interface, Control Surface
- Power: 4 x AA batteries (included) or USB power adapter
- Dimensions: 10.12 x 7.48 x 2.01 inches (Product Dimensions from specs)
- Weight: 2.7 pounds (Item Weight from specs)
- Battery Type: Alkaline (from specs)
- Headphones Jack: 3.5 millimeters (from specs)
Warranty & Support
For warranty information, product registration, and technical support, please visit the official Zoom website or contact their customer service. Keep your proof of purchase for warranty claims.
Official Zoom Website: www.zoom-na.com
For additional support, you may refer to the official user manual PDF available at: Zoom R8 User Manual (PDF)


