
1. Introduction
This manual provides essential information for the installation, operation, and maintenance of your Pro Comp LL5025 2.5" Level Lift Kit. This kit is designed to provide a 2.5-inch front lift, leveling the stance of your Toyota Tundra (1999-2006) or Toyota Sequoia (2000-2007). Please read these instructions thoroughly before beginning installation to ensure proper fitment and safe operation.
2. Safety Information
- Professional Installation Recommended: Installation of this lift kit requires specialized tools and automotive knowledge. It is highly recommended that installation be performed by a certified professional.
- Vehicle Support: Always use appropriate jack stands or a vehicle lift to securely support the vehicle during installation. Never work under a vehicle supported only by a jack.
- Personal Protective Equipment: Wear safety glasses, gloves, and other appropriate personal protective equipment during installation.
- Torque Specifications: Adhere strictly to all factory torque specifications for fasteners unless otherwise specified.
- Post-Installation Checks: After installation, perform a thorough inspection of all components, ensure proper alignment, and re-torque all fasteners after the first 500 miles of driving.
- Vehicle Handling: Modifying a vehicle's suspension can alter its handling characteristics. Drive cautiously until you are accustomed to the new vehicle dynamics.
3. Package Contents
Verify that all components are present before beginning installation. If any parts are missing or damaged, contact Pro Comp customer support immediately.
- Strut Spacers (2 units)
- Associated Mounting Hardware (bolts, nuts, washers)
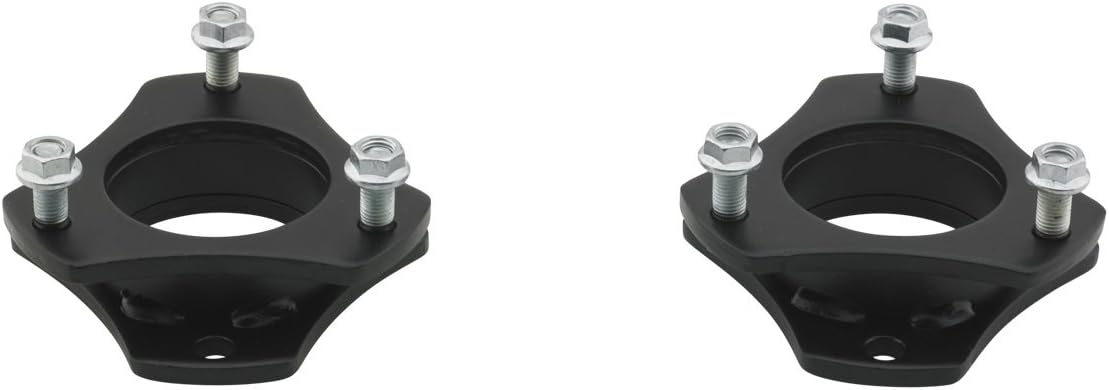
Image 1: Pro Comp LL5025 Strut Spacers. This image displays two black strut spacers, each with three silver-colored bolts protruding from the top surface, ready for installation.
4. Setup and Installation
This section provides a general overview of the installation process. Refer to a vehicle-specific service manual for detailed instructions on disassembling and reassembling your vehicle's front suspension components.
4.1. Required Tools and Materials
- Vehicle Lift or Jack and Jack Stands
- Standard Mechanic's Tool Set (sockets, wrenches, ratchets)
- Torque Wrench
- Wheel Chocks
- Penetrating Lubricant (optional)
4.2. Installation Steps (General)
- Prepare Vehicle: Park the vehicle on a level surface, engage the parking brake, and chock the rear wheels.
- Lift Vehicle: Safely lift the front of the vehicle using a vehicle lift or jack stands, ensuring the front wheels are off the ground.
- Remove Wheels: Remove the front wheels.
- Disconnect Suspension Components: Carefully disconnect necessary suspension components to allow for removal of the front strut assembly. This typically includes sway bar links, tie rod ends, and lower control arm bolts.
- Remove Strut Assembly: Unbolt and remove the factory front strut assembly from the vehicle.
- Install Strut Spacer: Attach the Pro Comp strut spacer to the top of the factory strut assembly using the provided hardware. Ensure proper orientation as per any markings on the spacer.
- Reinstall Strut Assembly: Reinstall the modified strut assembly back into the vehicle, securing it with factory hardware.
- Reconnect Components: Reconnect all previously disconnected suspension components.
- Torque All Fasteners: Using a torque wrench, tighten all fasteners to the vehicle manufacturer's specifications.
- Reinstall Wheels: Reinstall the front wheels and lower the vehicle.
- Final Checks: Perform a final visual inspection to ensure all components are correctly installed and tightened.
- Wheel Alignment: A professional wheel alignment is mandatory after installing any suspension lift kit to prevent premature tire wear and ensure proper vehicle handling.
5. Operating Considerations
After installing the Pro Comp LL5025 Level Lift Kit, be aware of the following operational changes:
- Center of Gravity: The vehicle's center of gravity will be slightly raised, which may affect handling, especially during sharp turns or emergency maneuvers.
- Braking: Braking performance should not be significantly affected, but always test braking in a safe environment after any suspension modification.
- Tire Clearance: The lift kit provides additional tire clearance, allowing for larger tires if desired. Ensure any new tires clear all suspension and body components throughout the full range of steering and suspension travel.
6. Maintenance
Regular maintenance is crucial for the longevity and safe operation of your vehicle after a lift kit installation.
- Initial Re-torque: Re-torque all suspension fasteners, especially those related to the lift kit, after the first 500 miles of driving.
- Periodic Inspection: Periodically inspect all suspension components, including the strut spacers, for signs of wear, damage, or loose fasteners. This should be done during routine vehicle maintenance.
- Alignment Checks: Have your wheel alignment checked annually or whenever you notice uneven tire wear or changes in steering behavior.
7. Troubleshooting
If you encounter issues after installation, consider the following common troubleshooting steps:
- Uneven Stance:
- Verify that the correct spacers are installed on the correct side of the vehicle (if applicable).
- Ensure all components are fully seated and torqued.
- Unusual Noises (Clunking, Squeaking):
- Check all fasteners for proper torque.
- Inspect for any components making contact with each other that should not be.
- Ensure all bushings are properly seated and lubricated if necessary.
- Steering or Handling Issues:
- Immediately have a professional wheel alignment performed.
- Inspect steering and suspension components for damage or incorrect installation.
If problems persist, contact Pro Comp customer support or a qualified automotive technician.
8. Specifications
| Brand | PRO COMP |
| Model Number | LL5025 (Manufacturer Part Number: 65175) |
| Included Components | Strut Spacer |
| Maximum Lifting Height | 2.5 Inches |
| Item Weight | 7.23 pounds |
| Package Dimensions | 13.9 x 6.9 x 3.8 inches |
| Compatible Vehicles | Toyota Tundra (1999-2006), Toyota Sequoia (2000-2007) |
| UPC | 614901022353 |
9. Warranty and Support
For specific warranty information, technical support, or to inquire about replacement parts, please contact Pro Comp directly through their official website or customer service channels. Keep your purchase receipt as proof of purchase.
Note: Unauthorized modifications or improper installation may void the product warranty.


