NEC NP-P350X LCD Projector User Manual
Model: NP-P350X
1. Introduction
Thank you for purchasing the NEC NP-P350X LCD Projector. This manual provides essential information for the safe and efficient use of your projector. Please read this manual thoroughly before operating the unit and keep it for future reference. The NP-P350X is designed for professional installation environments, offering high brightness, excellent contrast, and versatile connectivity for various presentation needs.
2. Safety Information
Always observe the following safety precautions to prevent fire, electric shock, or injury.
- Do not block ventilation openings. Ensure adequate space around the projector for proper airflow.
- Do not expose the projector to rain or moisture.
- Do not open the projector casing. Refer all servicing to qualified service personnel.
- Use only the power cord supplied with the projector or a suitable replacement.
- Avoid looking directly into the lens when the projector is on, as the bright light can damage your eyes.
- Disconnect the power cord from the wall outlet if the projector will not be used for an extended period.
3. Package Contents
Verify that all items listed below are included in your package:
- NEC NP-P350X Projector Unit
- Power Cord
- Remote Control with Batteries
- VGA Cable
- User Manual (this document)
- CD-ROM (Software/Drivers)
4. Setup
4.1 Physical Placement
The NP-P350X projector can be placed on a table, mounted on the ceiling, or used for front or rear projection. Ensure the projection surface is flat and perpendicular to the projector lens for optimal image geometry. Maintain adequate distance from the screen based on desired image size.
4.2 Connecting Devices
The NEC NP-P350X offers a wide range of input and output ports for various devices. Refer to the image below for port identification.
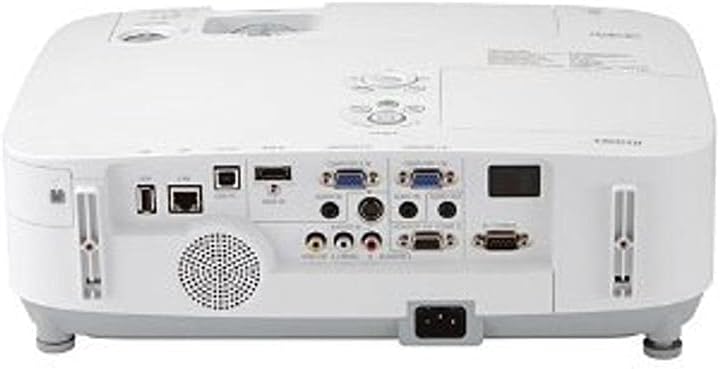
This image displays the rear panel of the NEC NP-P350X projector, highlighting its comprehensive array of connectivity options. From left to right, key ports include USB-A, USB-B, LAN (RJ45), two VGA (D-sub 15-pin) inputs, S-Video, composite video (RCA), audio inputs (RCA and 3.5mm mini-jack), audio output (3.5mm mini-jack), and a serial port (RS-232C). The power input socket is located at the bottom center.
To connect a device:
- Connect your video source (e.g., computer, DVD player) to the appropriate input port on the projector (e.g., VGA, HDMI, S-Video, Composite Video).
- For audio, connect your audio source to the corresponding audio input jacks.
- For network control or data transfer, connect an Ethernet cable to the RJ45 LAN port.
- Plug the power cord into the projector's AC inlet and then into a grounded electrical outlet.
4.3 Power On/Off
- Power On: Press the power button on the projector's control panel or the remote control. The power indicator light will turn green.
- Power Off: Press the power button twice. The projector will enter cooling mode, and the power indicator will blink. Once cooling is complete, the indicator will turn red. Do not unplug the projector during the cooling cycle.
5. Operating
5.1 Basic Operation
- Input Selection: Use the 'Input' button on the remote or control panel to cycle through available input sources (e.g., Computer 1, Computer 2, Video, S-Video, HDMI).
- Menu Navigation: Press the 'Menu' button to access the On-Screen Display (OSD). Use the arrow keys to navigate and 'Enter' to select options. Press 'Menu' again to exit.
5.2 Image Adjustment
- Focus: Rotate the focus ring on the lens until the image is sharp.
- Zoom: Adjust the zoom ring on the lens to change the image size.
- Keystone Correction: If the image appears trapezoidal, use the 'Keystone' function in the OSD menu to correct it.
- Brightness/Contrast: Adjust these settings in the 'Picture' menu of the OSD to suit your viewing environment.
5.3 Advanced Features
- Network Control: The projector supports network control via the RJ45 port, allowing remote management and monitoring. Refer to the network guide on the CD-ROM for detailed setup.
- Eco Mode: Activate Eco Mode to reduce lamp power consumption, extend lamp life, and lower fan noise. This can be found in the 'Setup' menu.
6. Maintenance
Regular maintenance ensures optimal performance and extends the lifespan of your projector.
6.1 Cleaning
- Lens: Use a soft, lint-free cloth specifically designed for optical lenses. Do not use abrasive cleaners.
- Casing: Wipe the projector casing with a soft, dry cloth. For stubborn dirt, use a cloth lightly dampened with water and a mild detergent, then wipe dry.
6.2 Lamp Replacement
The lamp life indicator will notify you when the lamp needs replacement. Always use genuine NEC replacement lamps.
- Turn off the projector and unplug the power cord. Allow the projector to cool down for at least 45 minutes.
- Locate the lamp cover (usually on the top or side) and remove the screw(s) securing it.
- Carefully pull out the old lamp module.
- Insert the new lamp module, ensuring it is seated correctly.
- Replace the lamp cover and secure it with the screw(s).
- Reset the lamp timer in the projector's OSD menu.
6.3 Filter Cleaning/Replacement
The air filter prevents dust from entering the projector. Clean it regularly, especially in dusty environments.
- Turn off the projector and unplug the power cord.
- Locate the air filter cover (refer to the projector diagram in the full manual).
- Remove the filter and clean it using a vacuum cleaner or by gently tapping out the dust. If heavily soiled or damaged, replace it with a new filter.
- Reinsert the clean/new filter and close the cover.
7. Troubleshooting
If you encounter issues with your projector, refer to the following common problems and solutions:
| Problem | Possible Cause | Solution |
|---|---|---|
| No image displayed | Incorrect input source selected; Loose cable connection; Projector in standby mode. | Select correct input source; Check all cable connections; Press power button to wake up. |
| Image is blurry | Lens out of focus. | Adjust the focus ring on the lens. |
| Image is trapezoidal | Projector not perpendicular to screen. | Adjust projector angle or use keystone correction in the OSD menu. |
| Projector overheats and shuts down | Blocked ventilation; Dirty air filter. | Ensure clear ventilation paths; Clean or replace air filter. |
| Remote control not working | Dead batteries; Obstruction between remote and projector. | Replace batteries; Ensure clear line of sight to IR receiver. |
8. Specifications
Detailed technical specifications for the NEC NP-P350X Projector:
- Model: NP-P350X
- Display Type: LCD; 0.63" LCD with MLA
- Native Resolution: XGA (1024 x 768)
- Maximum Resolution: UXGA (1600 x 1200)
- Brightness: 3500 Lumens
- Contrast Ratio: 2000:1
- Aspect Ratio(s): 16:9 (Native), 4:3 (Compatible)
- Connectivity Technology: HDMI, Wireless (optional adapter), VGA (D-sub 15-pin), S-Video, Composite Video, USB-A, USB-B, RJ45 (LAN), RS-232C
- Special Feature: Built-in speakers
- Product Dimensions: 19 x 15.5 x 9 inches
- Item Weight: 11.95 pounds
- Manufacturer: Nectron
- First Available: February 3, 2011
9. Warranty and Support
For warranty information and technical support, please refer to the warranty card included with your product or visit the official NEC Display Solutions website. Keep your purchase receipt as proof of purchase for warranty claims. Online resources, FAQs, and driver downloads may also be available on the manufacturer's support pages.


