1. Introduction
The Sealey MS016 Fork Seal Driver is a specialized tool designed for the efficient and safe installation of fork seals on motorcycles and other vehicles with telescopic forks. This tool helps to prevent damage to new fork seals and fork tubes during the installation process, ensuring a proper fit and extending the lifespan of the seals. Its adjustable design accommodates a range of fork sizes, making it a versatile addition to any mechanic's toolkit.

Figure 1: The Sealey MS016 Fork Seal Driver in its assembled state, ready for use. This image shows the knurled grip and the adjustable segments.
2. Safety Information
Always observe the following safety precautions when using the Sealey MS016 Fork Seal Driver:
- Wear appropriate personal protective equipment (PPE), including safety glasses, to protect against potential debris or splashes.
- Ensure the work area is clean, well-lit, and free from obstructions.
- Inspect the tool before each use for any signs of damage or wear. Do not use a damaged tool.
- Ensure the fork tube and new seal are clean and free of any burrs or sharp edges that could damage the seal or the tool.
- Do not force the tool. If the seal is not seating properly, re-evaluate the alignment and the condition of the fork components.
- Keep hands and fingers clear of pinch points during operation.
- Store the tool safely when not in use, away from moisture and extreme temperatures.
3. Package Contents
The Sealey MS016 Fork Seal Driver package typically includes the following components:
- 1 x Fork Seal Driver (35-55mm adjustable)

Figure 2: The individual components of the Sealey MS016 Fork Seal Driver, showing the two main halves and the adjustable inner ring.
4. Setup and Adjustment
The Sealey MS016 Fork Seal Driver is designed for easy adjustment to fit various fork seal sizes within its specified range (35-55mm). Follow these steps to prepare the tool for use:
- Identify Fork Tube Diameter: Before using the tool, accurately measure the diameter of the fork tube where the seal will be installed. This measurement is crucial for proper tool adjustment.
- Disassemble the Driver: The driver consists of two main halves and an inner adjustable ring. Separate the two halves of the driver.
- Adjust Inner Ring: The inner ring has adjustable segments. Loosen the small screws on the inner ring to allow the segments to move freely.
- Fit to Fork Tube: Place the inner ring around the fork tube, just above where the new seal will sit. Adjust the segments so they snugly fit the fork tube diameter. Tighten the small screws on the inner ring to secure its position. This ensures the driver will apply even pressure around the seal.
- Reassemble Driver Halves: Bring the two main halves of the driver together around the adjusted inner ring and the fork tube. Ensure they align correctly and can slide freely along the fork tube. The tool should fit securely around the fork tube without excessive play, but also without binding.
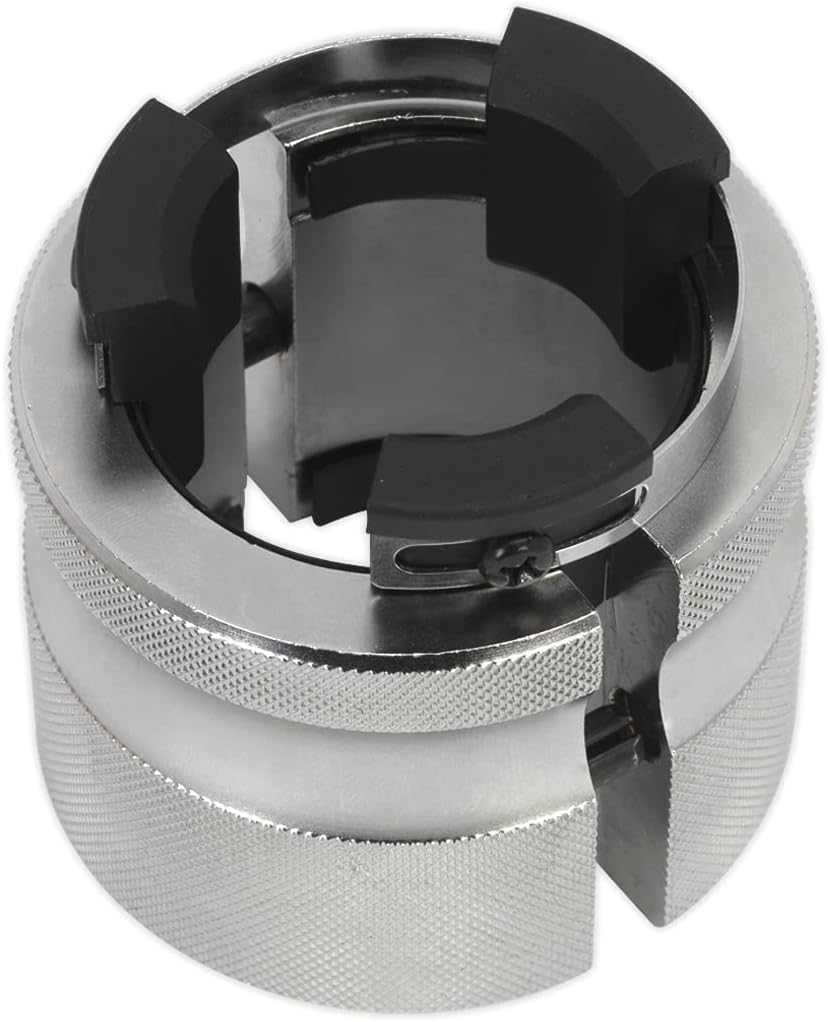
Figure 3: A close-up view of the Sealey MS016 Fork Seal Driver, highlighting the adjustable inner mechanism that allows it to adapt to different fork tube diameters.
5. Operating Instructions
Once the fork seal driver is properly set up for your fork tube diameter, follow these steps to install a new fork seal:
- Prepare the Fork: Ensure the fork tube is clean and free of any old seal residue, burrs, or corrosion. Lightly lubricate the new fork seal with fork oil to aid in installation and prevent damage.
- Position the New Seal: Carefully slide the new fork seal over the fork tube and down to its seating position. Ensure it is oriented correctly (lip facing the proper direction as per manufacturer specifications).
- Place the Driver: Slide the assembled fork seal driver over the fork tube, resting it squarely on top of the new fork seal. Ensure the driver is centered and level.
- Drive the Seal: Using a controlled, even motion, slide the driver up and down the fork tube, allowing its weight to gently tap the seal into place. The design of the tool ensures even pressure around the seal, minimizing the risk of damage. Continue this process until the seal is fully seated in its recess. You will typically hear a change in sound or feel a solid stop when the seal is fully seated.
- Verify Installation: Once the seal is seated, remove the driver and visually inspect the seal to ensure it is flush and evenly seated all around. There should be no gaps or signs of crimping.
- Reassemble Fork Components: Proceed with reassembling the remaining fork components (e.g., retaining clips, dust seals, fork oil, springs, caps) according to the vehicle manufacturer's service manual.
Note: Always refer to your vehicle's specific service manual for detailed instructions on fork disassembly and reassembly, as procedures may vary.
6. Maintenance
Proper maintenance will ensure the longevity and continued performance of your Sealey MS016 Fork Seal Driver:
- Cleaning: After each use, wipe down the tool with a clean, dry cloth to remove any oil, grease, or debris. For stubborn grime, a mild degreaser can be used, followed by thorough drying.
- Lubrication: Periodically apply a light coat of machine oil to the adjustable screws and sliding surfaces to prevent corrosion and ensure smooth operation.
- Inspection: Regularly inspect the tool for any signs of wear, cracks, or deformation, especially on the inner adjustable segments and the main body. Ensure all screws are tight.
- Storage: Store the tool in a clean, dry environment, away from direct sunlight and extreme temperatures. A tool box or drawer is ideal to protect it from dust and physical damage.
7. Troubleshooting
If you encounter issues while using the Sealey MS016 Fork Seal Driver, consider the following common problems and solutions:
| Problem | Possible Cause | Solution |
|---|---|---|
| Seal not seating evenly or getting stuck. |
|
|
| Driver feels loose or slips on the fork tube. |
|
|
| Difficulty separating driver halves. |
|
|
8. Specifications
| Attribute | Detail |
|---|---|
| Model No. | MS016 |
| Brand | Sealey |
| Minimum/Maximum Fork Diameter | 35-55mm |
| Item Weight | 1.64 pounds (approx. 0.74 kg) |
| Approximate Dimensions (H x W x L) | 2.8 x 4.7 x 3.0 inches (71 x 120 x 76 mm) |
| Manufacturer | SEJXJ |
| ASIN | B004LY586W |
9. Warranty and Support
Sealey products are manufactured to high standards and are designed for durability. While specific warranty terms may vary by region and retailer, Sealey typically offers a standard warranty against manufacturing defects. Please retain your proof of purchase for any warranty claims.
For technical support, warranty inquiries, or to purchase replacement parts, please contact Sealey customer service or your authorized Sealey dealer. Contact information can usually be found on the official Sealey website or on the product packaging.
Online Resources: For additional information, product updates, and FAQs, visit the official Sealey website: www.sealey.co.uk


