
1. Introduction
Thank you for choosing the Satco 80-1589 G-9 Porcelain Socket. This manual provides essential information for the safe and correct installation, operation, and maintenance of your new light socket. Please read these instructions thoroughly before beginning any installation to ensure proper function and safety.
2. Important Safety Information
WARNING: Risk of electric shock. Improper installation or use can lead to serious injury or death. Always follow these safety guidelines:
- Always disconnect power at the circuit breaker or fuse box before installing, servicing, or replacing any part of the lighting fixture.
- Consult a qualified electrician if you are unsure about any part of the installation process.
- Ensure all wiring connections are secure and comply with local electrical codes.
- Do not exceed the maximum wattage or voltage ratings specified for this socket.
- This socket is designed for indoor use unless otherwise specified by the fixture it is installed in.
- Keep children away from electrical components.
3. Product Overview
The Satco 80-1589 is a durable G-9 porcelain socket designed for various lighting applications. It features a threaded body for secure mounting and pre-attached leads for easy wiring.
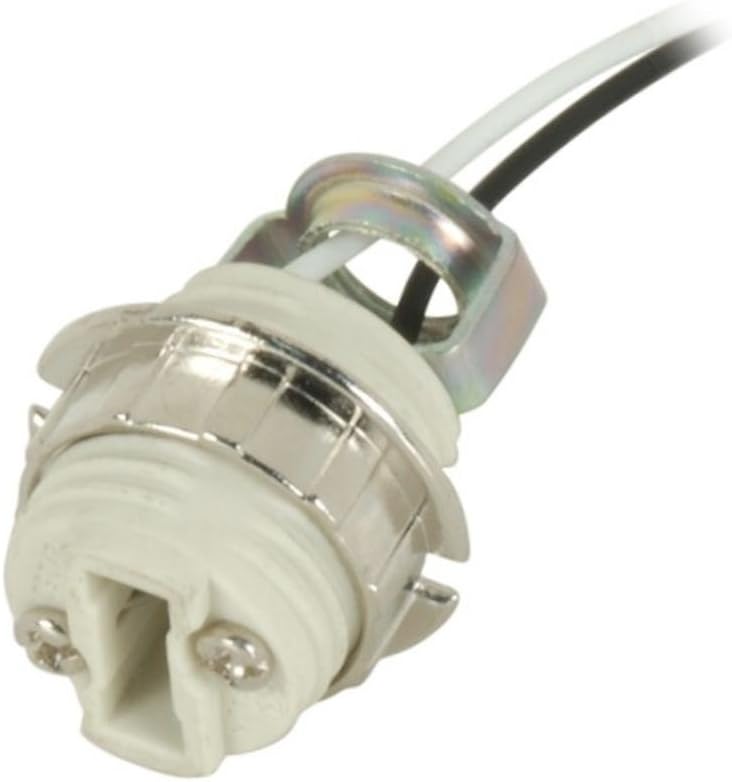
Image of the Satco 80-1589 G-9 Porcelain Socket, showing its threaded body, leads, and ring.
Key Features:
- Socket Type: Threaded G-9 Porcelain Socket
- Leads: 21-inch (approx. 53 cm) UL 10362 Leads
- Mounting: Includes a ring and 1/8 IP Hickey Inside Extrusion for secure installation
- Design: Double Leg configuration
- Maximum Rating: 660 Watts, 250 Volts
4. Installation
Installation of the Satco 80-1589 socket should be performed by a qualified individual or licensed electrician. Always ensure power is disconnected before proceeding.
Installation Steps:
- Disconnect Power: Turn off the power supply to the circuit at the main electrical panel. Verify power is off using a voltage tester.
- Prepare Wiring: Strip approximately 1/2 inch (1.25 cm) of insulation from the ends of the fixture's electrical wires and the socket's leads if necessary.
- Connect Wires: Connect the socket's leads to the fixture's wiring. Typically, one lead connects to the hot (black) wire and the other to the neutral (white) wire. Use appropriate wire connectors (not included) and ensure connections are tight and secure.
- Mount Socket: Secure the threaded body of the socket into the fixture's mounting point using the provided ring and 1/8 IP hickey inside extrusion. Ensure it is firmly seated.
- Restore Power: Once all connections are secure and the socket is mounted, restore power at the circuit breaker.
- Test: Insert a compatible G-9 bulb and test the functionality.
Note: Always refer to the specific instructions of the lighting fixture into which this socket is being installed.
5. Operating Instructions
Once the Satco 80-1589 G-9 Porcelain Socket is correctly installed in a compatible lighting fixture and wired to a power source, its operation is straightforward:
- Ensure the power supply to the fixture is off before inserting or removing a bulb.
- Carefully insert a compatible G-9 base halogen or LED bulb into the socket. Ensure the pins align correctly and the bulb is fully seated.
- Restore power to the fixture. The bulb should illuminate when the fixture's switch is activated.
Always use G-9 base bulbs that do not exceed the socket's maximum wattage rating of 660W and are compatible with your local voltage (e.g., 120V in North America).
6. Maintenance
The Satco 80-1589 G-9 Porcelain Socket requires minimal maintenance. Regular inspection and cleaning can help ensure its longevity and safe operation.
- Cleaning: Disconnect power before cleaning. Use a soft, dry cloth to wipe away any dust or debris from the socket. Do not use liquid cleaners or abrasive materials.
- Inspection: Periodically inspect the socket for any signs of damage, such as cracks in the porcelain, frayed wires, or discoloration. If any damage is observed, disconnect power immediately and replace the socket.
- Bulb Replacement: Always turn off power before replacing a bulb. Allow hot bulbs to cool completely before handling.
7. Troubleshooting
If you encounter issues with your Satco 80-1589 G-9 Porcelain Socket, consider the following common troubleshooting steps:
| Problem | Possible Cause | Solution |
|---|---|---|
| Light does not turn on | No power to the fixture | Check circuit breaker, wall switch, and fixture wiring. |
| Light does not turn on | Faulty bulb | Replace the G-9 bulb with a new, known-good bulb. |
| Light does not turn on | Loose wiring connection | (With power off) Inspect and tighten all wiring connections. |
| Socket appears damaged | Physical damage or wear | (With power off) Replace the socket immediately. Do not use a damaged socket. |
If these steps do not resolve the issue, consult a qualified electrician.
8. Specifications
| Feature | Detail |
|---|---|
| Brand | Satco |
| Model Number | 80-1589 |
| Socket Type | Threaded G-9 Porcelain Socket |
| Base Type | Pin Type |
| Maximum Voltage Rating | 250 Volts |
| Maximum Wattage Rating | 660 Watts |
| Lead Length | 21 inches (approx. 53 cm) |
| Compliance | UL Listed |
| UPC | 045923815898 |
| Material | Porcelain (Socket Body) |
9. Warranty and Support
For information regarding the warranty of your Satco 80-1589 G-9 Porcelain Socket, please contact the manufacturer directly. Warranty terms and conditions may vary.
If you require technical assistance or have questions not covered in this manual, please reach out to Satco customer support through their official website or contact channels.


