1. Product Overview
The MSA 485460 Metal Instant-Release Attachment Lug is a specialized component designed to facilitate the secure and quick attachment of various accessories to compatible MSA slotted hard hats. This lug ensures a reliable connection while allowing for rapid detachment when necessary. It is specifically engineered for use with MSA V-Guard, SmoothDome, Advance, Topgard, Thermal-E, and Super-V Slotted Caps.
2. Safety Information
Always read and understand all instructions before installing or using this product. Failure to follow these instructions may result in injury or product damage.
- Ensure the attachment lug is compatible with your specific MSA slotted cap model.
- Inspect the lug for any signs of damage, wear, or corrosion before each use. Do not use if damaged.
- Ensure all components are securely fastened during installation.
- This product is intended for its specified purpose only. Do not modify the lug or use it for unintended applications.
3. Parts List
The MSA 485460 Instant-Release Attachment Lug assembly typically includes the following components:
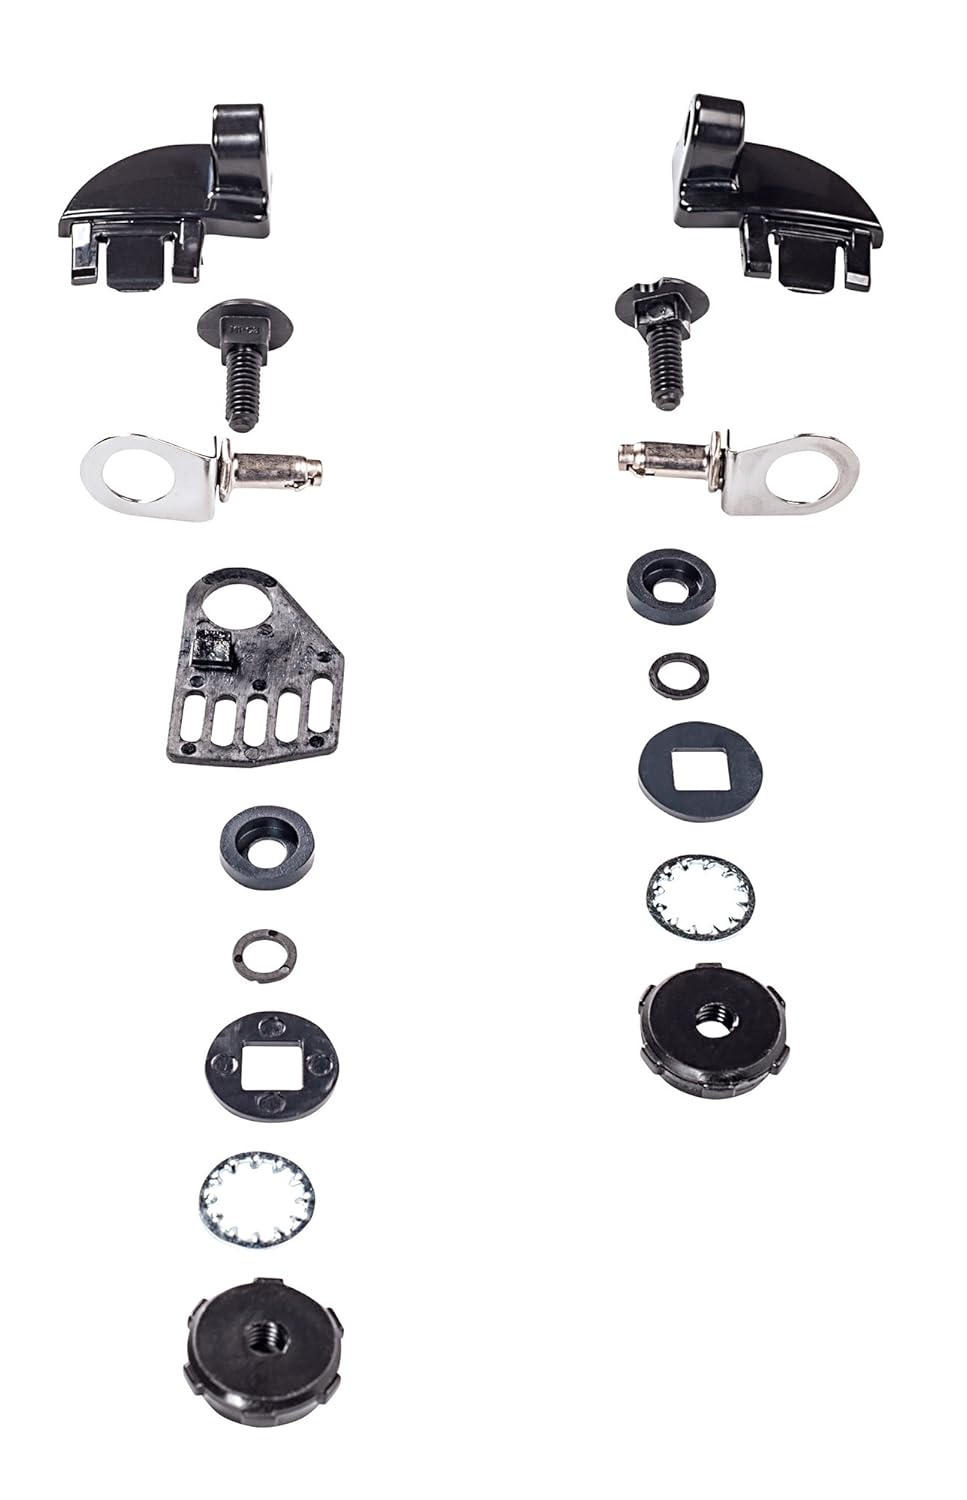
Figure 1: Exploded view of the MSA 485460 attachment lug components. The image displays two sets of disassembled lugs, each including a main black plastic housing, a metal T-bolt, a metal quick-release pin with a ring, various washers (flat, square, spring), and a threaded nut.
- Attachment Lug Body: The main housing that secures to the hard hat slot.
- T-Bolt: A threaded bolt with a T-shaped head for securing the assembly.
- Quick-Release Pin: A metal pin with a ring for easy attachment and detachment of accessories.
- Washers: Various washers (e.g., flat, square, spring) to ensure a secure fit and prevent loosening.
- Nut: A threaded nut to fasten the T-bolt.
4. Setup and Installation
Follow these steps to properly install the attachment lug onto your MSA slotted cap:
- Prepare the Hard Hat: Ensure your MSA V-Guard, SmoothDome, Advance, Topgard, Thermal-E, or Super-V Slotted Cap is clean and free from obstructions in the accessory slots.
- Insert the Lug Body: Position the main attachment lug body into the designated slot on the side of your hard hat. Ensure it sits flush and correctly oriented.
- Assemble the T-Bolt: From the inside of the hard hat, insert the T-bolt through the opening in the lug body. Depending on the design, you may need to add a flat washer first.
- Add Washers and Nut: Place any required washers (e.g., square washer, spring washer) onto the T-bolt from the outside of the lug body, followed by the threaded nut. Refer to Figure 1 for the correct order of components.
- Tighten Securely: Hand-tighten the nut until the lug body is firmly secured to the hard hat. Do not overtighten, as this may damage the hard hat or the lug. The lug should not wobble or move freely.
- Insert Quick-Release Pin: The quick-release pin is typically integrated into the accessory you wish to attach. Ensure the accessory's pin mechanism aligns with the lug's receiving slot.
5. Operation
Once the attachment lug is installed, you can use it to quickly attach and detach compatible accessories.
- Attaching an Accessory: Align the quick-release pin of your accessory with the opening in the attachment lug. Push the pin firmly into the lug until it clicks into place, indicating a secure connection. Gently pull on the accessory to confirm it is locked.
- Detaching an Accessory: To release the accessory, pull the ring on the quick-release pin outwards or in the direction indicated by the accessory's design. While holding the ring, pull the accessory away from the lug.
Always ensure accessories are securely attached before beginning work. Periodically check the connection during use.
6. Maintenance
Proper maintenance extends the life of your attachment lug and ensures continued safety.
- Inspection: Regularly inspect the metal lug and its components for signs of wear, cracks, deformation, or corrosion. Pay close attention to the quick-release mechanism for smooth operation.
- Cleaning: Clean the lug with mild soap and water. Avoid harsh chemicals or abrasive cleaners that could damage the material or finish. Rinse thoroughly and allow to air dry completely.
- Replacement: If any part of the attachment lug shows signs of damage, excessive wear, or malfunction, replace the entire lug assembly immediately. Do not attempt to repair damaged components.
- Storage: Store the lug and hard hat in a clean, dry environment away from direct sunlight, extreme temperatures, and corrosive substances.
7. Troubleshooting
If you encounter issues with your MSA 485460 attachment lug, consider the following:
- Accessory Not Attaching Securely:
- Ensure the lug is correctly installed and tightened on the hard hat.
- Verify the accessory's quick-release pin is fully engaged and clicks into place.
- Inspect the lug and accessory for any obstructions or damage preventing a secure connection.
- Difficulty Detaching Accessory:
- Ensure the quick-release ring or mechanism is fully actuated.
- Check for dirt or debris obstructing the release mechanism. Clean if necessary.
- Inspect for any deformation or damage to the lug or accessory pin.
- Lug Feels Loose on Hard Hat:
- Re-tighten the T-bolt and nut assembly.
- Inspect the hard hat slot and lug body for wear or damage that might prevent a snug fit.
If problems persist, discontinue use and contact MSA customer support.
8. Specifications
| Model Number: | 485460 |
| Product Dimensions: | 3.06 x 3.06 x 3.06 inches |
| Product Weight: | 1.44 ounces |
| Package Dimensions: | 5.28 L x 0.98 H x 3.78 W inches |
| Package Weight: | 0.93 pounds |
| Material: | Metal |
| Compatibility: | MSA V-Guard, SmoothDome, Advance, Topgard, Thermal-E, Super-V Slotted Caps |
| Manufacturer: | MSA |
| Country of Origin: | United States |
9. Warranty and Support
For specific warranty information regarding the MSA 485460 Metal Instant-Release Attachment Lug, please refer to the documentation provided with your purchase or visit the official MSA Safety website. For technical support, replacement parts, or any inquiries, please contact MSA customer service directly.
You can find contact information and additional resources on the official MSA Safety website: www.msasafety.com


