
1. Introduction
Thank you for choosing the Bell & Howell S7 Slim Digital Camera. This manual provides essential information for setting up, operating, and maintaining your camera. The S7 is a compact digital camera featuring a slim design, 1080p video recording, and a unique Infrared Night Vision capability for capturing images in low-light conditions.
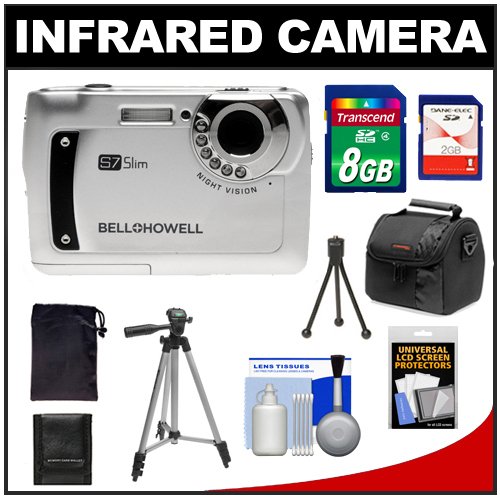
Figure 1.1: The Bell & Howell S7 Slim Digital Camera, shown with its included carrying pouch and a 2GB SD card. The image displays the camera's front with lens and flash, and its back with the LCD screen and control buttons.
2. Setup
2.1. Battery Installation
- Locate the battery compartment cover on the bottom or side of the camera.
- Slide the cover open according to the arrow indicator.
- Insert the battery, ensuring the correct polarity (+/-) as indicated inside the compartment.
- Close the battery compartment cover securely until it clicks into place.
2.2. Memory Card Installation
The Bell & Howell S7 uses SD flash memory cards.
- Locate the memory card slot, typically near the battery compartment.
- Insert the SD card with the metal contacts facing the correct direction, usually downwards or towards the front of the camera.
- Gently push the card until it clicks into place. To remove, push the card in again until it springs out.
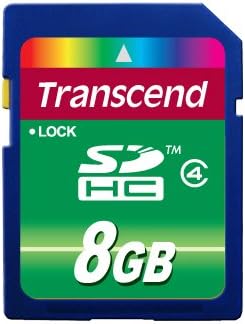
Figure 2.1: An 8GB Transcend SDHC memory card, suitable for use with the Bell & Howell S7 camera. Ensure the card is inserted correctly into the camera's memory card slot.
2.3. Charging the Camera
Connect the camera to a power source using the provided USB cable. The charging indicator light will illuminate during charging and turn off or change color when fully charged.
2.4. Powering On/Off
Press and hold the Power button (usually labeled "ON/OFF") to turn the camera on or off.
3. Operating the Camera
3.1. Taking Photos
- Turn on the camera.
- Frame your shot using the LCD screen.
- Use the W/T (Wide/Telephoto) buttons to zoom in or out.
- Press the Shutter button halfway to focus, then press fully to capture the image.
3.2. Recording Videos
- Switch the camera to video mode (refer to your camera's on-screen menu or mode dial).
- Press the Shutter button to start recording.
- Press the Shutter button again to stop recording.
3.3. Infrared Night Vision
The S7 camera features Infrared Night Vision for capturing images in very low light or complete darkness.
- Activate Night Vision mode through the camera's menu settings. This mode typically produces monochrome (black and white) images.
- Frame your shot. The camera will automatically use its infrared illuminators.
- Press the Shutter button to capture the image or start recording video.
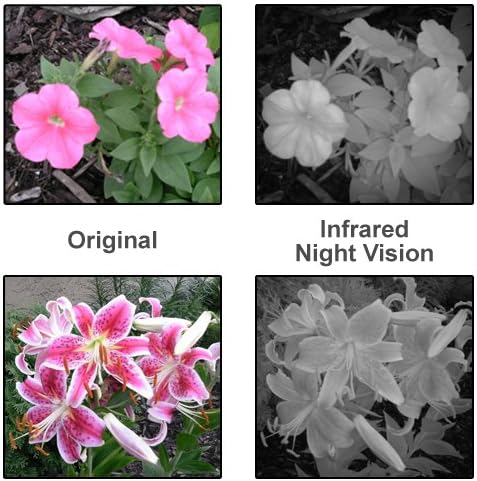
Figure 3.1: This image demonstrates the effect of Infrared Night Vision. The top left shows an "Original" color image of pink flowers, while the top right shows the same scene in "Infrared Night Vision" as a monochrome image. A similar comparison is shown for lilies at the bottom.
3.4. Playback Mode
Press the Playback button (often indicated by a triangle icon) to review your photos and videos. Use the directional buttons to navigate through your media.
3.5. Connecting to a Computer
Use the provided USB cable to connect the camera to your computer. The camera will typically appear as a removable disk drive, allowing you to transfer files.
4. Maintenance
4.1. Cleaning the Camera
- Use a soft, lint-free cloth to clean the camera body.
- For the lens and LCD screen, use a specialized lens cleaning cloth and solution. Avoid harsh chemicals.
- Do not touch the lens or screen directly with your fingers.
4.2. Battery Care
- Remove the battery if the camera will not be used for an extended period.
- Store batteries in a cool, dry place.
- Avoid exposing batteries to extreme temperatures.
4.3. Storage
Store the camera in a dry, dust-free environment, preferably in a camera case or pouch to protect it from scratches and impacts.

Figure 4.1: A black camera case by Precision Design, suitable for protecting the Bell & Howell S7 camera during storage and transport.

Figure 4.2: Accessories for camera maintenance, including a screen protector and grid cards for calibration or cleaning. These help keep the camera's display and lens in optimal condition.
5. Troubleshooting
| Problem | Possible Cause | Solution |
|---|---|---|
| Camera does not turn on. | Battery is dead or incorrectly inserted. | Charge the battery or re-insert it correctly. |
| Memory card error. | Card is full, corrupted, or incorrectly inserted. | Insert a new card, format the card (this will erase data), or re-insert the card. |
| Images are blurry. | Camera shake, dirty lens, or out of focus. | Hold the camera steady, clean the lens, or ensure the camera focuses before shooting. |
| Infrared Night Vision not working. | Mode not activated or insufficient darkness. | Ensure Night Vision mode is selected in the menu. It functions best in very low light or darkness. |
6. Specifications
| Feature | Detail |
|---|---|
| Brand | Bell+Howell |
| Model Name | S7 |
| Form Factor | Slim |
| Special Feature | Night Vision |
| Color | Silver |
| Connectivity Technology | USB |
| File Format | JPEG, RAW |
| Image Stabilization | Digital |
| Item Weight | 0.27 g |
| Video Resolution | 1080p |
| Continuous Shooting | 4 frames_per_second |
| Display Type | LCD |
| Flash Memory Type | SD |
| Compatible Mountings | Micro Four Thirds (Note: This might be a miscategorization in the source data as S7 is a compact camera, not typically M4/3. User should refer to actual product for lens mount.) |
| Expanded ISO Minimum | 100 |
| Wireless Technology | Infrared |
| Auto Focus Technology | Contrast Detection |
7. Warranty and Support
For warranty information and technical support, please refer to the documentation included with your purchase or visit the official Bell+Howell website. Keep your proof of purchase for warranty claims.
Manufacturer: BELL & HOWELL