
AR Blue Clean AR112
AR Blue Clean AR112 Electric Pressure Washer User Manual
Model: AR112 | Brand: AR Blue Clean
Introduction
Thank you for choosing the AR Blue Clean AR112 Electric Pressure Washer. This manual provides essential information for the safe operation, maintenance, and troubleshooting of your new pressure washer. Please read it thoroughly before first use and keep it for future reference.
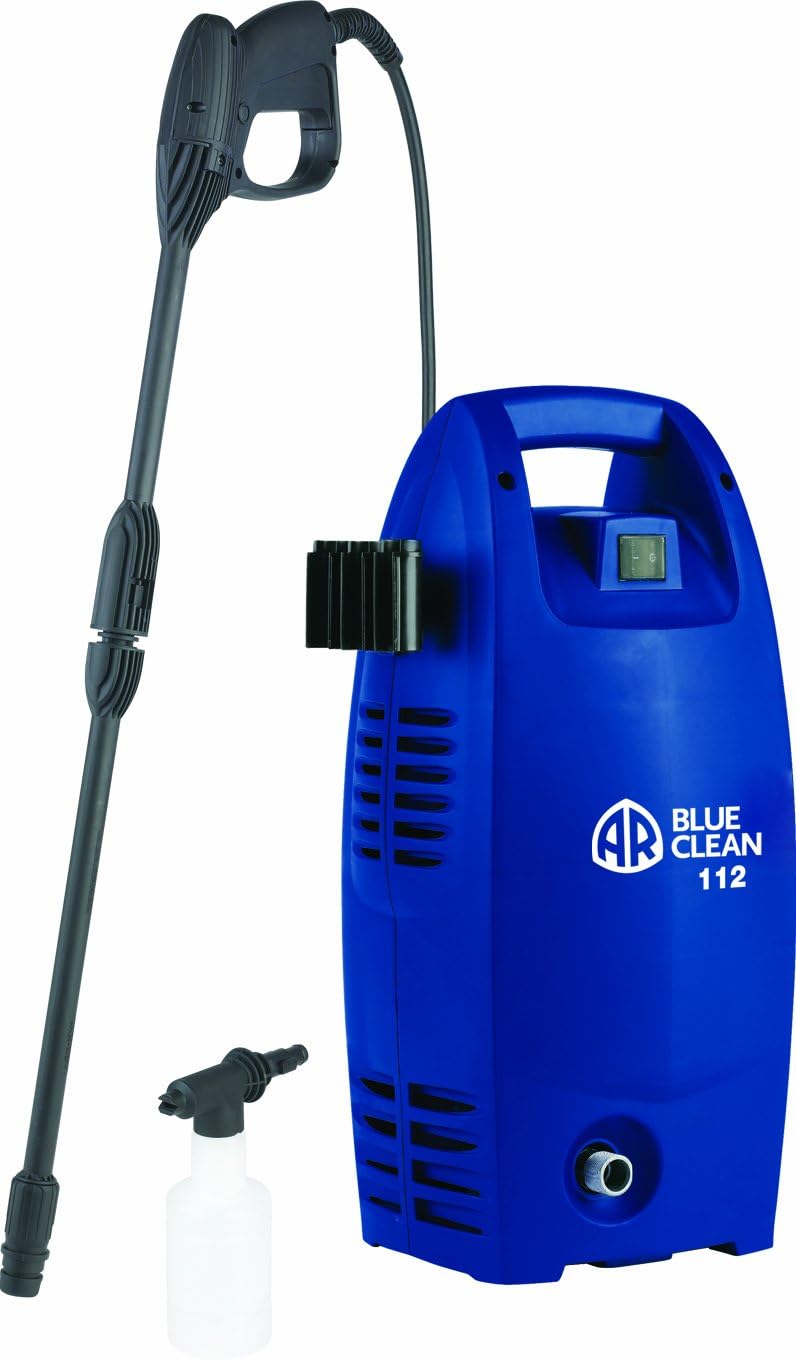
Figure 1: AR Blue Clean AR112 Electric Pressure Washer with accessories.
Safety Information
Always observe basic safety precautions when using this product to reduce the risk of injury or damage.
- Read all instructions: Familiarize yourself with the controls and proper use.
- Ground Fault Circuit Interrupter (GFCI): This unit is equipped with a GFCI. If it trips, reset it. If it continues to trip, do not use the unit and contact customer service.
- Eye Protection: Always wear safety goggles or glasses with side shields.
- Foot Protection: Wear appropriate footwear to prevent slipping and protect from spray.
- Keep clear: Do not direct the spray at people, pets, or electrical devices.
- Water Connection: Ensure the water supply is clean and free of debris.
- Electrical Connection: Use only with a properly grounded outlet. Do not use extension cords unless absolutely necessary and ensure they are rated for outdoor use and the appliance's power requirements.
- Total Stop System (TSS): The unit automatically shuts off when the trigger is not engaged, prolonging pump life.
Package Contents
Verify that all items are present before assembly:
- AR Blue Clean AR112 Pressure Washer Unit
- Spray Gun with Quick-Coupler fittings
- Variable Spray Nozzle Lance
- 20' High Pressure Hose
- 14 oz. Detergent Bottle
- 35' Power Cord with Auto-Reset GFCI Module
Setup
- Attach High Pressure Hose: Connect the 20' high pressure hose to the outlet on the pressure washer unit and to the spray gun. Ensure connections are secure.
- Connect Lance: Attach the variable spray nozzle lance to the spray gun using the quick-coupler fitting.
- Water Supply Connection: Connect a standard garden hose (not included) to the water inlet on the pressure washer. Ensure the water supply is turned on fully before starting the unit.
- Detergent Bottle (Optional): If using detergent, fill the 14 oz. detergent bottle with appropriate pressure washer detergent and attach it directly to the spray gun.
- Electrical Connection: Plug the 35' power cord with the Auto-Reset GFCI module into a grounded 120V AC outlet. Press the "RESET" button on the GFCI plug if necessary.
Operating Instructions
- Purge Air: Before turning on the power, squeeze the trigger on the spray gun to allow water to flow through the system and purge any air. Continue until a steady stream of water emerges.
- Start Unit: Turn the power switch on the pressure washer unit to the "ON" position. The motor will start when the trigger is squeezed and stop when released (Total Stop System).
- Adjust Spray Pattern: Rotate the head of the variable spray nozzle lance to change the spray pattern from a wide fan to a concentrated "pencil-point" high-pressure spray.
- Apply Detergent: If using the detergent bottle, ensure it is attached. The pressure washer will draw detergent when operating at low pressure or with the detergent nozzle engaged (refer to specific lance instructions if applicable).
- Cleaning Technique: Always start spraying from a distance and move closer to the surface to avoid damage. Work in small sections.
- Shut Down:
- Turn the power switch to "OFF".
- Turn off the water supply.
- Squeeze the spray gun trigger to release any remaining pressure in the system.
- Disconnect the garden hose and high-pressure hose.
Maintenance
Regular maintenance ensures optimal performance and extends the life of your pressure washer.
- Clean Nozzle: Periodically check the nozzle for blockages and clean with the provided nozzle cleaning tool (if included) or a thin wire.
- Water Inlet Filter: Inspect and clean the water inlet filter regularly to prevent debris from entering the pump.
- Hose and Connections: Check hoses and connections for leaks, kinks, or damage before each use. Replace damaged parts immediately.
- Storage: Store the pressure washer in a dry, frost-free environment. Disconnect all hoses and drain water from the pump and hoses before storing, especially in freezing temperatures. Utilize the on-board storage for the lance and detergent bottle.
- Cord Hook: Use the integrated cord hook for convenient power cord storage.
Troubleshooting
| Problem | Possible Cause | Solution |
|---|---|---|
| Unit does not start | No power; GFCI tripped; Power switch off | Check power outlet; Reset GFCI; Turn power switch ON |
| Low pressure | Insufficient water supply; Clogged nozzle; Air in pump | Ensure full water flow; Clean nozzle; Purge air from system |
| Water leaks | Loose connections; Damaged O-rings/seals | Tighten all connections; Inspect and replace O-rings/seals |
| Motor stops frequently (TSS) | Normal operation (Total Stop System); Overheating | This is normal. If it stops without trigger release, allow unit to cool. |
Specifications
- Model: AR112
- Power Source: Corded Electric
- Motor: 12 Amp / 1.3 HP Universal Motor
- Pump: Tri-Axial Pump
- Maximum Pressure: 1600 PSI
- Maximum Flow Rate: 1.5 GPM
- High Pressure Hose Length: 20 Feet
- Power Cord Length: 35 Feet with Auto-Reset GFCI
- Detergent Bottle Capacity: 14 oz.
- Item Weight: 17.56 pounds
- Product Dimensions: 7.5 x 10 x 18 inches
- Certification: CSA International
Warranty and Support
This AR Blue Clean AR112 Pressure Washer comes with a 1 Year "Bumper-to-Bumper" Warranty. For warranty claims, technical support, or replacement parts, please contact AR North America customer service.
Manufacturer: AR North America
For the most current support information, please visit the official AR Blue Clean website or refer to the contact details provided with your product packaging.
Related documentsAR112


Ask a question about this manual
Ask about setup, troubleshooting, compatibility, parts, safety, or missing instructions. Manuals+ will review the question and use this page’s manual context to help answer it.