
1. Introduction
This manual provides detailed instructions for the installation, operation, and maintenance of your Rockford Fosgate Power T2500-1bdCP 2500-Watt Mono Amplifier. This Class-BD amplifier features Constant Power technology, designed to deliver consistent power output across various impedance loads. Please read this manual thoroughly before attempting installation or operation to ensure proper use and to maximize the performance and longevity of your amplifier.

Figure 1: Rockford Fosgate Power T2500-1bdCP Mono Amplifier
2. Safety Information
Always observe the following safety precautions during installation and operation:
- Professional Installation Recommended: Due to the complexity of car audio systems and high power requirements, professional installation is highly recommended.
- Electrical Hazards: Disconnect the vehicle's negative battery terminal before any wiring to prevent electrical shorts and damage. Ensure all power connections are fused correctly and securely.
- Ventilation: Mount the amplifier in a location that allows for adequate airflow to prevent overheating. Avoid mounting in enclosed spaces without ventilation.
- Hearing Protection: Prolonged exposure to high sound pressure levels can cause permanent hearing loss. Use caution when adjusting volume levels.
- Secure Mounting: Securely mount the amplifier to prevent it from becoming a projectile in the event of a sudden stop or accident.
3. Package Contents
Verify that your package contains the following items:
- Rockford Fosgate T2500-1bdCP Mono Amplifier
- Owner's Manual (this document)
- Mounting Hardware (screws, washers)
- Remote Punch EQ Controller (if included with your model)
4. Setup and Installation
4.1 Mounting Location
Choose a mounting location that provides sufficient ventilation and is protected from moisture. Common locations include the trunk, under seats, or behind rear seats. Ensure the amplifier is securely fastened to a solid surface.
4.2 Wiring Connections
Refer to the diagram below for proper wiring connections. Always use appropriate gauge wiring for power and ground connections to handle the amplifier's current draw.

Figure 2: Amplifier Rear Panel Connections
- Power (B+): Connect directly to the positive terminal of the vehicle's battery using a fuse holder within 18 inches of the battery.
- Ground (GND): Connect to a clean, unpainted metal surface of the vehicle chassis. Ensure a solid connection for optimal performance and safety.
- Remote (REM): Connect to the remote turn-on lead from your head unit. This signal turns the amplifier on and off with your audio system.
- Speaker Outputs: Connect your subwoofer(s) to the speaker terminals. Ensure the total impedance of your speakers matches the amplifier's capabilities (1-Ohm, 2-Ohm, or 4-Ohm).
- RCA Inputs: Connect RCA cables from your head unit's subwoofer output to the amplifier's input jacks.
- RCA Pass-Thru Outputs: Use these outputs to send the audio signal to additional amplifiers if needed.
4.3 Initial Settings
After all connections are made, set the initial controls on the amplifier. These will be fine-tuned during operation.
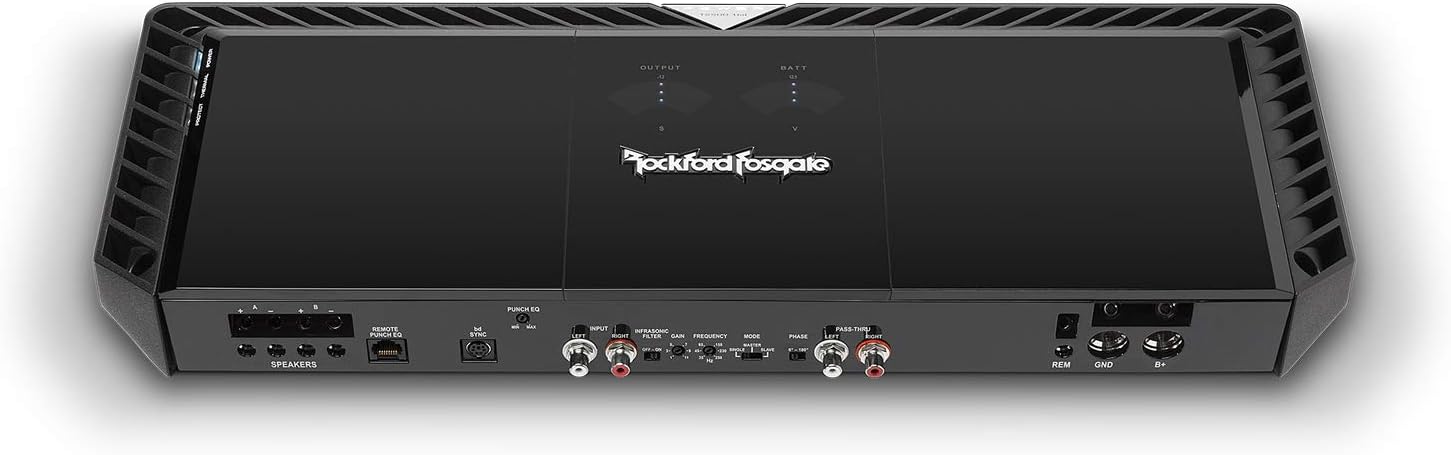
Figure 3: Amplifier Top Panel Controls
- Gain Control: Start with the gain control set to minimum. This adjusts the input sensitivity to match your head unit's output.
- Crossover (LPF): Set the Low-Pass Filter (LPF) to the desired frequency for your subwoofers, typically between 50Hz and 100Hz.
- Phase Switch: Set to 0 degrees initially. This can be adjusted later to optimize bass response with your other speakers.
- Punch EQ: Set to minimum (0dB) initially. This provides a bass boost at 45Hz.
5. Operating the Amplifier
Once installed and initially configured, the amplifier operates automatically with your head unit's remote turn-on signal. Fine-tuning the settings will optimize your audio experience.
- Gain Adjustment: Play a familiar track at a moderate volume. Slowly increase the amplifier's gain until you hear distortion, then back off slightly. This ensures maximum clean output.
- Crossover Adjustment: Adjust the LPF to blend the subwoofer output seamlessly with your main speakers. Experiment with different frequencies to find the best balance.
- Phase Adjustment: Switch between 0 and 180 degrees while listening to bass-heavy music. Choose the setting that provides the most impactful and coherent bass.
- Punch EQ: Use the Punch EQ to add a controlled bass boost at 45Hz. Use sparingly to avoid distortion and potential speaker damage.
- Constant Power Feature: The T2500-1bdCP's Constant Power technology ensures that the amplifier delivers its rated power output consistently, regardless of the speaker impedance (1-Ohm, 2-Ohm, or 4-Ohm). This provides stable and powerful performance.
6. Maintenance
Regular maintenance helps ensure the longevity and optimal performance of your amplifier:
- Cleaning: Periodically clean the amplifier's exterior with a soft, dry cloth. Avoid using harsh chemicals or abrasive cleaners.
- Connection Check: Annually, inspect all power, ground, remote, and speaker connections to ensure they are secure and free from corrosion.
- Ventilation: Ensure that the amplifier's cooling fins are free from dust and debris to maintain proper heat dissipation.
7. Troubleshooting
If you experience issues with your amplifier, consult the following troubleshooting guide:
| Problem | Possible Cause | Solution |
|---|---|---|
| No Power / Amplifier does not turn on | Blown fuse, loose power/ground/remote wire, faulty remote signal. | Check inline fuse near battery. Verify all power, ground, and remote connections are secure. Test remote wire for 12V when head unit is on. |
| No Sound Output | Loose RCA cables, incorrect gain setting, speaker wires disconnected, amplifier in protect mode. | Check RCA input connections. Ensure gain is not at minimum. Verify speaker wire connections. Check for protect light indicator. |
| Distorted Sound | Gain set too high, incorrect crossover settings, speaker impedance mismatch, poor ground connection. | Reduce gain. Adjust crossover frequency. Verify speaker impedance is within amplifier's limits. Improve ground connection. |
| Amplifier Overheating (Thermal Protect) | Insufficient ventilation, speaker impedance too low, gain set too high, prolonged high-power operation. | Ensure adequate airflow around the amplifier. Verify speaker impedance. Reduce gain. Allow amplifier to cool down. Consider professional review of system design. |
If these steps do not resolve the issue, contact Rockford Fosgate customer support or a qualified installer.
8. Specifications
The following table details the technical specifications for the Rockford Fosgate Power T2500-1bdCP Mono Amplifier:
| Specification | Value |
|---|---|
| Model | T2500-1bdCP |
| Brand | Rockford Fosgate |
| Output Power | 2500 watts |
| Number of Channels | 1 (Mono) |
| Voltage | 12 volts |
| Item Dimensions (L x W x H) | 21.9 x 8.1 x 2.1 inches |
| Item Weight | 20 pounds |
| Mounting Type | Freestanding |
| Specification Met | CE, FCC, RoHS |
| GTIN / UPC | 780687330293 / 613815573128 |
9. Warranty Information
The Rockford Fosgate Power T2500-1bdCP Mono Amplifier is covered by a 1-Year Manufacturer Warranty. This warranty covers defects in materials and workmanship under normal use. For specific terms, conditions, and to initiate a warranty claim, please refer to the official Rockford Fosgate warranty documentation or contact their customer support.
10. Support
For further assistance, technical support, or service inquiries regarding your Rockford Fosgate Power T2500-1bdCP Mono Amplifier, please contact Rockford Fosgate customer service directly or visit their official website. It is recommended to have your product model number and purchase information available when seeking support.
Rockford Fosgate Official Website: www.rockfordfosgate.com


