
Introduction
The SKIL 3540-02 7-Inch Wet Tile Saw is designed to assist with tiling projects by providing accurate and clean cuts on various tile materials. Its stainless steel tabletop resists corrosion, and features like an adjustable rip fence and miter gauge ensure precision. The integrated blade cooling water reservoir minimizes dust and debris while extending blade life. This manual provides essential information for safe and efficient operation.

Figure 1: SKIL 7-Inch Wet Tile Saw (Model 3540-02)
Safety Information
Always prioritize safety when operating power tools. Read and understand all instructions before use. Failure to follow safety guidelines can result in serious injury.
- Personal Protective Equipment (PPE): Always wear eye protection (safety glasses or goggles), hearing protection, and a dust mask. Avoid loose clothing, jewelry, and long hair that could get caught in moving parts.
- Electrical Safety: Ensure the saw is plugged into a grounded, three-prong outlet. Use a Ground Fault Circuit Interrupter (GFCI) protected circuit. Keep the power cord away from the cutting area and water.
- Work Area: Keep the work area clean, well-lit, and free from clutter. Do not operate in explosive atmospheres, such as in the presence of flammable liquids, gases, or dust.
- Blade Safety: Ensure the blade is properly installed and secured before operation. Never attempt to remove or adjust the blade while the saw is running. Allow the blade to reach full speed before cutting.
- Water Reservoir: Always ensure the water reservoir is filled to the appropriate level before and during operation to cool the blade and minimize dust.
- Material Handling: Securely hold the workpiece against the fence and tabletop. Avoid forcing the material through the blade.
Package Contents
Verify that all items are present upon unpacking:
- SKIL 120V 4.2 amp 7" Wet Tile Saw unit
- 7" Diamond Blade
- Adjustable Rip Fence
- Miter Gauge
- Blade Wrench (for blade changes)
- Instruction Manual
Setup
- Unpacking: Carefully remove all components from the packaging. Inspect for any shipping damage.
- Placement: Place the tile saw on a stable, level surface. Ensure adequate space around the saw for safe operation and material handling.
- Blade Installation:
- Ensure the saw is unplugged.
- Remove the blade guard and any retaining screws to access the arbor.
- Place the 7-inch diamond blade onto the arbor, ensuring the rotation arrow on the blade matches the direction of rotation indicated on the saw.
- Secure the blade with the provided washers and nut, tightening with the blade wrench.
- Reattach the blade guard.
Video 1: This video demonstrates the process of changing the saw blade, including removing the cover and securing the new blade. It also highlights the saw's ability to cut various materials like brick, stone, and ceramic tile.
- Fill Water Reservoir:
- Locate the water reservoir beneath the cutting table.
- Fill the reservoir with clean water up to the indicated "Min" and "Max" lines. The water cools the blade and reduces dust.
Video 2: This video shows the water reservoir being filled and provides an overview of the saw's components and safety precautions, including the blade guard and power switch. It also demonstrates cutting a glass bottle.
- Adjust Rip Fence and Miter Gauge:
- The adjustable rip fence can be positioned to guide straight cuts. Loosen the thumb screws, slide the fence to the desired measurement, and tighten.
- For angled cuts, attach the miter gauge to the rip fence and adjust to the required angle (0-45 degrees).
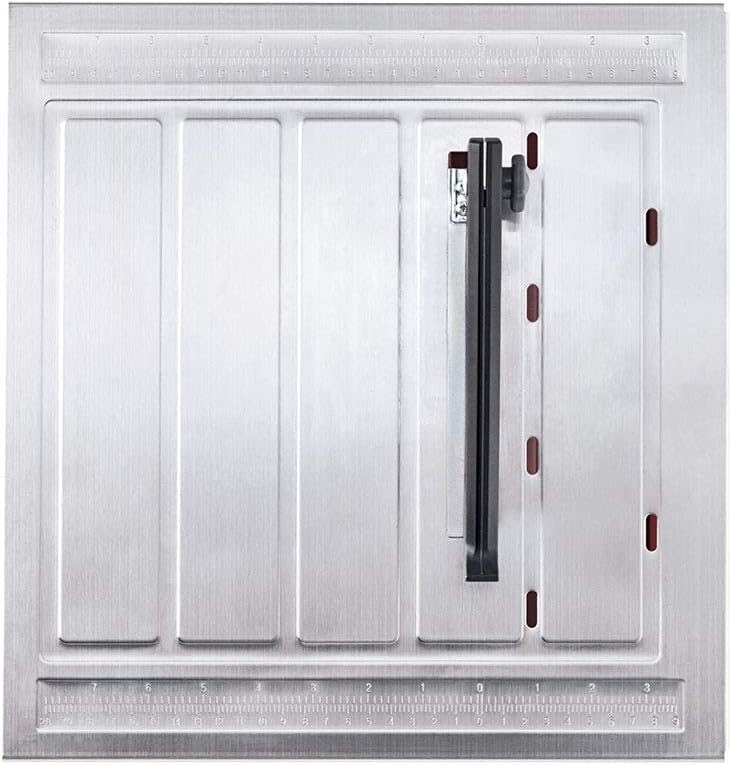
Figure 2: Top view of the saw with the adjustable rip fence in position for guiding cuts.
Operating Instructions
- Power On: Plug the saw into a grounded outlet. Press the power switch to turn the saw on. Allow the blade to reach full operating speed before beginning a cut.
- Making Straight Cuts:
- Position the tile firmly against the rip fence.
- Slowly and steadily push the tile through the blade. Do not force the material.
- Maintain a firm grip on the tile throughout the cut.

Figure 3: A user demonstrating a straight cut on a tile using the wet tile saw.
- Making Miter/Bevel Cuts:
- Adjust the cutting table to the desired angle (up to 45 degrees) using the bevel adjustment knob.
- Use the miter gauge to guide the tile at the correct angle.
- Proceed with the cut slowly and carefully.

Figure 4: The saw's cutting table is tilted to perform a precise bevel cut on a tile.
- Cutting Various Materials: The saw is suitable for cutting stone and masonry tiles. Adjust cutting speed based on material hardness.
Video 3: This video showcases the saw's powerful and accurate cutting capabilities on various tile types, demonstrating its ease of use for different projects.
Maintenance
Regular maintenance ensures optimal performance and longevity of your tile saw.
- Cleaning the Water Reservoir and Tracks:
- After each use, or when the water becomes muddy, drain and clean the water reservoir.
- Brush off any tile debris from the cutting table and water tracks to ensure proper water flow and prevent clogging.
Video 4: This video provides an unboxing and review of the saw, including a demonstration of how to clean the water reservoir and tracks to maintain optimal performance.
- Blade Replacement:
- Always unplug the saw before attempting blade replacement.
- Follow the blade installation steps in reverse to remove the old blade.
- Install a new 7-inch diamond blade, ensuring correct orientation and tightness.
- General Cleaning: Wipe down the saw with a damp cloth after each use. Do not use harsh chemicals that could damage the finish or components.
Troubleshooting
If you encounter issues with your tile saw, refer to the following common solutions:
- Saw Not Starting:
- Check if the power cord is securely plugged into a grounded outlet.
- Verify that the circuit breaker has not tripped.
- Ensure the power switch is in the "ON" position.
- Poor Cut Quality (Chipping, Slow Cutting):
- Check the blade for wear or damage. Replace if necessary.
- Ensure the water reservoir is adequately filled to cool the blade.
- Reduce the feed rate (how fast you push the tile).
- Excessive Dust/Debris:
- Ensure the water reservoir is filled to the correct level.
- Clean the water tracks and reservoir to ensure proper water circulation.
Specifications
| Feature | Specification |
|---|---|
| Brand | Skil |
| Model Number | 3540-02 |
| Power Source | Corded Electric |
| Voltage | 120 Volts |
| Amperage | 4.2 Amps |
| Wattage | 1325 Watts |
| No Load RPM | 3600 RPM |
| Blade Diameter | 7 Inches |
| Arbor Size | 5/8" |
| Bevel Angle Range | 0-45 Degrees |
| Depth of Cut at 90 Deg. | 1-3/8" |
| Depth of Cut at 45 Deg. | 1" |
| Cross Cut Capacity | 7.75 Inches |
| Diagonal Cut Capacity | 7.25 Inches |
| Item Weight | 18 Pounds |
| Product Dimensions | 17.32"L x 15.16"W x 7.52"H |
| Surface Recommendation | Tile |
| Special Feature | Brake |
Warranty and Support
This SKIL 7-Inch Wet Tile Saw comes with a Limited Warranty. For specific details regarding warranty coverage, terms, and conditions, please refer to the warranty card included with your product or visit the official Skil website.
For technical support, replacement parts, or service inquiries, please contact Skil customer service through their official website or the contact information provided in your product documentation.


