
Introduction
The Dayton Audio MA1240a is a versatile multi-zone 12-channel amplifier designed for distributing audio throughout multiple areas. This manual provides essential information for the proper setup, operation, and maintenance of your amplifier to ensure optimal performance and longevity.
Product Features
- Robust 60 WPC output at 4 ohms, 40 WPC output at 8 ohms.
- Independent and bus inputs enable unparalleled flexibility for audio routing.
- Bridgeable channel outputs provide additional power when higher output is required.
- Independent channel gain controls allow precise matching of output levels for each speaker.
- Multi-stage protection circuitry ensures reliability and simplifies troubleshooting of the audio system.
Setup and Connections
Proper connection of your MA1240a amplifier is crucial for optimal performance. Refer to the diagrams and instructions below for detailed guidance.
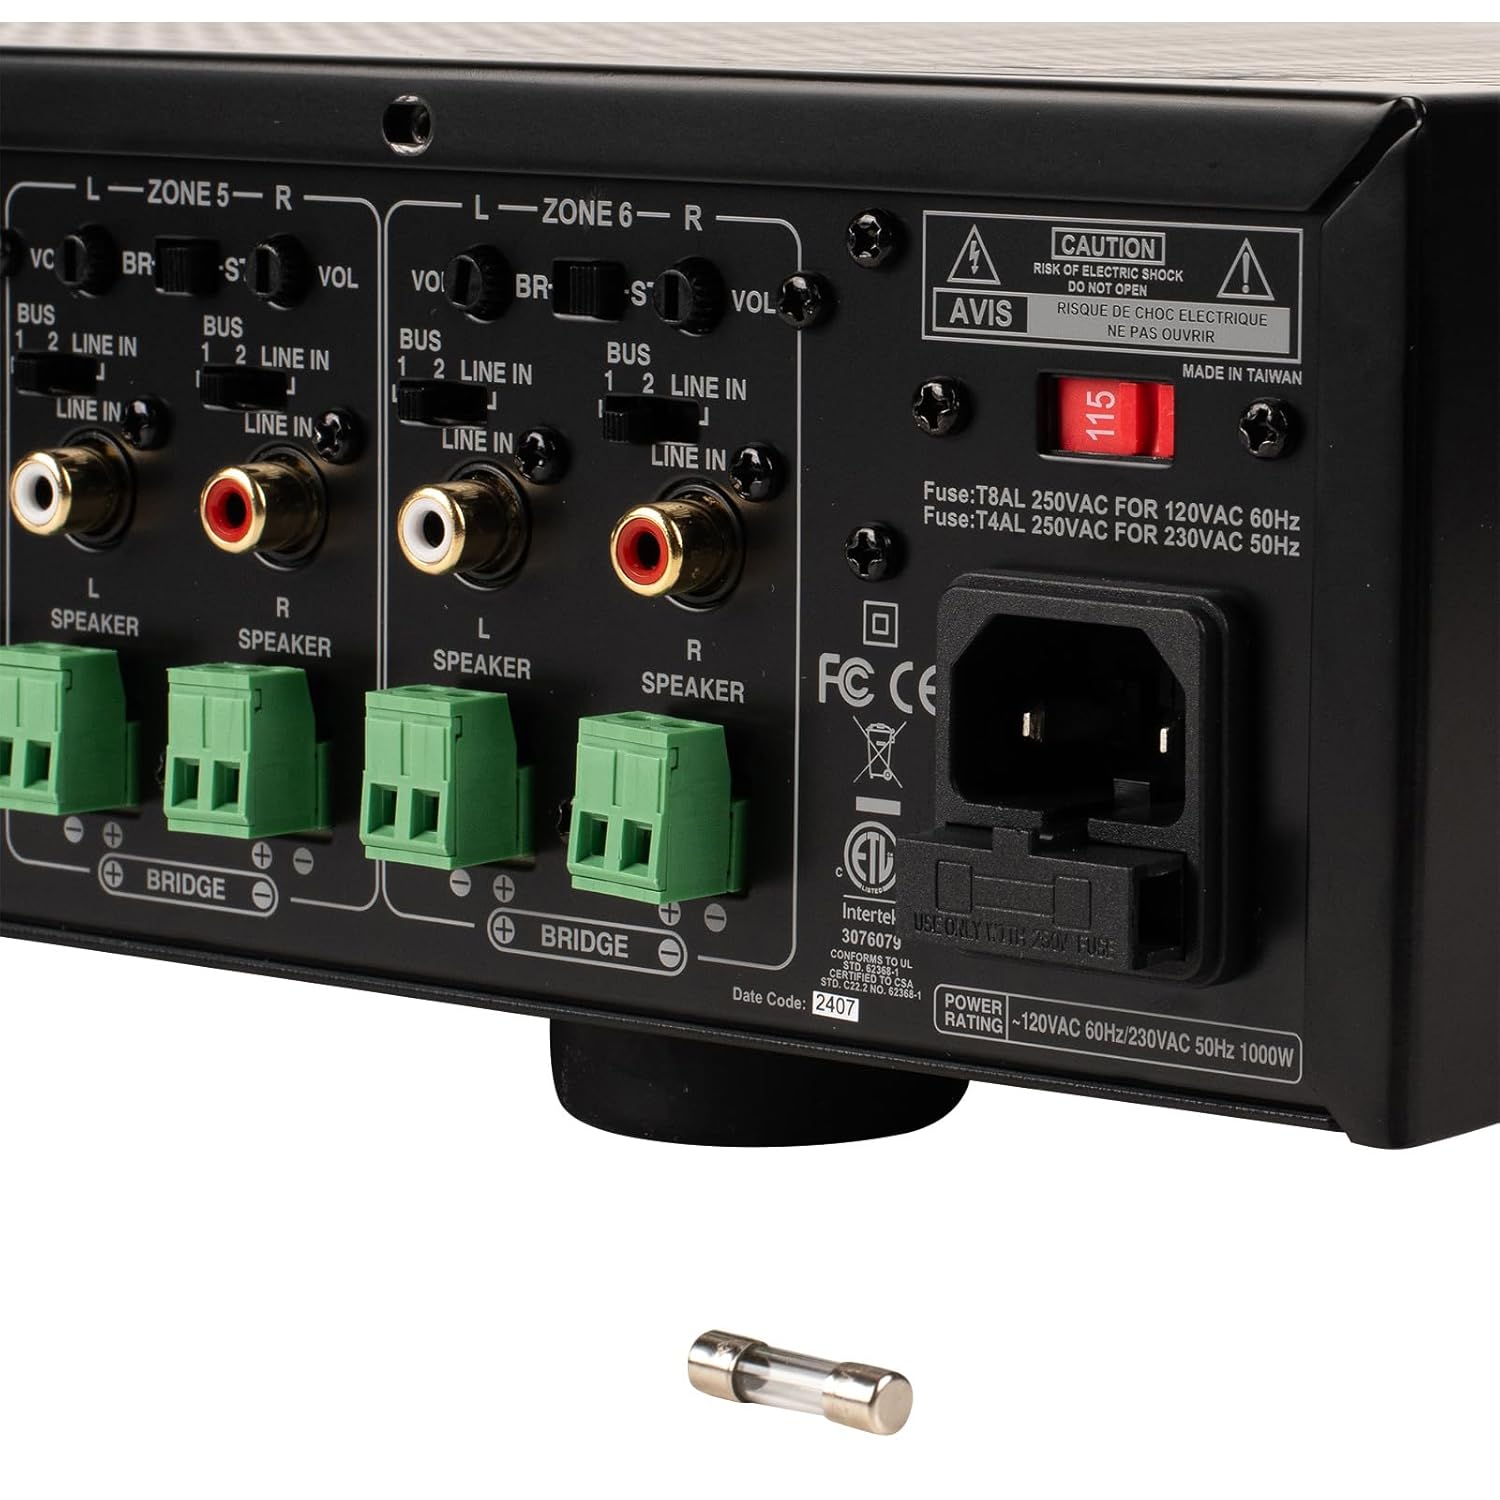
Image Description: A detailed rear view of the Dayton Audio MA1240a Multi-Zone 12 Channel Amplifier. Key features labeled include RCA Line Inputs/Outputs, 12 Channel Gain Controls, 6 Bridging Switches, Input Selection Switches, AC Voltage Switch, Fused AC Power Input, Individual Channel RCA Inputs, Speaker Output Terminals, Trigger Input/Output, and Remote Turn-On Switch.
Speaker Connections
The MA1240a features phoenix connectors for secure speaker wire connections. Each zone supports left and right speaker outputs. Ensure correct polarity (+ to + and - to -) when connecting speakers.

Image Description: A close-up view of the phoenix connectors for speaker outputs on the rear panel of the amplifier. Labels indicate "L SPEAKER" and "R SPEAKER" with corresponding positive and negative terminals, and a "BRIDGE" switch below them.
Audio Input Connections
Connect your audio sources (e.g., CD player, media streamer) to the RCA Line Inputs. The amplifier also features bus inputs for distributing a single source to multiple zones.

Image Description: A close-up of the RCA input and output section on the rear of the amplifier. It shows "BUS INPUT" and "BUS OUTPUT" RCA jacks, along with individual "LINE IN" RCA inputs for each zone. There are also "TRIGGER IN" and "TRIGGER OUT" jacks.
Power Connection
Connect the supplied power cable to the Fused AC Power Input. Ensure the Voltage Switch is set correctly for your region (115V or 230V) before powering on the unit.

Image Description: A close-up of the power input section on the rear panel, showing the Fused AC Power Input, the Voltage Selector switch (set to 115V in the image), and fuse specifications. A spare fuse is visible below the amplifier.
Operating Instructions
The MA1240a is designed for user-friendly operation. Follow these steps to control your audio system.
Front Panel Controls

Image Description: A front view of the Dayton Audio MA1240a amplifier. It features a Power On/Off LED Indicator on the left and Zone Status LED Indicators in the center, showing the active zones.
- Power On/Off: Use the main power switch on the front panel to turn the amplifier on or off.
- Zone Status LEDs: These indicators illuminate to show which audio zones are currently active.
- Input Selection: Use the switches on the rear panel to select between individual line inputs or bus inputs for each zone.
- Gain Controls: Adjust the independent gain controls for each channel on the rear panel to balance speaker output levels.
Multi-Room Setup Example
The MA1240a allows for flexible multi-room audio distribution. The following diagram illustrates a typical 6-room installation with an AM/FM receiver as the primary source.

Image Description: A schematic diagram showing a 6-room audio installation. An AM/FM receiver is connected to the amplifier's bus inputs. Each of the six zones of the amplifier is then connected to speakers in separate rooms (Room 1 to Room 6), demonstrating multi-zone audio distribution.
Specifications
- Brand: Dayton Audio
- Model Number: MA1240A
- Item Dimensions (L x W x H): 16.7 x 14.25 x 4 inches
- Item Weight: 34.1 pounds
- Number of Channels: 12
- Output Power: 40 Watts (at 8 ohms), 60 Watts (at 4 ohms)
- Voltage: 12 Volts (DC), 120-230 Volts (AC)
- Material: Metal, Plastic
- Mounting Type: Surface Mount
- Specification Met: FCC
- UPC: 844632081095
Troubleshooting
If you encounter issues with your Dayton Audio MA1240a amplifier, consider the following common troubleshooting steps:
- No Power: Check the power cable connection and ensure the AC Voltage Switch is set correctly. Verify the fuse is intact; replace if blown.
- No Sound: Confirm all audio input and speaker output connections are secure. Check input selection for each zone. Adjust individual channel gain controls and master volume.
- Distorted Sound: Reduce input signal level if distortion occurs. Check speaker impedance compatibility. Ensure speaker wires are not frayed or shorting.
- Uneven Volume: Adjust individual channel gain controls for balanced output across zones.
Maintenance
To maintain the performance and longevity of your amplifier, follow these guidelines:
- Cleaning: Use a soft, dry cloth to clean the exterior of the amplifier. Avoid liquid cleaners or abrasive materials.
- Ventilation: Ensure adequate ventilation around the unit to prevent overheating. Do not block ventilation openings.
- Storage: Store the amplifier in a cool, dry place away from direct sunlight and extreme temperatures when not in use for extended periods.
Warranty and Support
For warranty information or technical support, please refer to the documentation included with your product or visit the Dayton Audio official website. Keep your purchase receipt as proof of purchase.
Related Videos
Explore these official seller videos for additional setup and usage guidance.
Video Description: This video provides a comprehensive overview of the Rockville Home Matrix 4, a multi-zone, multi-source receiver/amplifier. It demonstrates how to set up and utilize its features for various home and commercial audio applications, including multi-room audio distribution, speaker combinations, and input routing. The video highlights the flexibility of playing different audio sources in different zones simultaneously and showcases the microphone inputs for karaoke setups. It also covers the physical connections and controls on the unit.
Video Description: This video provides a detailed guide on how to set up the Rockville Home Matrix 4. It covers connecting speakers, understanding speaker impedance combinations, and routing different audio sources to various zones. The presenter demonstrates the physical connections on the amplifier's rear panel and explains the front panel controls for volume, bass, treble, and input selection for each zone. The video also highlights the multi-source and multi-zone capabilities, allowing users to play different audio in different rooms simultaneously.
Video Description: This video introduces the Soundavo WS66i Whole-Home Audio Amplifier, highlighting its features and connectivity options. It showcases the amplifier's ability to distribute audio from multiple sources to various zones throughout a home or business. The video details the different input types, including Wi-Fi streaming, USB, analog, and digital audio devices. It also explains how to expand the system with additional amplifiers for more zones and control the system using a dedicated mobile app, IR remote, or wall-mounted keypads.


