1. Introduction
Welcome to the user manual for your new NEC NP43 Portable Projector. This manual provides essential information for the safe and efficient operation, setup, maintenance, and troubleshooting of your projector. Please read this manual thoroughly before using the product and keep it for future reference.
2. Safety Information
To ensure safe operation and prevent damage to the projector, please observe the following precautions:
- Do not block ventilation openings. Ensure adequate airflow around the projector.
- Do not look directly into the projector lens when the lamp is on, as the bright light can cause eye damage.
- Avoid placing the projector in direct sunlight, near heat sources, or in areas with high humidity or excessive dust.
- Use only the power cord supplied with the projector. Connect to a properly grounded outlet.
- Do not attempt to service the projector yourself. Refer all servicing to qualified service personnel.
- Unplug the projector from the power outlet before cleaning or when not in use for extended periods.
3. Package Contents
Verify that all items are present in the package:
- NEC NP43 Portable Projector
- Power Cord
- VGA Cable
- Remote Control with Batteries
- User Manual (this document)
- Carrying Case (may vary by region)
4. Product Overview
Familiarize yourself with the various parts and connections of your NEC NP43 projector.

Figure 4.1: Side view of the NEC NP43 projector, showing the lamp cover release and ventilation grilles. The "OPEN" arrow indicates the direction to slide the cover.
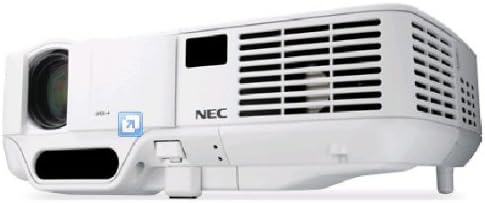
Figure 4.2: Front-side perspective view of the NEC NP43 projector, highlighting the lens, focus ring, zoom ring, and control panel area with indicator lights.
4.1 Front Panel
- Projection Lens: Emits the image.
- Focus Ring: Adjusts image sharpness.
- Zoom Ring: Adjusts image size.
- IR Receiver: Receives signals from the remote control.
4.2 Rear Panel (Input/Output Ports)
- VGA Input: Connects to computers or other VGA-compatible devices.
- RCA Video Input: Connects to composite video sources.
- Audio Input: Connects to audio sources.
- Power Inlet: Connects the power cord.
5. Setup
5.1 Projector Placement
Place the projector on a stable, flat surface or mount it securely. Ensure the projector is positioned at an appropriate distance from the screen to achieve the desired image size. Maintain adequate ventilation space around the unit.
5.2 Power Connection
- Connect the supplied power cord to the projector's power inlet.
- Plug the other end of the power cord into a grounded electrical outlet.
5.3 Connecting Source Devices
The NEC NP43 supports VGA and RCA connectivity.
- VGA Connection: Connect a VGA cable from your computer's VGA output port to the projector's VGA input port.
- RCA Connection: Connect an RCA composite video cable from your video source (e.g., DVD player) to the projector's RCA video input. Ensure to also connect audio cables if your source provides separate audio output.
6. Operating Instructions
6.1 Powering On/Off
- To Power On: Press the Power button on the projector's control panel or the remote control. The power indicator light will turn green.
- To Power Off: Press the Power button again. A confirmation message may appear. Press the Power button a second time to confirm shutdown. Allow the projector to cool down before unplugging.
6.2 Input Source Selection
Press the "Input" or "Source" button on the projector or remote control to cycle through available input sources (VGA, Video).
6.3 Image Adjustment
- Focus: Rotate the focus ring on the lens until the image appears sharp.
- Zoom: Rotate the zoom ring on the lens to adjust the image size.
- Keystone Correction: Use the keystone correction buttons on the control panel or remote to correct trapezoidal distortion if the projector is not perfectly perpendicular to the screen.
7. Maintenance
7.1 Lamp Replacement
The lamp has a life expectancy of up to 2500 hours in normal mode and 3500 hours in eco mode. When the lamp indicator lights up or the image becomes dim, it's time to replace the lamp. Refer to the lamp replacement section in the full service manual for detailed instructions. Always use genuine NEC replacement lamps.
7.2 Air Filter Cleaning
Regularly clean the air filter to maintain optimal performance and prevent overheating. The filter is typically located on the side or bottom of the projector. Use a soft brush or vacuum cleaner to remove dust. Replace the filter if it is heavily soiled or damaged.
7.3 General Cleaning
Wipe the projector's exterior with a soft, dry cloth. For stubborn marks, dampen the cloth slightly with water. Do not use abrasive cleaners or solvents. Clean the lens gently with a lens cleaning cloth designed for optical surfaces.
8. Troubleshooting
| Problem | Possible Cause | Solution |
|---|---|---|
| No image on screen | Incorrect input source selected; Loose cable connection; Projector in standby mode. | Select the correct input source. Check all cable connections. Press the Power button to wake the projector. |
| Image is blurry | Focus not adjusted; Lens is dirty. | Adjust the focus ring on the lens. Clean the projector lens. |
| Projector overheats and shuts down | Blocked ventilation; Dirty air filter; High ambient temperature. | Ensure clear ventilation paths. Clean or replace the air filter. Operate in a cooler environment. |
| No sound | Audio cable not connected; Volume too low; Muted. | Connect audio cable. Increase volume. Unmute the projector or source device. |
9. Specifications
| Feature | Detail |
|---|---|
| Model Number | NP43 |
| Display Technology | DLP (0.55" DMD) |
| Native Resolution | 1024 x 768 (XGA) |
| Maximum Display Resolution | 1024 x 768 |
| Brightness | 2300 Lumens |
| Contrast Ratio | 1600:1 |
| Lamp Type | 200W AC/170 eco |
| Lamp Life | 2500 hours (Normal) / 3500 hours (Eco) |
| Supported Video Standards | NTSC 4.43, PAL, PAL-60, PAL-M, PAL-N, SECAM |
| Connectivity Technology | VGA, RCA |
| Product Dimensions (L x W x H) | 7.17 x 9.69 x 2.83 inches |
| Item Weight | 3.75 pounds |
| Special Feature | Pico, Speakers |
10. Warranty and Support
For warranty information and technical support, please refer to the warranty card included with your product or visit the official NEC Display Solutions website. Keep your proof of purchase for warranty claims.
Contact Information: Please refer to the contact details provided on the NEC website or in your product's packaging for customer service and technical assistance.


