
Introduction
This manual provides instructions for the setup, operation, and maintenance of your Digi 7-inch Digital Picture Frame. This device allows you to display your digital photos with ease, featuring a high-resolution LCD screen and convenient remote control.
Package Contents
Verify that all items listed below are included in your package. If any items are missing or damaged, please contact customer support.
- Digi 7-inch Digital Picture Frame
- Remote Control
- AC Power Adapter
- Adjustable Stand
- Two Decorative Frames (optional, may vary by package)

Image: The remote control for the digital picture frame, sealed in plastic packaging.
Product Overview
The Digi 7-inch Digital Picture Frame is designed for displaying JPEG images. It features a 7-inch LCD screen with 800 x 480 pixel resolution, built-in stereo speakers, and supports SD cards and USB drives for media input.

Image: Front view of the Digi 7-inch Digital Picture Frame, white frame, displaying a black screen, placed on a wooden surface.
Rear Controls and Ports

Image: Rear view of the digital picture frame, showing the control panel with buttons for Power, Play/Pause, Menu, Up, Down, Prev, Next, Mode, Copy/Delete, and Rotate. An adjustable stand is also visible.
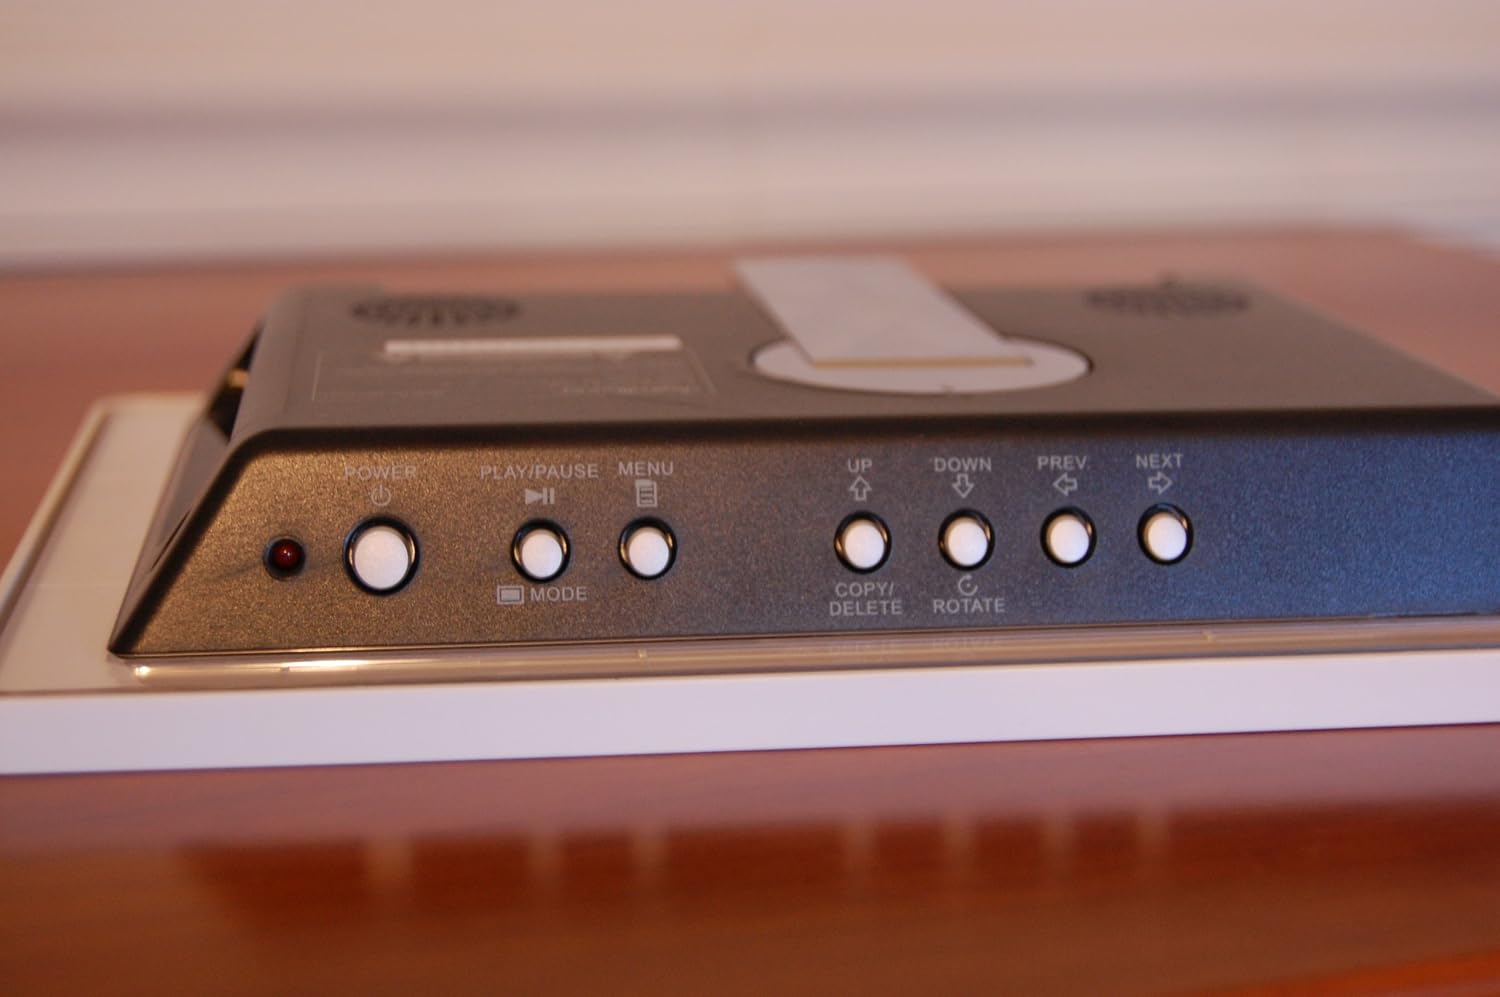
Image: Close-up view of the control buttons on the back of the digital picture frame, detailing labels for Power, Play/Pause, Menu, Mode, Up, Down, Prev, Next, Copy/Delete, and Rotate.

Image: Side view of the digital picture frame, showing the USB port and volume control slot.
The rear panel includes buttons for power, menu navigation, playback control, and image manipulation. Side ports provide connectivity for USB devices and volume adjustment.
Setup
- Attach the Stand: Securely attach the adjustable stand to the back of the digital picture frame.
- Connect Power: Plug the AC power adapter into the DC IN port on the frame, then plug the adapter into a standard electrical outlet.
- Insert Media: Insert an SD card into the SD card slot or connect a USB flash drive to the USB port. Ensure the media is inserted correctly.
- Power On: Press the POWER button on the back of the frame or on the remote control to turn on the device.
Operating Instructions
Basic Navigation
- Power Button: Turns the frame on or off.
- Menu Button: Accesses the main menu for settings and options.
- Up/Down/Prev/Next Buttons: Navigate through menus, photos, or adjust settings.
- Play/Pause Button: Starts or pauses a slideshow or video playback.
- Mode Button: Switches between different display modes (e.g., photo, video, music).
- Copy/Delete/Rotate Buttons: Perform specific actions on the currently displayed image.
Using the Remote Control
The remote control provides convenient access to all functions from a distance.
- Power: Turns the frame on or off.
- Menu: Opens the main menu.
- Source: Selects the input source (e.g., SD card, USB).
- Zoom: Zooms in or out on an image.
- Channel/Volume: Navigates or adjusts volume for audio/video playback.
- Directional Buttons (Up, Down, Left, Right): For menu navigation and selection.
- Play/Pause: Controls media playback.
Displaying Photos
- Ensure your photos are in JPEG format.
- Insert your SD card or USB drive containing photos.
- The frame should automatically detect the media and start a slideshow. If not, use the SOURCE button on the remote to select the correct input.
- Use the PREV and NEXT buttons to manually browse photos.
- Press PLAY/PAUSE to start or stop the slideshow.
Adjusting Settings
Press the MENU button to access settings such as slideshow interval, transition effects, brightness, and language. Use the directional buttons to navigate and select options.
Maintenance
- Cleaning the Screen: Use a soft, dry, lint-free cloth to gently wipe the screen. Do not use liquid cleaners or abrasive materials.
- Cleaning the Frame: Wipe the frame with a soft, slightly damp cloth. Avoid getting moisture into any openings.
- Storage: When not in use for extended periods, disconnect the power adapter and store the frame in a cool, dry place away from direct sunlight.
- Environmental Conditions: Avoid exposing the frame to extreme temperatures, high humidity, or dusty environments.
Troubleshooting
| Problem | Possible Cause | Solution |
|---|---|---|
| Frame does not power on. | Power adapter not connected or faulty. | Ensure the AC adapter is securely plugged into the frame and a working electrical outlet. Test the outlet with another device. |
| No images displayed. | No media inserted, incorrect file format, or media not detected. |
|
| Remote control is not working. | Battery is dead or incorrectly inserted. Obstruction between remote and frame. |
|
| Images appear distorted or low quality. | Low resolution images or incorrect aspect ratio. | Use images with a resolution close to 800x480 pixels for optimal display. Adjust display settings in the menu if available. |
Specifications
| Feature | Detail |
|---|---|
| Brand | Digi |
| Model | B0036ISLWC |
| Screen Size | 7 Inches |
| Display Resolution | 800 x 480 pixels |
| Connectivity Technology | USB |
| Power Source | Corded Electric (AC Adapter) |
| Control Method | Remote, On-device buttons |
| Supported Media | JPEG files, SD cards |
| Audio | Built-in stereo speakers |
| Manufacturer | Digital Living |
Warranty and Support
For information regarding warranty coverage, please refer to the warranty card included with your product or contact the manufacturer directly.
For technical support or further assistance, please visit the Digital Living website or contact their customer service department.