
TP-Link TL-WA901ND
TP-Link N450 Wireless Access Point (TL-WA901ND) User Manual
Comprehensive guide for setup, operation, and maintenance of your TP-Link TL-WA901ND Wireless Access Point.
1. Introduction
The TP-Link TL-WA901ND is a versatile N450 Wireless Access Point designed to establish or expand a scalable high-speed wireless N network. It supports multiple operating modes, including Access Point, Client, Universal/WDS Repeater, and Wireless Bridge, offering flexibility for various networking needs. With 450Mbps wireless transmission rates and 3 detachable 5dBi antennas, it provides robust wireless performance and coverage.
This manual provides detailed instructions for installing, configuring, and maintaining your TL-WA901ND device.
2. Package Contents
Please verify that all items listed below are included in your package. If any item is missing or damaged, please contact your retailer.
- Wireless Access Point TL-WA901ND
- 3 Detachable Omni-Directional Antennas
- Power Supply Unit
- PoE Power Injector
- Resource CD
- Quick Installation Guide
- RJ-45 Ethernet Cable
3. Product Overview
Familiarize yourself with the physical components of your TL-WA901ND Access Point.
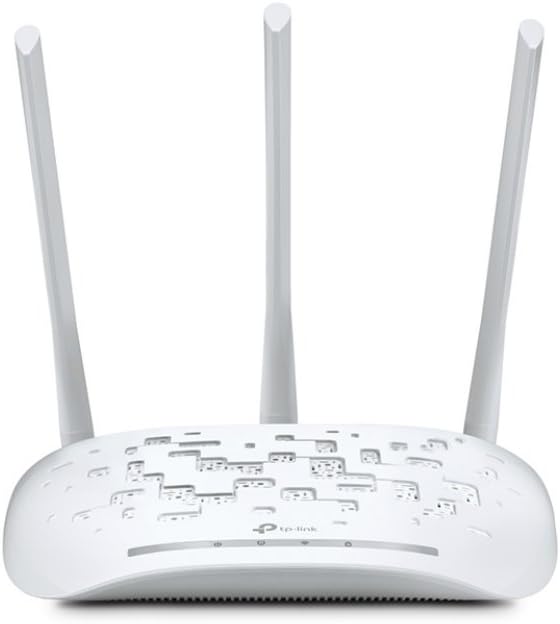
Figure 3.1: Front view of the TL-WA901ND Access Point, showing the main unit with three detachable antennas connected. The front panel includes LED indicators for power, system, and wireless activity.

Figure 3.2: Rear view of the TL-WA901ND Access Point, displaying the power input, Ethernet port, and the Reset/QSS button. The three antenna connectors are also visible.
LED Indicators
- Power: On when the device is powered on.
- System: Blinks when the system is working normally.
- Wireless: On when wireless function is enabled, blinks when data is being transmitted.
- LAN: On when connected to an Ethernet device, blinks when data is being transmitted.
Buttons
- QSS/Reset Button: Press and hold for 1-2 seconds to activate QSS (Quick Security Setup) for easy wireless security setup. Press and hold for more than 5 seconds to restore factory default settings.
4. Setup and Installation
4.1 Hardware Connection
- Attach Antennas: Screw the three detachable antennas onto the connectors on the back panel of the Access Point.
- Power On: Connect the power adapter to the AP's power port and then to a power outlet. The Power LED should light up.
- Ethernet Connection:
- Standard Connection: Connect one end of the provided Ethernet cable to the LAN port of the AP and the other end to your router, switch, or PC.
- PoE Connection (Optional): If using Passive PoE, connect the Ethernet cable from the AP's LAN port to the PoE injector's "PoE" port. Then, connect another Ethernet cable from the PoE injector's "LAN" port to your router/switch/PC. Finally, connect the power adapter to the PoE injector.
4.2 Accessing the Web Management Interface
To configure the Access Point, you need to access its web-based management interface.
- Ensure your computer is connected to the AP via Ethernet.
- Set your computer's IP address to obtain an IP address automatically (DHCP) or manually set it to an IP address within the same subnet as the AP (e.g., 192.168.0.100 if the AP's default IP is 192.168.0.254).
- Open a web browser (e.g., Chrome, Firefox) and type the default IP address of the AP (usually http://192.168.0.254) into the address bar and press Enter.
- A login window will appear. The default username and password are both admin (all lowercase).
Note: It is highly recommended to change the default login credentials after initial setup for security purposes.
5. Operating Modes
The TL-WA901ND supports several operating modes to meet diverse wireless networking requirements.
5.1 Access Point (AP) Mode
In AP mode, the device acts as a central hub for your wireless network, allowing wireless clients to connect to a wired network. This is the default mode.
- Connect the AP to your wired router or switch.
- Configure wireless settings (SSID, security type, password) via the web interface.
5.2 Client Mode
In Client mode, the device acts as a wireless adapter to connect a wired device (e.g., a gaming console, smart TV, or desktop PC) to an existing wireless network.
- Connect the wired device to the AP's LAN port.
- Configure the AP to connect to your existing wireless network (select the network and enter its password).
5.3 Universal/WDS Repeater Mode
This mode extends the range of your existing wireless network by repeating the wireless signal. Universal Repeater mode works with any AP, while WDS Repeater mode requires the main AP to support WDS.
- Place the AP within the wireless range of your main router/AP.
- Configure the AP to connect to your main wireless network and set up its own SSID (or extend the existing one).
5.4 Wireless Bridge Mode
Bridge mode allows two or more wired networks to be connected wirelessly. This is useful for connecting two separate LANs without running cables between them.
- Requires at least two APs configured in Bridge mode.
- Configure each AP to bridge to the other AP(s) using their MAC addresses.
6. Maintenance
6.1 Firmware Upgrade
Keeping your device's firmware up to date ensures optimal performance and security. Visit the TP-Link official website (www.tp-link.com) to download the latest firmware for your TL-WA901ND model.
- Download the correct firmware file to your computer.
- Log in to the web management interface.
- Navigate to System Tools > Firmware Upgrade.
- Browse for the downloaded firmware file and click "Upgrade".
- Do not power off the device during the upgrade process.
6.2 Factory Reset
If you forget your login password or encounter persistent issues, you can restore the device to its factory default settings.
- Via Button: With the device powered on, press and hold the QSS/Reset button on the back panel for more than 5 seconds until the System LED blinks rapidly. Release the button and wait for the device to restart.
- Via Web Interface: Log in to the web management interface, navigate to System Tools > Factory Defaults, and click "Restore".
Note: A factory reset will erase all your custom configurations.
6.3 Physical Cleaning
To maintain optimal performance, periodically clean the device. Use a soft, dry cloth to wipe the exterior. Do not use liquid cleaners or aerosols.
7. Troubleshooting
This section addresses common issues you might encounter with your TL-WA901ND Access Point.
- Cannot access the web management page:
- Ensure your computer is connected to the AP via Ethernet.
- Verify your computer's IP settings are compatible with the AP's default IP (192.168.0.254).
- Try clearing your browser's cache or using a different browser.
- If the IP address has been changed, try the new IP. If forgotten, perform a factory reset.
- No internet access after setup:
- Check the physical connections between the AP and your modem/router.
- Ensure the AP is configured in the correct operating mode (e.g., AP mode if connecting to a router).
- Verify your router is providing internet access.
- Check DHCP settings on the AP if it's acting as a DHCP server, or ensure it's getting an IP from your main router.
- Weak wireless signal or frequent disconnections:
- Ensure antennas are securely attached and oriented correctly.
- Relocate the AP to a central location, away from obstacles (thick walls, metal objects) and interference sources (microwaves, cordless phones).
- Try changing the wireless channel in the AP's settings to avoid interference from neighboring networks.
- Update the AP's firmware to the latest version.
- QSS button not working:
- Ensure the wireless function is enabled on the AP.
- Make sure the client device also supports WPS/QSS and is activated within two minutes of pressing the button on the AP.
8. Specifications
| Feature | Description |
|---|---|
| Model | TL-WA901ND |
| Wireless Standards | IEEE 802.11n, IEEE 802.11g, IEEE 802.11b |
| Frequency | 2.4-2.4835GHz |
| Signal Rate | Up to 450Mbps |
| Antenna Type | 3 x 5dBi Detachable Omni Directional |
| Interface | 1 x 10/100Mbps Ethernet Port (RJ45) |
| Power Supply | 9VDC / 0.85A Passive PoE Supported |
| Operating Modes | AP Mode, Multi-SSID Mode, Client Mode, Repeater Mode (Universal/WDS), Bridge Mode |
| Security | 64/128/152-bit WEP, WPA/WPA2, WPA-PSK/WPA2-PSK encryption |
| Dimensions (W x D x H) | 11.34 x 8.9 x 2.8 inches (approx.) |
| Item Weight | 1.41 pounds |
9. Legal Disclaimer
*Maximum wireless transmission rates are the physical rates derived from IEEE Standard 802.11 specifications. Range and coverage specifications along with the number of connected devices were defined according to test results under normal usage conditions. Actual wireless transmission rate, wireless coverage, and number of connected devices are not guaranteed, and will vary as a result of 1) environmental factors, including building materials, physical objects and obstacles, 2) network conditions, including local interference, volume and density of traffic, product location, network complexity, and network overhead and 3) client limitations, including rated performance, location, connection quality, and client condition.
On-mode power consumption: 5.8 watts.
10. Warranty and Support
TP-Link products come with a limited warranty. For detailed warranty information, please refer to the warranty card included with your product or visit the official TP-Link website.
For technical support, firmware updates, and frequently asked questions, please visit the TP-Link support page:
You can also find additional resources and community forums on the TP-Link website.
Related documentsTL-WA901ND


Ask a question about this manual
Ask about setup, troubleshooting, compatibility, parts, safety, or missing instructions. Manuals+ will review the question and use this page’s manual context to help answer it.