1. Introduction
This manual provides essential instructions for the safe and efficient operation of your Epson PowerLite Home Cinema 705 HD projector. Please read this manual thoroughly before using the product and retain it for future reference.
Safety Information
- Do not block ventilation openings. Ensure adequate space around the projector for proper airflow.
- Do not look directly into the projector lens when the lamp is on, as it can cause eye damage.
- Use only the power cord supplied with the projector.
- Do not attempt to service this product yourself. Refer all servicing to qualified service personnel.
- Keep the projector away from water or moisture.
2. Product Overview
The Epson PowerLite Home Cinema 705 HD is a 720p 3LCD home theater projector designed for high-definition entertainment. It features 2500 lumens of color and white light output for bright, vibrant images.
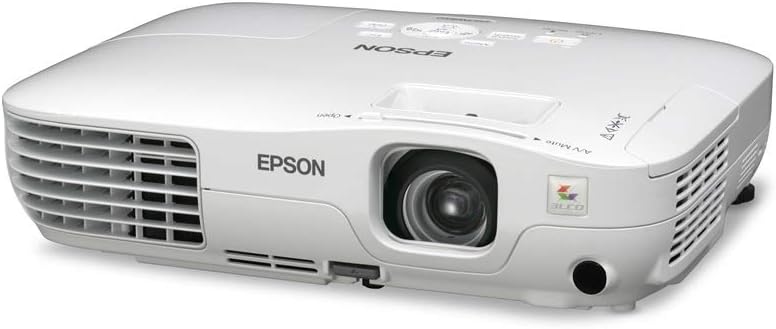
Figure 2.1: Front view of the Epson PowerLite Home Cinema 705 HD Projector. This image shows the projector's white casing, the main lens, ventilation grilles on the front and sides, and control buttons on the top panel. The Epson logo is visible on the front.
Key Features:
- 720p HD Resolution: Delivers clear, high-definition images.
- 2500 Lumens: Brightness for both color and white light output.
- 3LCD Technology: Advanced 3-chip technology for rich, true-to-life colors.
- Easy Setup: Features 1.2x optical zoom and auto keystone correction.
- Versatile Connectivity: Includes HDMI, USB Type A, Component Video, and S-Video digital connections.
- Integrated Speakers: For audio output.
3. Package Contents
Verify that all items listed below are included in your package:
- Epson PowerLite Home Cinema 705 HD Projector
- Power Cord
- Remote Control
- User Manual (this document)
Note: Additional cables for video input (e.g., HDMI, Component, S-Video) are typically sold separately.
4. Setup
4.1 Projector Placement
Position the projector on a stable, flat surface or mount it securely. Ensure the projector is placed at an appropriate distance from the screen to achieve the desired image size. Refer to the projector's throw distance specifications for optimal placement.
- Ensure proper ventilation around the projector.
- Avoid direct sunlight or strong artificial light sources on the screen.
4.2 Connecting Devices
Connect your video source (e.g., Blu-ray player, game console, computer) to the projector using the appropriate cables.
- HDMI Connection: For high-definition digital video and audio.
- Connect an HDMI cable from your device's HDMI output to the projector's HDMI input.
- Component Video Connection: For high-quality analog video.
- Connect component video cables (Red, Green, Blue) from your device to the corresponding inputs on the projector.
- S-Video Connection: For standard definition video.
- Connect an S-Video cable from your device to the projector's S-Video input.
- USB Type A: For connecting USB devices or displaying content directly from a USB drive.
- Insert your USB device into the USB Type A port.
4.3 Powering On
- Connect the power cord to the projector and then to a power outlet.
- Press the Power button on the projector's control panel or the remote control. The power light will illuminate.
- Wait for the projector to warm up and display the image.
5. Operating Instructions
5.1 Basic Operation
- Power Button: Turns the projector on or off.
- Menu Button: Accesses the projector's on-screen menu.
- Navigation Buttons (Arrows): Used to navigate through menu options.
- Enter Button: Confirms selections in the menu.
- Source Search Button: Automatically detects and switches to an active input source.
5.2 Image Adjustment
- Focus Ring: Rotate the focus ring around the lens to sharpen the image.
- Zoom Lever: Adjust the zoom lever near the lens to change the image size without moving the projector.
- Keystone Correction: If the image appears trapezoidal, use the keystone correction function (often found in the menu or via dedicated buttons) to square the image. The projector also features auto keystone correction.
5.3 Input Selection
To switch between connected devices, press the Source Search button or navigate to the "Input" or "Source" option in the projector's menu and select the desired input (e.g., HDMI, Component, S-Video, USB).
5.4 Audio Output
The projector includes built-in speakers for audio output. Adjust the volume using the remote control or the projector's menu. For enhanced audio, connect an external audio system to your source device, as the projector does not feature an audio output jack.
6. Maintenance
6.1 Cleaning the Projector
- Exterior: Wipe the projector's casing with a soft, dry, lint-free cloth. For stubborn dirt, dampen the cloth with a mild detergent solution.
- Lens: Gently wipe the lens with a lens cleaning cloth or lens tissue. Do not use abrasive cleaners.
6.2 Cleaning the Air Filter
Regularly clean the air filter to maintain optimal performance and prevent overheating. The filter is typically located on the side or bottom of the projector.
- Turn off the projector and unplug the power cord.
- Locate the air filter cover and open it.
- Remove the filter and clean it using a small vacuum cleaner or a soft brush.
- Replace the clean filter and close the cover securely.
6.3 Lamp Replacement
The projector lamp has a finite lifespan. When the lamp indicator light illuminates or the image becomes dim, the lamp may need replacement. Refer to the projector's on-screen menu or specific service instructions for detailed lamp replacement procedures. Always use genuine Epson replacement lamps.
7. Troubleshooting
| Problem | Possible Cause | Solution |
|---|---|---|
| No image displayed |
|
|
| Image is blurry |
|
|
| Image is trapezoidal |
|
|
| No sound |
|
|
8. Specifications
| Model Number | V11H331020 |
| Display Resolution | 1280x720 (720p HD) |
| Brightness | 2500 Lumens (Color and White Light Output) |
| Technology | 3LCD, 3-chip technology |
| Connectivity | HDMI, USB Type A, Component Video, S-Video |
| Special Features | Integrated speakers, 1.2x optical zoom, auto keystone |
| Item Weight | 5.1 pounds |
| Product Dimensions | 9 x 11.6 x 3.1 inches |
9. Warranty and Support
For warranty information and technical support, please refer to the official Epson website or contact Epson customer service. Keep your purchase receipt as proof of purchase for warranty claims.
Epson Support: www.epson.com/support


