1. Introduction
The Westek TM1609DHB is a heavy-duty daily mechanical timer designed to automate the on/off cycles of various indoor electrical devices. This timer features two grounded outlets and a simple-to-use dial for programming up to 24 on/off settings per day.
Key Features:
- Daily Mechanical Timer: Automates power to lights, heaters, fans, and other devices.
- Programmable: Allows up to 24 on/off settings per day using non-removable pins.
- Dual Outlets: Control two devices simultaneously with a single timer.
- Manual Override: Front-mounted switch for easy manual operation.
- Energy Efficient: Helps reduce electricity consumption by operating devices only when desired.
Package Contents:
- Westek TM1609DHB 2-Outlet Indoor Daily Mechanical Timer
- Instruction Manual (this document)
2. Safety Information
Please read and understand all safety instructions before using this product. Failure to follow these instructions may result in electric shock, fire, or property damage.
- For indoor use only. Do not expose to water or moisture.
- Do not exceed the maximum load rating of 15 Amps, 1875 Watts Resistive, 1250 Watts Tungsten.
- Ensure the timer is securely plugged into a grounded 125VAC, 60Hz outlet.
- Do not use with appliances that could cause a hazardous condition if left unattended, such as heating appliances without automatic shut-off.
- Keep out of reach of children.
- Do not disassemble or modify the timer. There are no user-serviceable parts inside.
3. Product Overview
Familiarize yourself with the components of your Westek TM1609DHB timer.
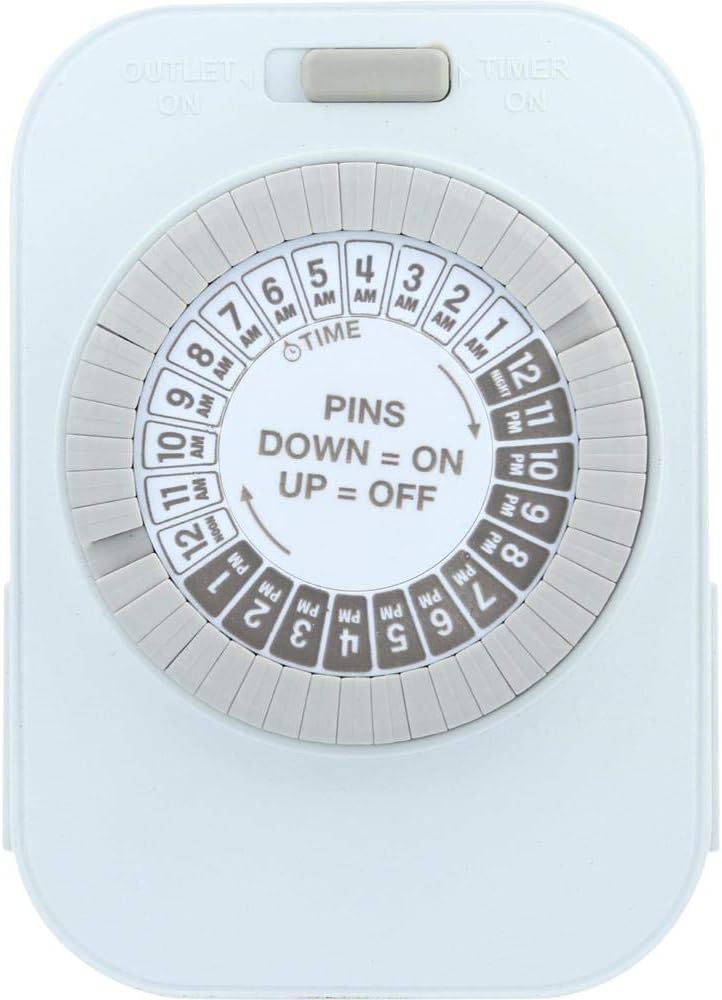
Image 1: Front view of the Westek TM1609DHB timer. This image displays the main programming dial, which is divided into 24 hours with AM and PM markings. The central part of the dial indicates "PINS DOWN = ON, UP = OFF". A slider switch is visible at the top, labeled "OUTLET ON" and "TIMER ON".

Image 2: Side view of the Westek TM1609DHB timer, highlighting one of the two three-prong grounded outlets located on the sides of the unit. This view also shows the thickness of the timer and part of the programming dial.
Components:
- Programming Dial: A rotating dial marked with 24 hours (AM/PM) for setting the current time and programming on/off cycles.
- Programmable Pins: Non-removable segments around the dial. Each segment represents 30 minutes. Pushing a pin DOWN activates the connected device during that time; leaving it UP deactivates it.
- Manual Override Switch: Located at the top, this slider switch allows you to bypass the timer settings and manually turn the connected devices ON or OFF.
- Grounded Outlets: Two three-prong outlets, one on each side of the timer, for connecting your devices.
- Power Plug: A three-prong grounded plug on the back of the unit for connecting the timer to a wall outlet.
4. Setup and Installation
4.1 Setting the Current Time
- Locate the arrow on the inner white dial, labeled "TIME". This arrow indicates the current time.
- Rotate the entire outer dial clockwise until the current time aligns with the "TIME" arrow. Ensure you correctly distinguish between AM and PM hours. For example, if it's 3 PM, align '3 PM' on the dial with the arrow.
4.2 Programming On/Off Times
The outer ring of the dial consists of multiple pins, each representing a 30-minute interval. These pins are non-removable.
- To set a device to turn ON, push the corresponding pins DOWN for the desired time duration.
- To set a device to turn OFF, leave the corresponding pins UP for the desired time duration.
- You can program up to 24 ON/OFF settings per day.
Example: If you want a light to turn on from 6 PM to 10 PM, push down all the pins between the '6 PM' and '10 PM' markings on the dial.
4.3 Connecting Devices
- Ensure the timer is unplugged from the wall outlet before connecting any devices.
- Plug the device(s) you wish to control into the grounded outlets on the sides of the timer.
- Plug the Westek TM1609DHB timer into a standard 125VAC, 60Hz grounded wall outlet.
5. Operation
Manual Override Switch
The slider switch at the top of the timer allows you to manually control the power to the connected devices, overriding the programmed settings.
- Slide the switch to "OUTLET ON" to keep the connected devices continuously ON, regardless of the timer settings.
- Slide the switch to "TIMER ON" to enable the programmed ON/OFF cycles. The devices will operate according to your pin settings.
6. Maintenance
The Westek TM1609DHB timer requires minimal maintenance.
- Cleaning: Unplug the timer from the wall outlet before cleaning. Wipe the exterior with a soft, dry cloth. Do not use liquid cleaners or abrasive materials.
- Storage: If storing the timer for an extended period, ensure it is unplugged and kept in a dry, cool place.
7. Troubleshooting
| Problem | Possible Cause | Solution |
|---|---|---|
| Device does not turn ON/OFF at programmed times. |
|
|
| Timer dial is not rotating. |
|
|
| Connected device does not work at all. |
|
|
8. Specifications

Image 3: Back view of the Westek TM1609DHB timer, displaying the three-prong power plug and a label with product specifications including model number, electrical ratings, and manufacturing information.
| Specification | Detail |
|---|---|
| Model Number | TM1609DHB |
| Brand | Westek |
| Input Voltage | 125VAC, 60Hz |
| Max Load (Resistive) | 15 Amps, 1875 Watts |
| Max Load (Tungsten) | 10 Amps, 1250 Watts |
| Number of Outlets | 2 (Grounded) |
| Programming Intervals | 30 minutes |
| Daily Settings | Up to 24 ON/OFF cycles |
| Dimensions | Approximately 7.25 x 4.5 x 2.2 inches |
| Item Weight | 4.8 ounces |
| Mounting Type | Wall Mount (Plugs directly into outlet) |
9. Warranty and Support
Warranty Information:
This Westek TM1609DHB timer comes with a 1-year limited warranty from the date of purchase. This warranty covers defects in materials and workmanship under normal use. It does not cover damage resulting from misuse, abuse, unauthorized modification, or improper installation.
Customer Support:
For technical assistance, troubleshooting, or warranty claims, please contact Westek customer support. Refer to the packaging or the official Westek website for the most current contact information.
You can visit the Westek Store on Amazon for more product information.


