
1. Introduction
This manual provides essential information for the safe and efficient operation of your Schauer JAC1548H 48 Volt Charger. This charger is designed to provide optimal charging for 48V golf cart batteries, specifically compatible with pre-2007 Club Car golf carts. It features advanced charging control to ensure battery health and longevity.
Important Compatibility Note: This charger is compatible with pre-2007 Club Car golf carts only.

Image 1.1: Front view of the Schauer JAC1548H 48 Volt Charger, showing the control panel, output cable, and AC input cable.
2. Safety Information
Please read and understand all safety instructions before operating the charger. Failure to follow these instructions may result in electric shock, fire, or serious injury.
- Ventilation: Ensure adequate ventilation when charging batteries. Batteries can produce explosive gases.
- Eye Protection: Always wear eye protection when working near batteries.
- Gloves: Wear protective gloves to prevent contact with battery acid.
- Flammable Materials: Keep the charger and batteries away from open flames, sparks, and flammable materials.
- Connection Order: Connect the charger to the battery first, then plug the charger into the AC power outlet. Disconnect in reverse order.
- Damaged Cables: Do not operate the charger with damaged cables or connectors.
- Water Exposure: Do not expose the charger to rain or excessive moisture.
- Children and Pets: Keep the charger and batteries out of reach of children and pets.
3. Product Features
The Schauer JAC1548H charger incorporates several advanced features for efficient and safe battery charging:
- Optimal Battery Health Charge Control: Utilizes advanced charge control, starting with constant current, transitioning to constant voltage, and concluding with a float standby mode. This process prevents overcharging and extends battery life.
- Club Car Adapter: Includes a specific adapter for seamless and secure connection to Club Car models, ensuring stable power delivery.
- Fully Automatic Three-Stage Charging: Offers bulk, absorption, and float stages for a hands-free charging process, adapting to the battery's needs.
- Multi-Battery Compatibility: Works with various lead-acid battery types, including conventional (flooded), maintenance-free, gel, and AGM batteries.
- Customizable Voltage Settings: Features adjustable cyclic voltage settings for flooded (2.47 volts/cell) and gel & AGM (2.4 volts/cell) batteries, allowing optimization for specific battery types.

Image 3.1: The charger is fully automatic and intelligently monitors battery impedance throughout the charging cycle.

Image 3.2: The charger features a fully automatic 3-stage charging process, allowing it to be left connected in float mode.
4. Setup
Follow these steps to set up your Schauer JAC1548H charger:
- Unpack: Carefully remove the charger from its packaging and inspect for any damage.
- Placement: Place the charger on a stable, dry, and well-ventilated surface. Ensure there is sufficient space around the unit for airflow, especially around the cooling fan.
- Battery Type Selection: Locate the front panel switch labeled "FLOODED BATTERIES" and "GEL or AGM". Select the appropriate setting for your battery type.
- Flooded Batteries: For normal lead-acid batteries with caps for checking liquid levels.
- Gel or AGM: For sealed Gel or Absorbed Glass Mat batteries.
- Connect to Battery: Connect the charger's output cable (with the Club Car adapter) to the charging port of your Club Car golf cart. Ensure a secure connection.
- Connect to AC Power: Plug the charger's AC input cable into a standard 120V AC wall outlet.
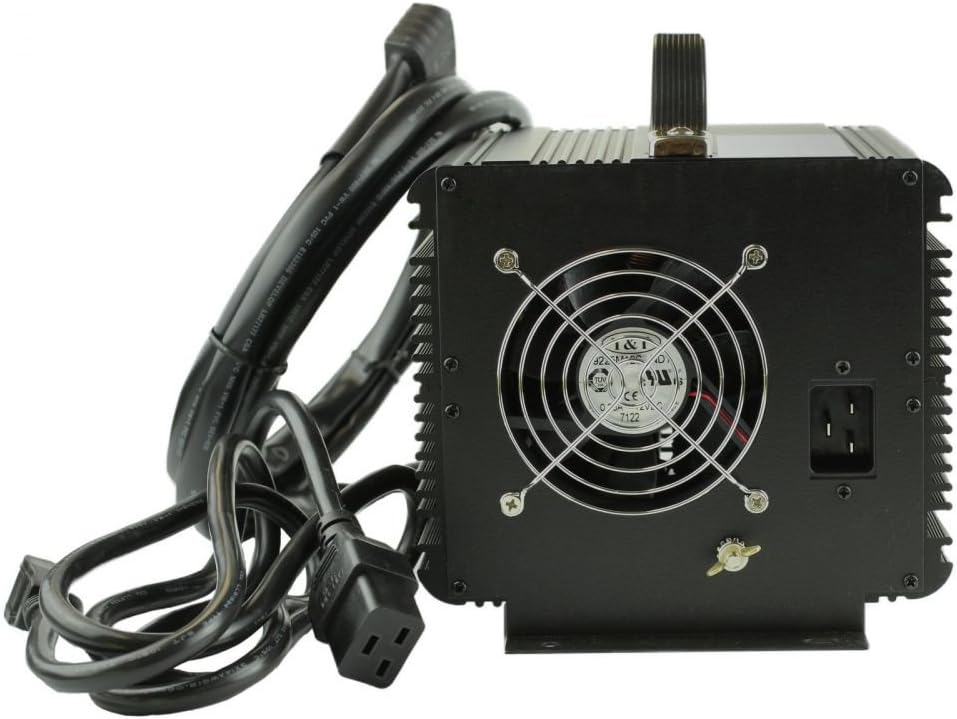
Image 4.1: Side view of the charger, highlighting the cooling fan for proper ventilation during operation.

Image 4.2: Close-up of the Club Car adapter, designed for secure connection to compatible golf carts.
5. Operating Instructions
Once the charger is properly set up, follow these steps to begin charging:
- Power On: Flip the ON/OFF switch on the front panel to the "ON" position.
- Monitor Indicators: Observe the LED indicators on the front panel to understand the charging status.
- Automatic Charging: The charger will automatically begin the charging process based on the battery's state of charge and the selected battery type.
- Float Mode: Once the battery is fully charged, the charger will automatically transition into float mode, maintaining the battery at full charge without overcharging. It is safe to leave the charger connected indefinitely in this mode.
- Disconnecting: To disconnect, first unplug the AC power cord from the wall outlet, then disconnect the charger's output cable from the golf cart.
LED Indicator Guide:
- Red LED (POWER): Indicates AC power is connected and the charger is turned on.
- Yellow LED (CHARGING): Indicates the battery is actively charging.
- Green LED (FLOAT MODE): Indicates that charging has completed, and the charger has entered float (maintenance) mode.

Image 5.1: Front panel of the charger showing the LED indicators for power, charging, and float mode.
6. Maintenance
Proper maintenance ensures the longevity of both your charger and your golf cart batteries.
Charger Maintenance:
- Cleaning: Keep the charger clean and free from dust and debris. Use a dry cloth for cleaning. Do not use liquid cleaners.
- Cable Inspection: Regularly inspect the AC power cord and the DC output cable for any signs of damage, fraying, or exposed wires. Replace if damaged.
- Ventilation: Ensure the cooling fan and vents are not obstructed to prevent overheating.
- Storage: Store the charger in a cool, dry place when not in use.
Battery Maintenance (for Flooded Batteries):
- Water Levels: Periodically check the electrolyte levels in flooded lead-acid batteries and top up with distilled water if necessary, after charging.
- Terminal Cleaning: Keep battery terminals clean and free of corrosion.
The charger's maintenance mode significantly reduces the formation of sulfates on battery plates, contributing to extended battery life.
7. Troubleshooting
If you encounter issues with your charger, refer to the following common problems and solutions:
| Problem | Possible Cause | Solution |
|---|---|---|
| Charger not turning on (Red POWER LED off) | No AC power; Charger switch off; Blown fuse. | Check AC outlet and power cord. Ensure ON/OFF switch is ON. Check and replace internal fuses if necessary (consult qualified technician). |
| Yellow CHARGING LED does not illuminate | Battery not connected; Battery fully charged; Incorrect battery type selected; Faulty battery. | Ensure secure connection to golf cart. Check if battery is already fully charged (Green FLOAT LED might be on). Verify correct battery type switch setting. Have battery tested by a professional. |
| Charger gets excessively hot | Poor ventilation; Overloaded circuit. | Ensure charger is in a well-ventilated area and vents are clear. Do not cover the charger. |
| Charger not reaching full charge / taking too long | Deeply discharged battery; Incorrect battery type setting; Battery degradation. | Allow more time for deeply discharged batteries. Confirm correct battery type switch setting. Consider having battery health assessed. |
If the problem persists after attempting these solutions, please contact customer support.
8. Specifications
Technical specifications for the Schauer JAC1548H 48 Volt Charger:
| Specification | Value |
|---|---|
| Brand | Schauer |
| Model Number | JAC1548H |
| Output Voltage | 48 Volts (DC) |
| Input Voltage | 48 Volts (AC) |
| Item Weight | 11.5 Pounds |
| Item Dimensions (LxWxH) | 8 x 6.5 x 7.5 inches |
| Color | Black |
| Case Material | Aluminum |
| Sport Type | Golf |

Image 8.1: The charger features a durable aluminum case with specified dimensions and weight.
9. Warranty and Support
Warranty Information:
Brookwood Group Inc., DBA Schauer Battery Chargers (hereinafter “SCHAUER”), warrants to the Original Consumer Purchaser, subject to the conditions set forth below, that it will repair or replace (at SCHAUER’s option) the product or any part thereof which proves defective by reason of improper workmanship or material for a period of two (2) years from the original purchase date without charge for parts or labor.
Customer Support:
For technical assistance, warranty claims, or further inquiries, please refer to the contact information provided with your purchase documentation or visit the official Schauer website.


