
1. Introduction
Thank you for choosing the Schonbek 5022-74 Dorchester Chandelier. This manual provides essential information for the safe installation, operation, and maintenance of your new lighting fixture. Please read these instructions thoroughly before beginning installation and retain them for future reference.
The Schonbek Dorchester Chandelier is a handcrafted crystal lighting fixture designed to provide elegant illumination. Its design reflects the traditional Schonbek style, known for quality and craftsmanship since 1870.
2. Important Safety Information
WARNING: RISK OF ELECTRIC SHOCK. Disconnect power at the fuse box or circuit breaker before installation or servicing.
- All electrical connections must be in accordance with local codes, ordinances, or the National Electric Code (NEC).
- Consult a qualified electrician if you are unsure about the installation process.
- This fixture is intended for indoor use only.
- Do not exceed the maximum wattage specified for the bulbs.
- Handle crystal components with care to prevent breakage.
- Ensure the mounting surface can support the weight of the fixture (approximately 37 pounds).
3. Setup & Installation
Before installation, unpack all components carefully and inspect for any damage. Keep all packaging materials until you are satisfied with the product.
3.1. Components Checklist
- Chandelier frame (Parchment Bronze finish)
- Crystal components (various shapes and sizes)
- Mounting hardware (crossbar, screws, wire nuts)
- Instruction manual
Note: Bulbs (B10-8, 60 Max.) are not included and must be purchased separately.
3.2. Tools Required (Not Included)
- Phillips head screwdriver
- Flathead screwdriver
- Wire strippers
- Pliers
- Electrical tape
- Ladder
3.3. Installation Steps
- Turn off power: Locate the circuit breaker or fuse box and turn off the power to the junction box where the chandelier will be installed.
- Prepare mounting: Attach the mounting crossbar to the junction box using the provided screws. Ensure it is securely fastened.
- Wire connections:
- Connect the bare copper ground wire from the fixture to the ground wire from the junction box (usually green or bare copper). Secure with a wire nut.
- Connect the white (neutral) wire from the fixture to the white (neutral) wire from the junction box. Secure with a wire nut.
- Connect the black (hot) wire from the fixture to the black (hot) wire from the junction box. Secure with a wire nut.
- Wrap all wire connections with electrical tape for added security.
- Mount the fixture: Carefully lift the chandelier and attach it to the mounting crossbar. Secure with the canopy screws.
- Install bulbs: Screw in the recommended B10-8 bulbs (max 60 watts each) into the sockets. Do not overtighten.
- Attach crystal components: Refer to the included crystal diagram (if applicable) to attach the crystal elements to the chandelier frame. Handle crystals by their edges to avoid fingerprints.
- Restore power: Once installation is complete and all components are securely in place, restore power at the circuit breaker.
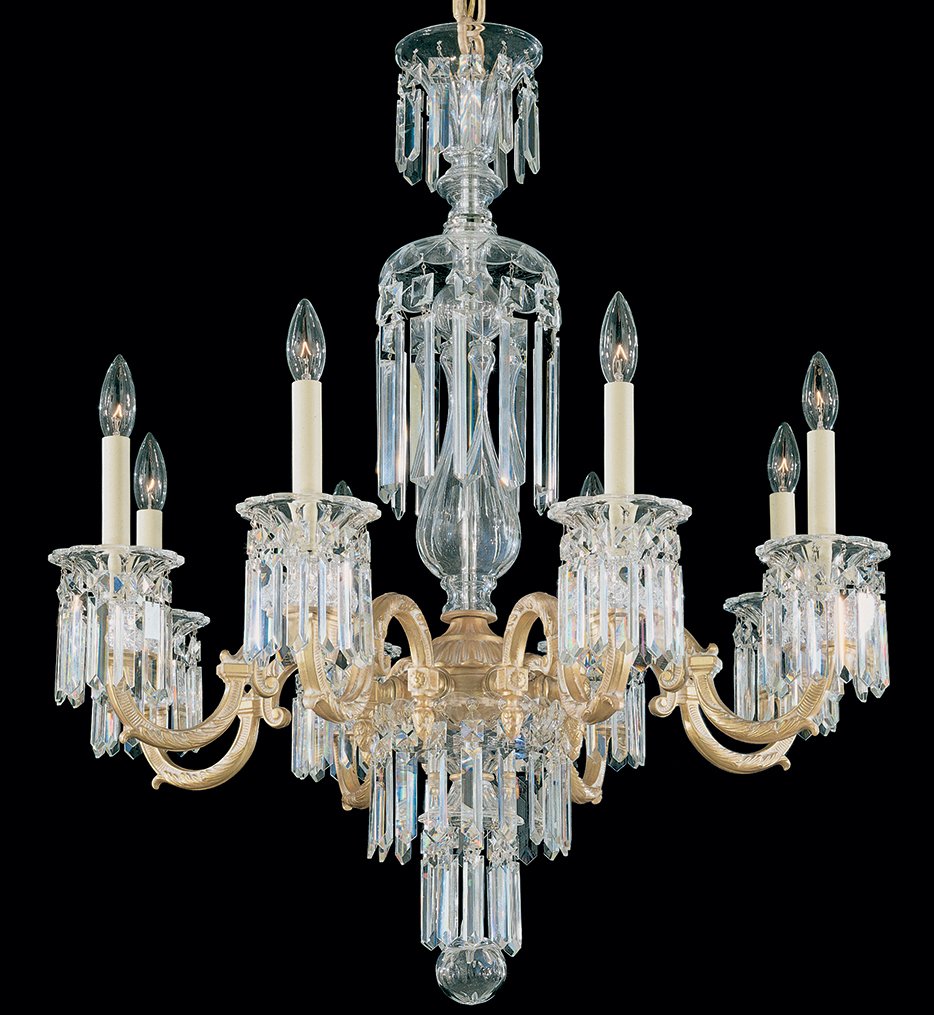
Figure 1: Schonbek 5022-74 Dorchester Chandelier. This image shows the fully assembled chandelier with its parchment bronze finish and crystal accents, ready for installation.
4. Operating Instructions
The Schonbek 5022-74 Dorchester Chandelier operates via a standard wall switch connected to its electrical circuit.
- Turning On/Off: Use the wall switch to turn the chandelier on or off.
- Dimming (Optional): If a compatible dimmer switch is installed and dimmable bulbs are used, the light output can be adjusted. Consult a qualified electrician for dimmer switch installation.
Ensure all bulbs are securely screwed in before operating. If the fixture does not illuminate, check the power supply and bulb connections.
5. Maintenance
Regular maintenance will help preserve the beauty and longevity of your Schonbek chandelier.
5.1. Cleaning the Fixture
- Dusting: Regularly dust the chandelier with a soft, dry, lint-free cloth.
- Cleaning Crystal: For a deeper clean, gently wipe crystal components with a soft cloth dampened with distilled water or a specialized crystal cleaner. Avoid harsh chemicals or abrasive materials.
- Cleaning Metal Finish: Wipe the Parchment Bronze finish with a soft, dry cloth. Do not use abrasive cleaners or polishes, as they may damage the finish.
- Always turn off power to the fixture before cleaning.
5.2. Bulb Replacement
- Turn off power: Always turn off the power to the fixture at the circuit breaker before replacing bulbs.
- Allow to cool: Allow bulbs to cool completely before touching them.
- Replace with correct type: Replace with B10-8 bulbs, not exceeding 60 watts per bulb.
- Dispose of old bulbs according to local regulations.
6. Troubleshooting
If you encounter issues with your chandelier, refer to the following common problems and solutions:
| Problem | Possible Cause | Solution |
|---|---|---|
| Fixture does not light up. | No power to the fixture. Loose wire connection. Faulty bulb. | Check circuit breaker/fuse. Ensure wall switch is ON. Turn off power, check wire connections. Replace bulb. |
| Lights flicker. | Loose bulb. Incompatible dimmer switch/bulbs. Loose wire connection. | Tighten bulbs. Ensure dimmer and bulbs are compatible. Turn off power, check wire connections. |
| Humming sound from fixture. | Incompatible dimmer switch. Loose components. | Replace dimmer with a high-quality, compatible LED dimmer (if using LED bulbs) or standard incandescent dimmer. Check for any loose parts. |
If these solutions do not resolve the issue, please contact Schonbek customer support or a qualified electrician.
7. Specifications
| Feature | Detail |
|---|---|
| Model Number | 5022-74 |
| Brand | Schonbek |
| Finish Type | Parchment Bronze |
| Material | Crystal, Metal |
| Bulb Type | B10-8 (Not Included) |
| Max Wattage per Bulb | 60 watts |
| Voltage | 110 Volts |
| Item Weight | 37 Pounds |
| UPC | 771857024623 |
8. Warranty & Support
Schonbek products are crafted with the highest quality materials and workmanship. For specific warranty details, please refer to the warranty card included with your purchase or visit the official Schonbek website.
For technical assistance, replacement parts, or further inquiries, please contact Schonbek customer support:
- Website: www.schonbek.com (This is a placeholder, actual link not provided in input)
- Customer Service: Refer to the contact information provided on the Schonbek website or product packaging.
When contacting support, please have your model number (5022-74) and purchase date available.