
1. Introduction
The Master Airbrush G222 is a multi-purpose dual-action gravity feed airbrush gun set designed for precision and versatility across various artistic and hobby applications. This kit includes three nozzle sets (0.2mm, 0.3mm, and 0.5mm) to accommodate different spray requirements, from fine details to broader coverage. Its robust metal construction ensures durability, making it suitable for both beginners and experienced users.
Applications include model painting, graphics, cake decorating, nail art, temporary tattoos, and fine art. The dual-action trigger provides independent control over both air and fluid flow, allowing for precise adjustments during operation.

Figure 1: Master Airbrush G222 components, highlighting the gravity feed cup and ergonomic trigger.
2. Setup
Before initial use, ensure all components are present and free from damage. The G222 airbrush comes with interchangeable nozzle and needle sets for varied applications.
2.1 Kit Contents
- Master Airbrush G222 Dual-Action Airbrush
- 0.2mm Nozzle, Needle, and Nozzle Cap Set
- 0.3mm Nozzle, Needle, and Nozzle Cap Set (pre-installed)
- 0.5mm Nozzle, Needle, and Nozzle Cap Set
- 1/3 oz Gravity Fluid Cup
- Quick Disconnect Coupler
- Airbrush Quick Start Guide
- Transparent Hard Shell Carrying Case
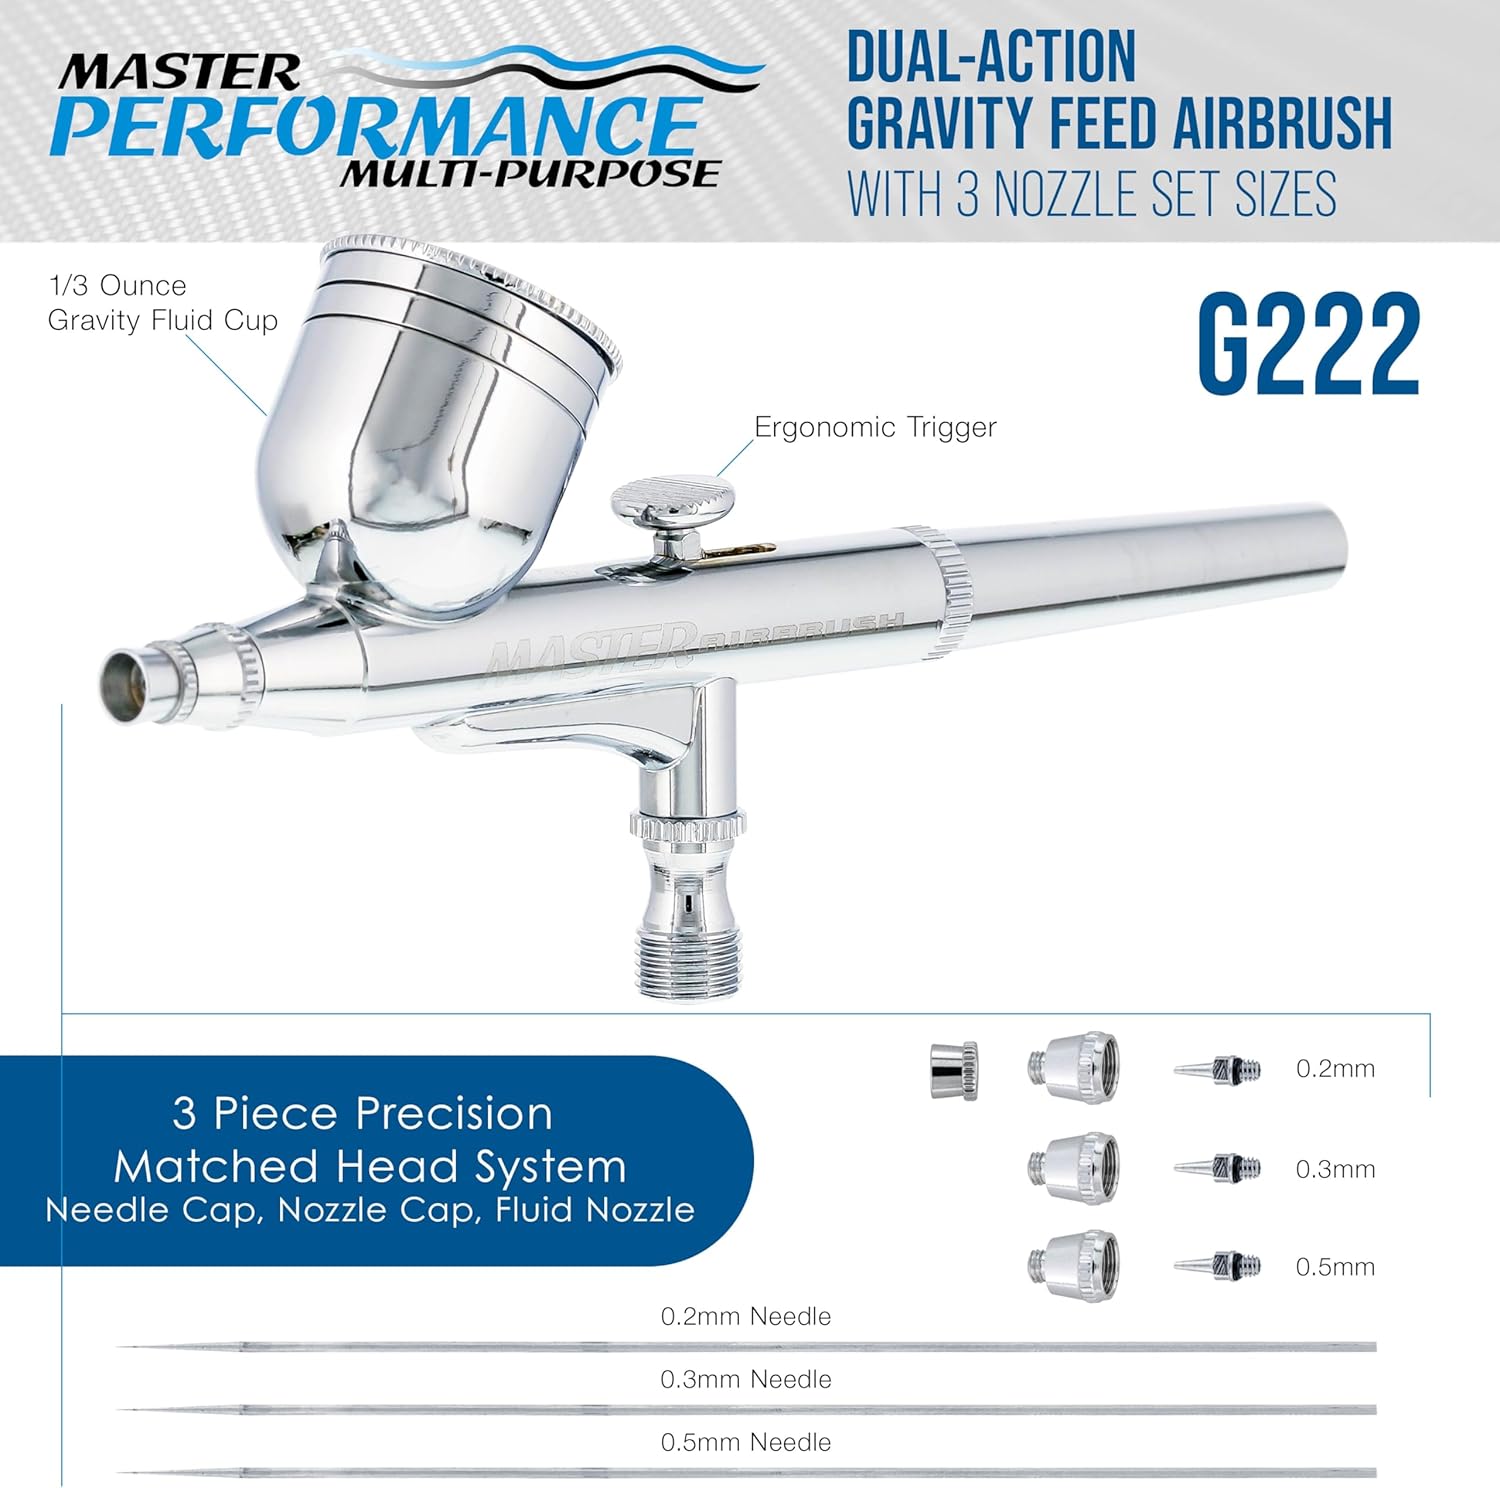
Figure 2: The Master Airbrush G222 kit, including the airbrush and various accessories, neatly stored in its carrying case.
2.2 Assembling the Airbrush
- Select Nozzle Set: Choose the desired nozzle, needle, and nozzle cap set (0.2mm, 0.3mm, or 0.5mm) based on your project's detail requirements. The 0.3mm set is typically pre-installed.
- Install Nozzle and Needle: Carefully screw the chosen nozzle into the airbrush body. Insert the corresponding needle from the rear of the airbrush, ensuring it seats properly within the nozzle.
- Attach Nozzle Cap: Screw the nozzle cap onto the front of the airbrush, finger-tight.
- Attach Fluid Cup: The 1/3 oz gravity fluid cup is designed to sit on top of the airbrush. Ensure it is securely in place.
- Connect Air Hose: Attach your air hose (not included) to the quick disconnect coupler, then connect the coupler to the air inlet at the bottom of the airbrush.

Figure 3: Exploded diagram illustrating the individual components of the G222 airbrush for assembly and maintenance.
3. Operating Instructions
The G222 is a dual-action airbrush, meaning the trigger controls both air and fluid flow independently. This allows for precise control over your spray pattern.
3.1 Preparing Paint
Always thin your paint to the consistency of milk for optimal flow and atomization. Use appropriate thinners recommended by your paint manufacturer. Pour the prepared paint into the 1/3 oz gravity fluid cup.
3.2 Dual-Action Control
- Air Flow: Press the trigger down to release air.
- Fluid Flow: Pull the trigger back to release paint.
- Combined Control: For a continuous spray, press down for air, then pull back for paint. Adjusting the distance you pull back controls the amount of paint.
3.3 Spray Pattern Adjustment
The G222 offers versatile spray patterns, from fine lines to broader coverage, depending on the nozzle size and trigger control.

Figure 4: Illustration of spray patterns and fluid tip sizes for the G222 airbrush.

Figure 5: User demonstrating the ergonomic design and handling of the G222 airbrush.
3.4 Official Product Video
Watch this video for a visual overview and demonstration of the Master Airbrush G222 Pro Set.
Video 1: Master Performance G222 Pro Set Master Airbrush Overview.
4. Maintenance
Proper cleaning and maintenance are crucial for the longevity and optimal performance of your airbrush.
4.1 Cleaning After Each Use
- Empty Fluid Cup: Remove any remaining paint from the gravity fluid cup.
- Flush with Cleaner: Pour appropriate airbrush cleaner or thinner into the cup. Spray through the airbrush until the cleaner runs clear.
- Back-Flush: Cover the nozzle cap with a finger or cloth and press the trigger down to allow air to bubble back into the fluid cup. This helps dislodge paint from the nozzle area.
- Wipe Down: Use a soft cloth and cleaner to wipe the exterior of the airbrush and the fluid cup.
4.2 Deep Cleaning (Periodically)
For thorough cleaning, disassemble the airbrush components (needle, nozzle, nozzle cap, fluid cup). Clean each part individually with appropriate cleaning solutions and specialized airbrush cleaning brushes. Reassemble carefully, ensuring not to overtighten delicate parts.
5. Troubleshooting
Below are common issues and their potential solutions:
| Problem | Possible Cause | Solution |
|---|---|---|
| No paint flow | Clogged nozzle/needle, paint too thick, air pressure too low | Clean nozzle/needle, thin paint, increase air pressure |
| Inconsistent spray pattern | Partially clogged nozzle, bent needle, loose nozzle cap | Deep clean, inspect needle for damage, tighten nozzle cap |
| Air bubbles in fluid cup | Loose nozzle, damaged nozzle, bent needle tip | Tighten nozzle, replace damaged parts, straighten needle tip |
| Paint spraying too wide/narrow | Incorrect air pressure, wrong nozzle size for task, trigger control | Adjust air pressure, use appropriate nozzle, practice trigger control |
6. Specifications
- Brand: Master Airbrush
- Model: G222-SET
- Type: Dual-Action Gravity Feed
- Nozzle Sizes: 0.2mm, 0.3mm, 0.5mm
- Fluid Cup Capacity: 1/3 oz
- Material: Metal (Chrome finish)
- Item Dimensions (L x W x H): 8.75 x 4.5 x 1.75 inches
- UPC: 844825072015
7. Warranty and Support
Master Airbrush is committed to customer satisfaction. For any questions, technical assistance, or warranty claims, please refer to the contact information provided with your product packaging or visit the official Master Airbrush website. Keep your purchase receipt as proof of purchase.