1. Safety Instructions
Always observe basic safety precautions when using electric tools to reduce the risk of fire, electric shock, and personal injury. Read all instructions carefully before operating this belt sander.
- Work Area Safety: Keep the work area clean and well-lit. Cluttered or dark areas invite accidents. Do not operate power tools in explosive atmospheres, such as in the presence of flammable liquids, gases, or dust.
- Electrical Safety: Power tool plugs must match the outlet. Never modify the plug in any way. Avoid body contact with earthed or grounded surfaces such as pipes, radiators, ranges, and refrigerators.
- Personal Safety: Always wear eye protection. Use dust masks, non-skid safety shoes, hard hats, or hearing protection for appropriate conditions. Do not overreach. Keep proper footing and balance at all times.
- Tool Use and Care: Do not force the power tool. Use the correct power tool for your application. Disconnect the plug from the power source before making any adjustments, changing accessories, or storing power tools.
- Dust Extraction: This tool is equipped with an integrated dust extraction system and an adapter for external dust extraction. Always use dust collection to minimize exposure to harmful dust.
2. Product Overview
The Einhell TE-BS 8540 is a high-performance belt sander designed for flexible and effective grinding tasks. It features variable speed control, precise belt tracking adjustment, and a quick, tool-free sanding belt change mechanism.
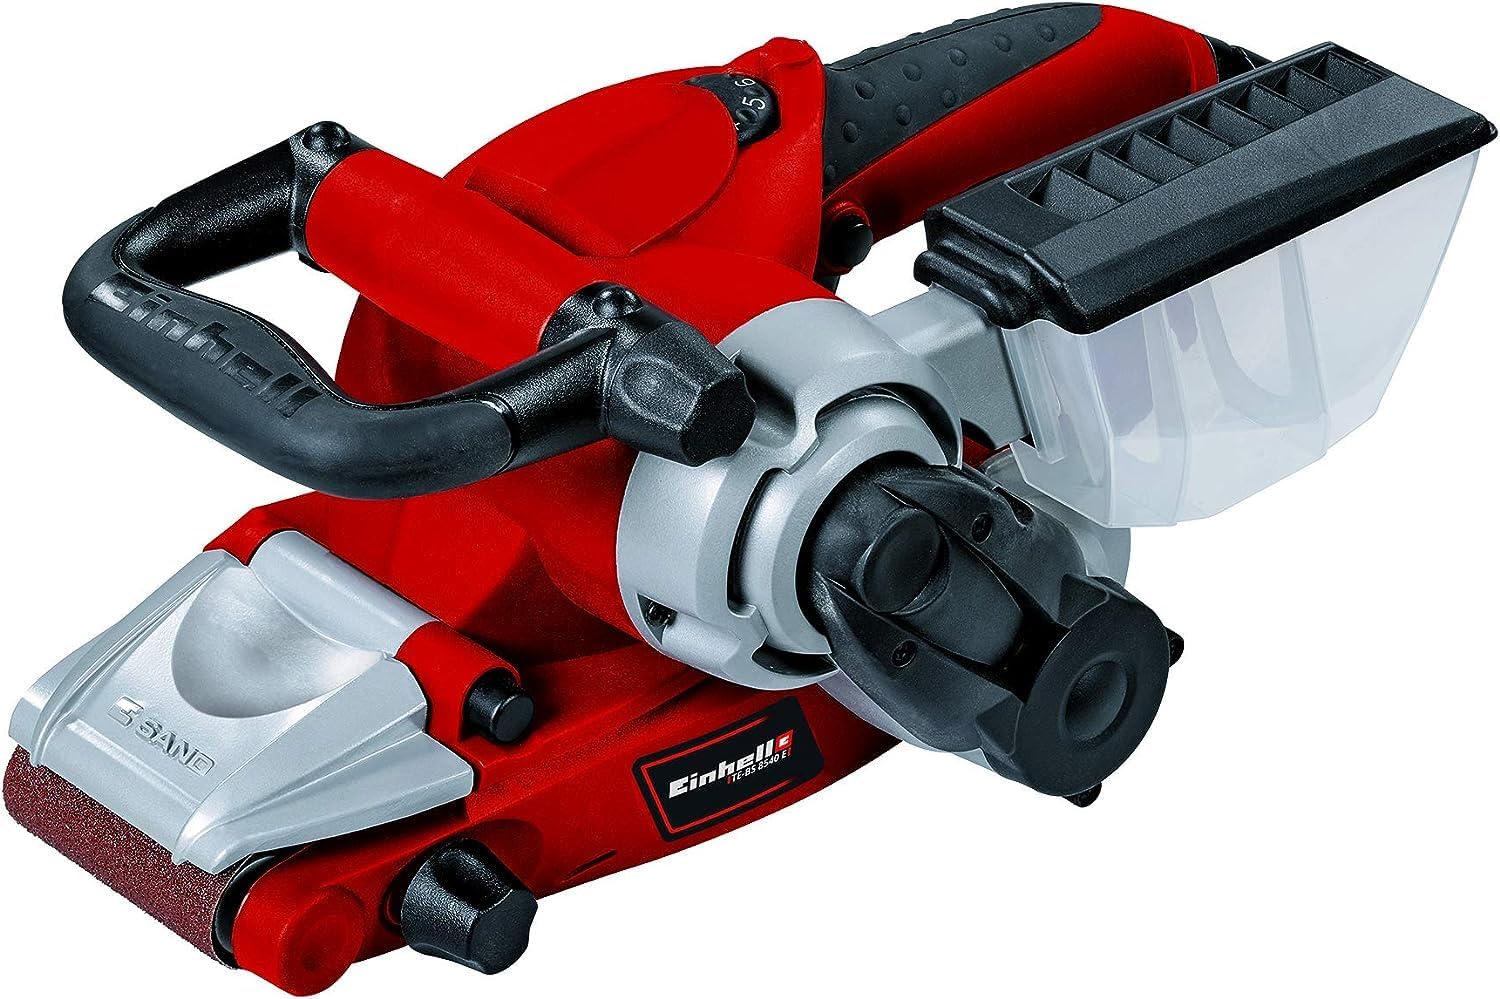
Figure 2.1: Overall view of the Einhell TE-BS 8540 Belt Sander. This image displays the complete tool, highlighting its ergonomic design with the main handle and auxiliary handle, the sanding belt area, and the dust collection box.
Key Features:
- Powerful Motor: 850 W motor for efficient sanding on various surfaces.
- Large Sanding Surface: 75 mm x 140 mm grinding/sanding face for quick and precise results on large areas.
- Electronic Speed Control: Adjustable speed settings to match the material and application requirements.
- Precision Belt Adjustment: Ensures exact belt positioning for optimal performance.
- Hinged Front Cover: Allows for sanding close to edges.
- Ergonomic Design: Soft grip and tool-free adjustable additional handle for comfortable use.
- Integrated Dust Extraction: Includes a dust collection box and an adapter for connecting an external dust extractor.
- Quick Belt Change: Tool-free sanding belt replacement via a locking lever.
- Cable Clip: For tidy storage of the power cable.
3. Setup
3.1. Installing the Sanding Belt
- Ensure the sander is disconnected from the power supply.
- Locate the locking lever for the sanding belt (see Figure 3.1).
- Pull the locking lever to release the tension on the sanding belt.
- Remove the old sanding belt, if present.
- Place the new sanding belt onto the rollers, ensuring the arrow on the inside of the belt matches the direction of rotation indicated on the sander (see Figure 3.2).
- Push the locking lever back to tension the new sanding belt.

Figure 3.1: The locking lever for quick and tool-free sanding belt changes. Pushing this lever releases tension, allowing for easy belt removal and installation.

Figure 3.2: A typical sanding belt, showing the internal arrow indicating the correct direction of rotation for installation on the sander.
3.2. Adjusting Belt Tracking
After installing a new belt, it is crucial to adjust the belt tracking to ensure the belt runs centrally on the rollers and does not rub against the housing.
- Briefly switch on the sander (without touching the workpiece) and observe the belt's movement.
- Use the belt tracking adjustment knob (see Figure 3.3) to fine-tune the belt's position. Turn the knob clockwise to move the belt in one direction and counter-clockwise to move it in the other until it runs centrally.
- Repeat this process if the belt tracking shifts during operation.

Figure 3.3: The knob used for precise adjustment of the sanding belt's tracking, ensuring it remains centered during operation.
3.3. Dust Collection
The sander comes with an integrated dust collection box. For enhanced dust control, an adapter is provided to connect an external dust extractor.
- Attach the dust collection box to the designated port on the sander.
- Alternatively, connect a suitable external dust extractor hose to the adapter and then to the sander's dust port.
- Regularly empty the dust collection box or external extractor to maintain optimal performance and prevent clogging.

Figure 3.4: Side view of the belt sander, showing the dust extraction port where the collection box or an external extractor can be attached.
3.4. Adjusting the Auxiliary Handle
The additional handle can be adjusted without tools to provide optimal grip and comfort for different working positions. Loosen the knob on the handle, adjust to the desired angle, and then tighten the knob securely.
4. Operation
4.1. Powering On/Off
- Connect the sander to a suitable power outlet.
- To switch on, press the ON/OFF switch. For continuous operation, engage the lock-on button.
- To switch off, release the ON/OFF switch. If locked on, press the switch again briefly to release the lock.
4.2. Variable Speed Control
The electronic speed control allows you to adjust the sanding speed to suit the material and desired finish.

Figure 4.1: Close-up of the variable speed control dial, allowing users to select the appropriate sanding speed for different materials and tasks.
- Rotate the speed control dial to select the desired speed setting (typically from 1 to 6).
- Lower speeds are suitable for delicate materials or fine finishing, while higher speeds are for rapid material removal.
4.3. Sanding Techniques
Always hold the sander firmly with both hands. Apply even, moderate pressure and move the sander smoothly across the workpiece. Avoid excessive pressure, which can lead to uneven sanding and premature belt wear.

Figure 4.2: A user demonstrating the proper two-handed grip and technique for operating the belt sander on a flat surface.
- General Sanding: Move the sander in the direction of the wood grain for best results. Overlap each pass slightly to ensure uniform sanding.
- Edge Sanding: The front cover of the sander can be folded up to allow sanding closer to edges and in confined spaces (see Figure 4.3).

Figure 4.3: Front view of the belt sander, illustrating the hinged cover that can be lifted to facilitate sanding in areas close to edges.
5. Maintenance
Regular maintenance ensures the longevity and optimal performance of your belt sander. Always disconnect the tool from the power supply before performing any maintenance.
- Cleaning: After each use, clean the tool, especially the ventilation slots and the dust collection system, to prevent dust buildup. Use a soft brush or compressed air.
- Sanding Belt Replacement: Replace worn or damaged sanding belts promptly following the instructions in Section 3.1.
- Cable Inspection: Regularly inspect the power cable for any signs of damage. If damaged, have it replaced by a qualified electrician.
- Storage: Store the belt sander in a dry, secure place, out of reach of children. Use the integrated cable clip (see Figure 5.1) for tidy cable storage.

Figure 5.1: Rear view of the belt sander, showing the practical cable clip for securing the power cord during storage.
6. Troubleshooting
| Problem | Possible Cause | Solution |
|---|---|---|
| Sander does not start. | No power supply; faulty switch. | Check power connection and outlet. Ensure switch is fully engaged. If problem persists, seek professional service. |
| Sanding belt slips or runs off. | Belt not tensioned correctly; belt tracking not adjusted; worn belt. | Ensure locking lever is engaged. Adjust belt tracking (Section 3.2). Replace worn belt. |
| Poor sanding performance. | Worn sanding belt; incorrect grit for material; insufficient pressure. | Replace sanding belt. Use appropriate grit for the task. Apply even, moderate pressure. |
| Excessive dust. | Dust collection box full or improperly attached; clogged dust port. | Empty dust box. Ensure proper attachment. Clear any blockages in the dust port. |
7. Specifications
| Feature | Detail |
|---|---|
| Brand | Einhell |
| Model Number | TE-BS 8540 |
| Power Source | Corded Electric |
| Voltage | 230 Volts |
| Wattage | 850 watts |
| Product Dimensions (L x W x H) | 12.99" x 6.69" x 4.72" |
| Item Weight | 3.1 Kilograms (6.82 pounds) |
| Grit Type | Medium (P80 included) |
| Maximum Rotational Speed | 12000 RPM (Motor speed, not belt speed) |
| Sanding Surface Area | 75 mm x 140 mm |
8. Warranty and Support
For warranty information, please refer to the warranty card included with your product or visit the official Einhell website. For technical support, spare parts, or service inquiries, please contact Einhell customer service directly. Keep your purchase receipt as proof of purchase.
Contact Information: Please refer to the contact details provided in your product packaging or on the official Einhell website for your region.


